Vermillion Wasteland: Difference between revisions
Plaguerized (talk | contribs) m (→Treasures) |
m (Fixed the virus's locations.) |
||
| (8 intermediate revisions by 4 users not shown) | |||
| Line 4: | Line 4: | ||
|description=A deserted and gloomy area of unknown origin. | |description=A deserted and gloomy area of unknown origin. | ||
|room_count=23 | |room_count=23 | ||
|quest_count=2 | |||
|treasure_default=7 | |treasure_default=7 | ||
|treasure_key = 0 | |treasure_key = 0 | ||
| Line 11: | Line 12: | ||
|treasure_gold=0 | |treasure_gold=0 | ||
|trader_count=7}} | |trader_count=7}} | ||
{{Spoilers}} | |||
'''Vermillion Wasteland''' is a [[Locations|location]] that is an unofficial area of [[CrossWorlds]]. | '''Vermillion Wasteland''' is a [[Locations|location]] that is an unofficial area of [[CrossWorlds]]. It's a dark and strange region designed and built early in CrossWorlds' development, but was later put on hold. It's located in the right tip of the Croissant, separated from the rest of the Playground. | ||
== Layout == | == Layout == | ||
Most of the region is immediately accessible. The South and North Challenges are unlocked during [[The Southern Trial Building]] and [[The Northern Trial Building]] quests respectively. The storage rooms are unlocked later in the plot, on the way to the [[Vermillion Dungeon]]. | |||
=== Connecting regions === | === Connecting regions === | ||
* [[Vermillion Dungeon]] | * [[Vermillion Dungeon]] via Vermillion Tower | ||
* [[Sapphire Ridge]] (endgame) | * [[Sapphire Ridge]] via Spiral Cliff (endgame) | ||
* [[Vermillion Tower]] (endgame) | * [[Vermillion Tower]] via Vermillion Tower (endgame) | ||
=== Area map === | === Area map === | ||
The Town Center landmark becomes accessible towards the end of the game. | The Town Center landmark becomes accessible towards the end of the game. | ||
[[File:Vermillion Wasteland Map.png|thumb|upright=1.8|left| | [[File:Vermillion Wasteland Map.png|thumb|upright=1.8|left|link=https://static.wikia.nocookie.net/crosscode_gamepedia/images/a/a7/Vermillion_Wasteland_Map.png | Click the map for a full-resolution image.]] | ||
{| class="wikitable" | {| class="wikitable sortable" | ||
|+ | |+ Rooms of Vermillion Wasteland | ||
|- | |- | ||
! # | ! # | ||
! | ! Room/Landmark Name | ||
! Floor | |||
|- | |- | ||
|1 | |1 | ||
|East Town | |East Town | ||
|GF | |||
|- | |- | ||
|2 | |2 | ||
|West Town | |West Town | ||
'''Landmark: Town Center''' | '''Landmark: Town Center''' | ||
|GF | |||
|- | |- | ||
|3 | |3 | ||
|Crimson Lake | |Crimson Lake | ||
|GF | |||
|- | |- | ||
|4 | |4 | ||
|Scarlet River | |Scarlet River | ||
|GF | |||
|- | |- | ||
|5 | |5 | ||
|River Delta | |River Delta | ||
|GF | |||
|- | |- | ||
|6 | |6 | ||
|Spiral Cliff | |Spiral Cliff | ||
|GF | |||
|- | |- | ||
|7 | |7 | ||
|Ebony Forest | |Ebony Forest | ||
|GF | |||
|- | |- | ||
|8 | |8 | ||
|Vermillion Tower | |Vermillion Tower | ||
|GF | |||
|- | |- | ||
|9 | |9 | ||
|Dormitory Entrance | |Dormitory Entrance | ||
|GF | |||
|- | |- | ||
|10 | |10 | ||
|Dormitory Floor 1 | |Dormitory Floor 1 | ||
|GF | |||
|- | |- | ||
|11 | |11 | ||
|Dormitory Room 4 | |Dormitory Room 4 | ||
|GF | |||
|- | |- | ||
|12 | |12 | ||
|Tradehut | |Tradehut | ||
|GF | |||
|- | |- | ||
|13 | |13 | ||
|Store | |Store | ||
|GF | |||
|- | |- | ||
|14 | |14 | ||
|Quest Hub | |Quest Hub | ||
|GF | |||
|- | |- | ||
|15 | |15 | ||
|South Challenge | |South Challenge | ||
|GF | |||
|- | |- | ||
|16 | |16 | ||
|South Challenge B1 | |South Challenge B1 | ||
|U1 | |||
|- | |- | ||
|17 | |17 | ||
|Strange Lobby | |Strange Lobby | ||
|U1 | |||
|- | |- | ||
|18 | |18 | ||
|North Challenge | |North Challenge | ||
|GF | |||
|- | |- | ||
|19 | |19 | ||
|North Challenge B1 | |North Challenge B1 | ||
|U1 | |||
|- | |- | ||
|20 | |20 | ||
|Strange Flat | |Strange Flat | ||
|U1 | |||
|- | |- | ||
|21 | |21 | ||
|Storage Room 1 | |Storage Room 1 | ||
|GF | |||
|- | |- | ||
|22 | |22 | ||
|Storage Room 2 | |Storage Room 2 | ||
|GF | |||
|- | |- | ||
|23 | |23 | ||
|Storage Basement | |Storage Basement | ||
|U1 | |||
|} | |} | ||
=== Treasures === | |||
There are limited opportunities to collect the treasures in Vermillion Wasteland, and some of them may be inaccessible in the [[A New Home]] DLC. It is recommended to collect them all either during the initial visit to Vermillion Wasteland, or right before entering [[Vermillion Tower]] at the end of the main game. | |||
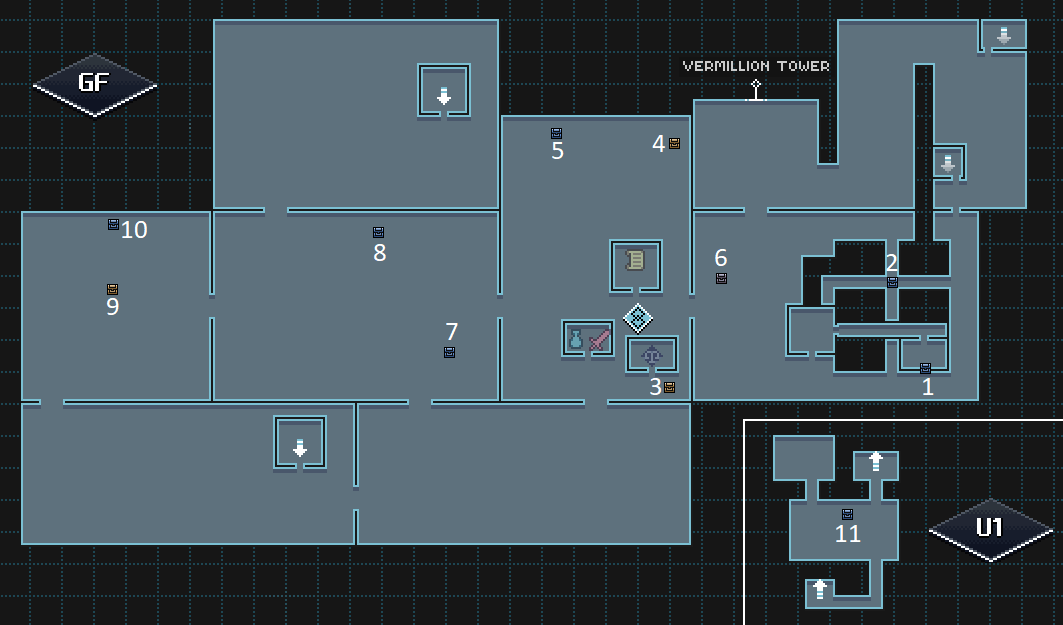
[[File:Vermillion Wasteland Treasure Map.png|thumb|upright=1.8|left|link=https://static.wikia.nocookie.net/crosscode_gamepedia/images/d/d3/Vermillion_Wasteland_Treasure_Map.png | Click the map for a full-resolution image.]] | |||
{{TreasureList|{{TreasureList/entry|acc=1|type=default|item=Echo Roll|amount=3|loc=East Town|info=}} | |||
{{TreasureList/entry|acc=2|type=default|item=Full Course|amount=2|loc=East Town|info=}} | |||
{{TreasureList/entry|acc=3|type=bronze|item=Refined Metal|amount=3|loc=West Town|info=}} | |||
{{TreasureList/entry|acc=4|type=bronze|item=Precious Metal|amount=2|loc=West Town|info=}} | |||
{{TreasureList/entry|acc=5|type=normal|item=Golden Bars|amount=3|loc=West Town|info=}} | |||
{{TreasureList/entry|acc=6|type=silver|item=Vermillion Mantle|amount=1|loc=East Town|info=Enter on the north path from West Town to reach this.}} | |||
{{TreasureList/entry|acc=7|type=default|item=Infected Cell|amount=5|loc=Crimson Lake|info=}} | |||
{{TreasureList/entry|acc=8|type=default|item=Chef Sandwich|amount=6|loc=Crimson Lake|info=}} | |||
{{TreasureList/entry|acc=9|type=bronze|item=Precious Metal|amount=2|loc=Spiral Cliff|info=}} | |||
{{TreasureList/entry|acc=10|type=normal|item=Elemental DNA|amount=4|loc=Spiral Cliff|info=}} | |||
{{TreasureList/entry|acc=11|type=normal|item=Pepper Night Tea|amount=4|loc=Storage Basement|info=}} | |||
}} | |||
== Enemies == | == Enemies == | ||
{ | {| class="wikitable" | ||
|+ [[Enemies]] of Vermillion Wasteland | |||
! Name | |||
! Sprite | |||
! Drops | |||
! Locations | |||
|- | |||
| [[Neutral Virus]] | |||
| [[File:Neutral-virus-sprite.png|center]] | |||
| {{ItemLink|Infected Cell}} | |||
| Crimson Lake, Ebony Forest, River Delta, Scarlet River, Spiral Cliff, South Challenge B1<ref name="south-challenge" />, North Challenge B1<ref name="north-challenge" />, Storage Basement<ref name="respawn" /> | |||
|- | |||
| [[Heat Virus]] | |||
| [[File:Heat-virus-sprite.png|center]] | |||
| {{ItemLink|Infected Cell}}, {{ItemLink|Elemental DNA}} | |||
| Crimson Lake, Ebony Forest, Spiral Cliff<ref name="respawn"/>, South Challenge B1<ref name="south-challenge" />, North Challenge B1<ref name="north-challenge" />, Storage Basement<ref name="respawn" /> | |||
|- | |||
| [[Cold Virus]] | |||
| [[File:Cold-virus-sprite.png|center]] | |||
| {{ItemLink|Infected Cell}}, {{ItemLink|Elemental DNA}} | |||
| Ebony Forest, River Delta, Spiral Cliff<ref name="respawn"/>, North Challenge B1<ref name="north-challenge" />, Storage Basement<ref name="respawn" /> | |||
|- | |||
| [[Furious Security Brute]] | |||
| [[File:Furious-security-brute-sprite.png|center]] | |||
| None | |||
| East Town, West Town, Vermillion Tower, Storage Basement | |||
|- | |||
| [[Cool Security Brute]] | |||
| [[File:Cool-security-brute-sprite.png|center]] | |||
| None | |||
| East Town, West Town, Vermillion Tower, Storage Basement | |||
|- | |||
| [[Tense Security Brute]] | |||
| [[File:Tense-security-brute-sprite.png|center]] | |||
| None | |||
| East Town, West Town, Vermillion Tower, Storage Basement, Spiral Cliff<ref name="raid" />, Crimson Lake<ref name="raid" /> | |||
|- | |||
| [[Groovy Security Brute]] | |||
| [[File:Groovy-security-brute-sprite.png|center]] | |||
| None | |||
| East Town, West Town, Vermillion Tower, Storage Basement, Spiral Cliff<ref name="raid" />, Crimson Lake<ref name="raid" /> | |||
|- | |||
| [[Laser of Doom]] | |||
| [[File:Laser-of-doom-sprite.png|center]] | |||
| None | |||
| East Town, West Town, Vermillion Tower | |||
|- | |||
| [[Arengee]] | |||
| [[File:Arengee-sprite.png|center]] | |||
| None | |||
| South Challenge<ref name="south-challenge" /> | |||
|- | |||
| [[Failed Rhino]] | |||
| [[File:Failed-rhino-sprite.png|center]] | |||
| None | |||
| North Challenge<ref name="north-challenge" /> | |||
|} | |||
<references> | |||
<ref name="respawn">Does not respawn</ref> | |||
<ref name="south-challenge">Spawns during [[The Southern Trial Building]] quest</ref> | |||
<ref name="north-challenge">Spawns during [[The Northern Trial Building]] quest</ref> | |||
<ref name="raid">During the chapter 10 raid of Vermillion Wasteland</ref> | |||
</references> | |||
==Shops== | ==Shops== | ||
Vermillion Wasteland has basic equipment and item shops located in the Vermillion Town store. | |||
[[File:Vermillion Equipment.png|thumb|right|Vermillion Equipment]] | |||
* '''Vermillion Equipment''' – Located in Store. | |||
{| class="wikitable sortable" | |||
! Item | |||
! Credits | |||
|- | |||
| {{ItemLink|Steel Goggles}} || 15850 | |||
|- | |||
| {{ItemLink|Silver Goggles}} || 29450 | |||
|- | |||
| {{ItemLink|Steel Edge}} || 15800 | |||
|- | |||
| {{ItemLink|Silver Edge}} || 29375 | |||
|- | |||
| {{ItemLink|Steel Mail}} || 16100 | |||
|- | |||
| {{ItemLink|Silver Mail}} || 29725 | |||
|- | |||
| {{ItemLink|Steel Boots}} || 15950 | |||
|- | |||
| {{ItemLink|Silver Boots}} || 29450 | |||
|} | |||
[[File:Vermillion Consumables.png|thumb|right|Vermillion Consumables]] | |||
* '''Vermillion Consumables''' – Located in Store. | |||
{| class="wikitable sortable" | {| class="wikitable sortable" | ||
! | ! Item | ||
! | ! Credits | ||
|- | |||
| {{ItemLink|Sandwich|showFoodIcon=1}} || 100 | |||
|- | |||
| {{ItemLink|Hi-Sandwich|showFoodIcon=1}} || 300 | |||
|- | |||
| {{ItemLink|Green Leaf Tea|showFoodIcon=1}} || 250 | |||
|- | |||
| {{ItemLink|Just Water|showFoodIcon=1}} || 222 | |||
|- | |||
| {{ItemLink|Spicy Bun|showFoodIcon=1}} || 200 | |||
|- | |- | ||
| | | {{ItemLink|Fruit Drink|showFoodIcon=1}} || 200 | ||
|- | |||
| {{ItemLink|Rice Cracker|showFoodIcon=1}} || 200 | |||
|- | |- | ||
| | | {{ItemLink|Veggie Sticks|showFoodIcon=1}} || 200 | ||
|} | |} | ||
==Traders== | ==Traders== | ||
Vermillion Wasteland has a small group of basic traders located in the Vermillion Town tradehut. | |||
* '''Vermillion Heals''' – Located in Tradehut | |||
{| class="wikitable sortable" | |||
! Offered Item | |||
! Credits | |||
! Requisite Items | |||
|- | |||
| {{ItemLink|Chef Sandwich|showFoodIcon=1}} | |||
| 950 | |||
| 2x {{ItemLink|Veggie Set}}, 2x {{ItemLink|Fruit Set}} | |||
|- | |||
| {{ItemLink|Sweet Berry Tea|showFoodIcon=1}} | |||
| 1050 | |||
| {{ItemLink|Veggie Set}}, {{ItemLink|Fruit Set}}, {{ItemLink|Spice Set}} | |||
|} | |||
* '''Vermillion Buffs''' – Located in Tradehut | |||
{| class="wikitable sortable" | {| class="wikitable sortable" | ||
! Offered Item | |||
! Credits | |||
! Requisite Items | |||
|- | |- | ||
| {{ItemLink|Flaming Bun|showFoodIcon=1}} | |||
| 550 | |||
| 2x {{ItemLink|Fruit Set}} | |||
|- | |||
| {{ItemLink|Fruit Salad|showFoodIcon=1}} | |||
| 550 | |||
| 2x {{ItemLink|Fruit Set}} | |||
|- | |||
| {{ItemLink|Tofu Cracker|showFoodIcon=1}} | |||
| 550 | |||
| 2x {{ItemLink|Veggie Set}} | |||
|- | |||
| {{ItemLink|Veggie Wraps|showFoodIcon=1}} | |||
| 550 | |||
| 2x {{ItemLink|Veggie Set}} | |||
|} | |||
* '''Vermillion Sets & Metal''' – Located in Tradehut | |||
{| class="wikitable sortable" | |||
! Offered Item | |||
! Credits | |||
! Requisite Items | |||
|- | |||
| {{ItemLink|Veggie Set}} | |||
| 100 | |||
| {{ItemLink|Infected Cell}}, {{ItemLink|Rice Cracker}}, {{ItemLink|Veggie Sticks}} | |||
|- | |||
| {{ItemLink|Fruit Set}} | |||
| 100 | |||
| {{ItemLink|Infected Cell}}, {{ItemLink|Spicy Bun}}, {{ItemLink|Fruit Drink}} | |||
|- | |||
| {{ItemLink|Spice Set}} | |||
| 250 | |||
| {{ItemLink|Elemental DNA}}, 2x {{ItemLink|Green Leaf Tea}} | |||
|- | |||
| {{ItemLink|Junk Metal}} | |||
| 90 | |||
| {{ItemLink|Infected Cell}}, {{ItemLink|Sandwich}} | |||
|- | |- | ||
| | | {{ItemLink|Refined Metal}} | ||
| | | 450 | ||
| {{ | | 2x {{ItemLink|Junk Metal}}, {{ItemLink|Elemental DNA}}, 2x {{ItemLink|Hi-Sandwich}} | ||
{{ | |} | ||
* '''Vermillion Weapons''' – Located in Tradehut | |||
{| class="wikitable sortable" | |||
! Offered Item | |||
! Credits | |||
! Requisite Items | |||
|- | |- | ||
| | | {{ItemLink|Hunter's Bolt}} | ||
| | | 31313 | ||
| {{ | | {{ItemLink|Steel Edge}}, 3x {{ItemLink|Refined Metal}}, 5x {{ItemLink|Infected Cell}}, 4x {{ItemLink|Flaming Bun}} | ||
{{ | |||
{{ | |||
{{ | |||
|- | |- | ||
| | | {{ItemLink|Sunset Claw}} | ||
| | | 35800 | ||
| {{ | | {{ItemLink|Steel Edge}}, 3x {{ItemLink|Refined Metal}}, 3x {{ItemLink|Elemental DNA}}, 5x {{ItemLink|Flaming Bun}} | ||
{{ | |} | ||
* '''Vermillion Torso''' – Located in Tradehut | |||
{| class="wikitable sortable" | |||
! Offered Item | |||
! Credits | |||
! Requisite Items | |||
|- | |- | ||
| {{ItemLink|Petal Cloak}} | |||
| 32700 | |||
| {{ | | {{ItemLink|Steel Mail}}, 3x {{ItemLink|Refined Metal}}, 5x {{ItemLink|Infected Cell}}, 4x {{ItemLink|Veggie Wraps}} | ||
{{ | |||
{{ | |||
{{ | |||
{{ | |||
|- | |- | ||
| | | {{ItemLink|Ramming Shell}} | ||
| | | 36630 | ||
| {{ | | {{ItemLink|Steel Mail}}, 3x {{ItemLink|Refined Metal}}, 3x {{ItemLink|Elemental DNA}}, 5x {{ItemLink|Veggie Wraps}} | ||
{{ | |} | ||
* '''Vermillion Head''' – Located in Tradehut | |||
{| class="wikitable sortable" | |||
! Offered Item | |||
! Credits | |||
! Requisite Items | |||
|- | |- | ||
| | | {{ItemLink|Red Bandana}} | ||
| | | 32450 | ||
| {{ | | {{ItemLink|Steel Goggles}}, 3x {{ItemLink|Refined Metal}}, 5x {{ItemLink|Infected Cell}}, 4x {{ItemLink|Tofu Cracker}} | ||
{{ | |||
|- | |- | ||
| Vermillion Legs | | {{ItemLink|Nifty Grey Shades}} | ||
| | | 36001 | ||
| | | {{ItemLink|Steel Goggles}}, 3x {{ItemLink|Refined Metal}}, 3x {{ItemLink|Elemental DNA}}, 5x {{ItemLink|Tofu Cracker}} | ||
{{ | |} | ||
* '''Vermillion Legs''' – Located in Tradehut | |||
{| class="wikitable sortable" | |||
! Offered Item | |||
! Credits | |||
! Requisite Items | |||
|- | |||
| {{ItemLink|Shinkickers}} | |||
| 32050 | |||
| {{ItemLink|Steel Boots}}, 3x {{ItemLink|Refined Metal}}, 5x {{ItemLink|Infected Cell}}, 4x {{ItemLink|Fruit Salad}} | |||
|- | |||
| {{ItemLink|Stable Footguard}} | |||
| 35760 | |||
| {{ItemLink|Steel Boots}}, 3x {{ItemLink|Refined Metal}}, 3x {{ItemLink|Elemental DNA}}, 5x {{ItemLink|Fruit Salad}} | |||
|} | |} | ||
| Line 186: | Line 389: | ||
Only two mandatory quests are associated with this area, and they have to be completed to progress the story. | Only two mandatory quests are associated with this area, and they have to be completed to progress the story. | ||
{{ | *[[The Southern Trial Building]] | ||
| | *[[The Northern Trial Building]] | ||
| | |||
| | == A New Home DLC Changes == | ||
| | {{Location_Card|name=Vermillion Wasteland | ||
| | |color=#801B47 | ||
|image=File:Vermillion Wasteland.PNG | |||
|description=A deserted and gloomy area of unknown origin. | |||
|room_count=30 | |||
| | |quest_count=2 | ||
| | |treasure_default=7 | ||
|treasure_key = 0 | |||
|treasure_masterkey = 0 | |||
|treasure_bronze=3 | |||
|treasure_silver=1 | |||
|treasure_gold=0 | |||
|trader_count=7}} | |||
The [[A New Home]] DLC's main addition to Vermillion Wasteland is Sidwell's secret lab, which is infiltrated during the final chapter. | |||
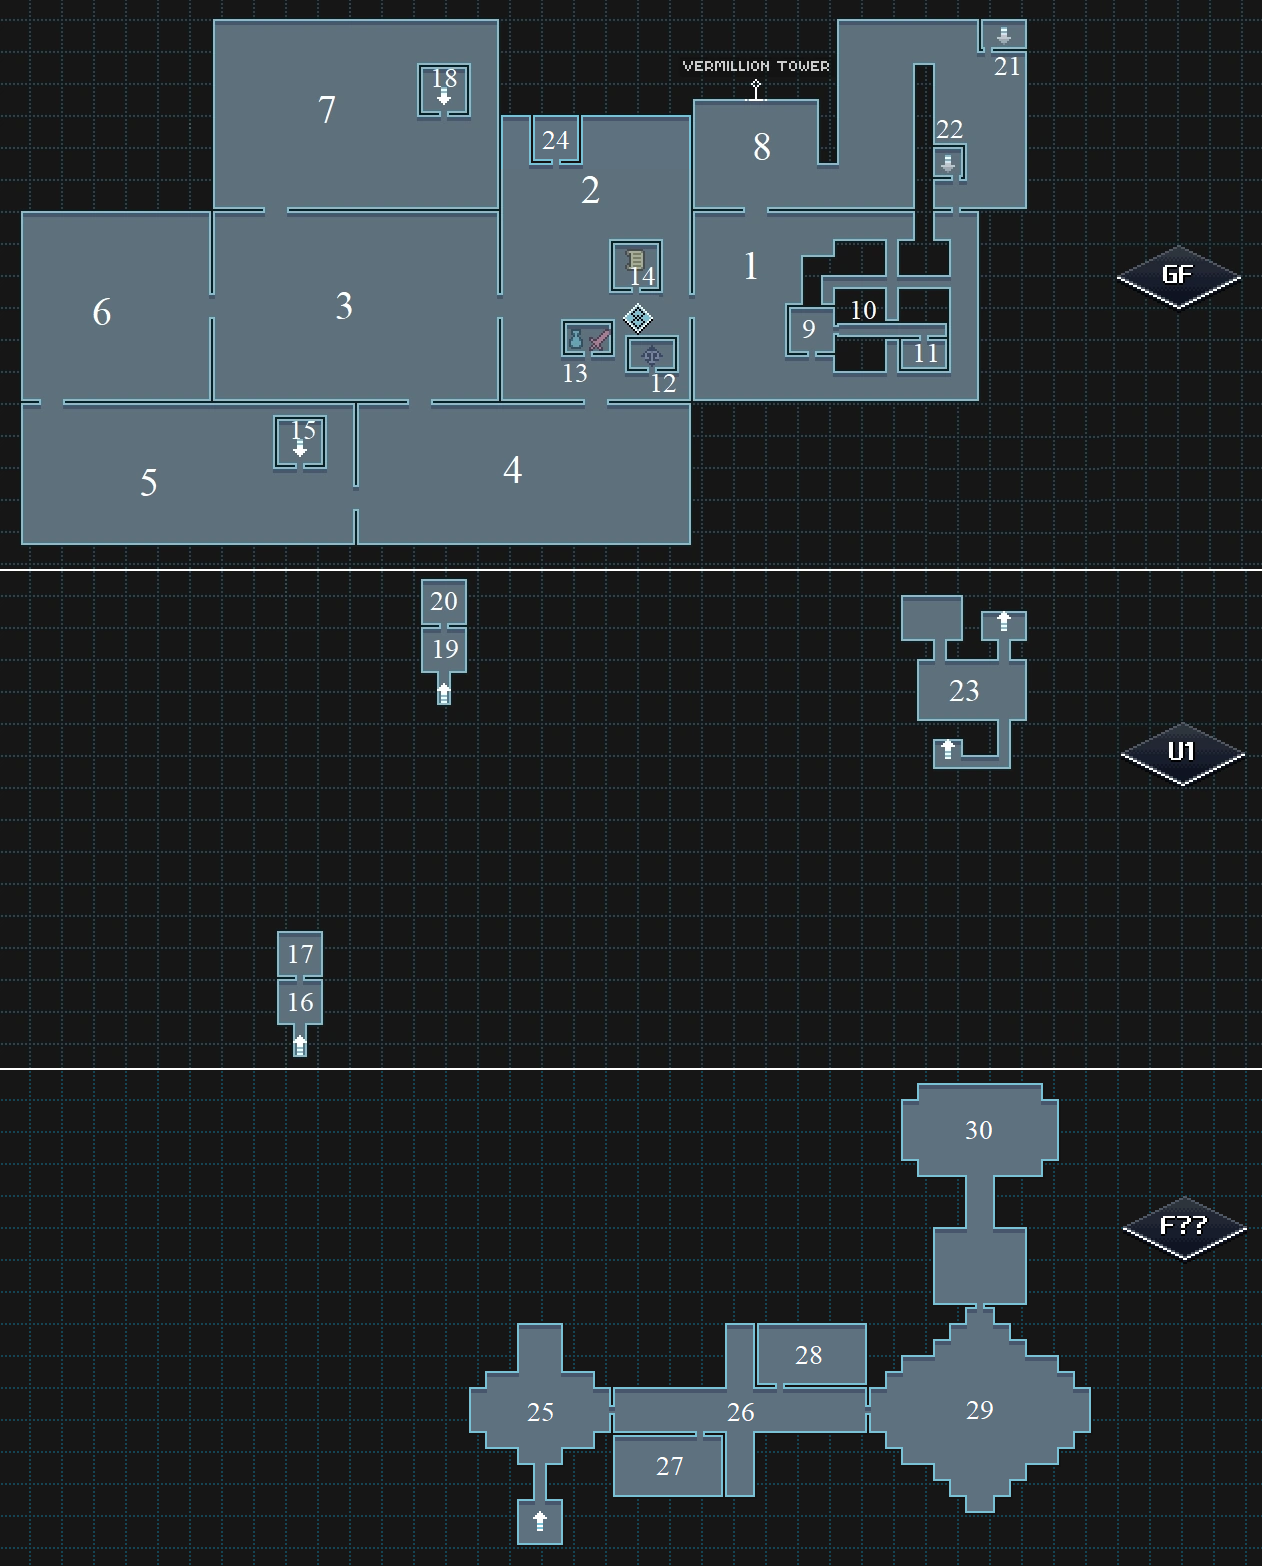
=== Area Map === | |||
[[File:Vermillion Wasteland DLC Map.png|thumb|upright=1.8|left|link=https://static.wikia.nocookie.net/crosscode_gamepedia/images/5/5b/Vermillion_Wasteland_DLC_Map.png | Click the map for a full-resolution image.]] | |||
{| class="wikitable sortable" | |||
|+ Rooms of Vermillion Wasteland | |||
|- | |||
! # | |||
! Room/Landmark Name | |||
! Floor | |||
|- | |||
|1 | |||
|East Town | |||
|GF | |||
|- | |||
|2 | |||
|West Town | |||
'''Landmark: Town Center''' | |||
|GF | |||
|- | |||
|3 | |||
|Crimson Lake | |||
|GF | |||
|- | |||
|4 | |||
|Scarlet River | |||
|GF | |||
|- | |||
|5 | |||
|River Delta | |||
|GF | |||
|- | |||
|6 | |||
|Spiral Cliff | |||
|GF | |||
|- | |||
|7 | |||
|Ebony Forest | |||
|GF | |||
|- | |||
|8 | |||
|Vermillion Tower | |||
|GF | |||
|- | |||
|9 | |||
|Dormitory Entrance | |||
|GF | |||
|- | |||
|10 | |||
|Dormitory Floor 1 | |||
|GF | |||
|- | |||
|11 | |||
|Dormitory Room 4 | |||
|GF | |||
|- | |||
|12 | |||
|Tradehut | |||
|GF | |||
|- | |||
|13 | |||
|Store | |||
|GF | |||
|- | |||
|14 | |||
|Quest Hub | |||
|GF | |||
|- | |||
|15 | |||
|South Challenge | |||
|GF | |||
|- | |||
|16 | |||
|South Challenge B1 | |||
|U1 | |||
|- | |||
|17 | |||
|Strange Lobby | |||
|U1 | |||
|- | |||
|18 | |||
|North Challenge | |||
|GF | |||
|- | |||
|19 | |||
|North Challenge B1 | |||
|U1 | |||
|- | |||
|20 | |||
|Strange Flat | |||
|U1 | |||
|- | |||
|21 | |||
|Storage Room 1 | |||
|GF | |||
|- | |||
|22 | |||
|Storage Room 2 | |||
|GF | |||
|- | |||
|23 | |||
|Storage Basement | |||
|U1 | |||
|- | |||
|24 | |||
|??? | |||
|GF | |||
|- | |||
|25 | |||
|Lab Entrance | |||
|F?? | |||
|- | |||
|26 | |||
|Hallway H03 | |||
|F?? | |||
|- | |||
|27 | |||
|Meeting Room M04-01 | |||
|F?? | |||
|- | |||
|28 | |||
|Meeting Room M04-02 | |||
|F?? | |||
|- | |||
|29 | |||
|Junction J03-01 | |||
|F?? | |||
|- | |||
|30 | |||
|Sidwell's Office | |||
|F?? | |||
|} | |||
=== Enemies === | |||
A few more enemies are encountered while exploring the secret lab. As the game ends immediately after this, none of these enemies respawn. | |||
{| class="wikitable" | |||
|+ [[Enemies]] of Vermillion Wasteland | |||
! Name | |||
! Sprite | |||
! Drops | |||
! Location | |||
|- | |||
| [[Neutral Virus]] | |||
| [[File:Neutral-virus-sprite.png|center]] | |||
| {{ItemLink|Infected Cell}} | |||
| Lab Entrance, Junction J03-01 | |||
|- | |||
| [[Heat Virus]] | |||
| [[File:Heat-virus-sprite.png|center]] | |||
| {{ItemLink|Infected Cell}}, {{ItemLink|Elemental DNA}} | |||
| Lab Entrance, Junction J03-01 | |||
|- | |||
| [[Cold Virus]] | |||
| [[File:Cold-virus-sprite.png|center]] | |||
| {{ItemLink|Infected Cell}}, {{ItemLink|Elemental DNA}} | |||
| Lab Entrance, Junction J03-01 | |||
|- | |||
| [[Arengee]] | |||
| [[File:Arengee-sprite.png|center]] | |||
| None | |||
| Junction J03-01 | |||
|- | |||
| [[Failed Rhino]] | |||
| [[File:Failed-rhino-sprite.png|center]] | |||
| None | |||
| Lab Entrance | |||
|- | |||
| [[Sidwell (boss)|Sidwell]] ([[Bosses|Boss]]) | |||
| [[File:Sidwell-sprite.png|center]] | |||
| None | |||
| Sidwell's Office | |||
|} | |||
== Role in the Plot == | |||
Vermillion Wasteland is a planned but abandoned area of [[CrossWorlds]]. [[Benedict Sidwell|Sidwell]] somehow obtained control over the area, and turned it into the central location of the [[Evotar]] interrogation project. Newly-created Evotars are introduced here, and spend time in the area recovering their memories before entering the [[Vermillion Dungeon]] where they are interrogated. | |||
After being abducted by the [[Designer]] during the [[Para island raid]], [[Lea]] finds herself in Vermillion Wasteland. [[Sergey Asimov|Sergey]] seems unable to bring her back to the main playground, and advises her to explore the area for now. After a brief encounter with [[Gautham Ranganathan|Gautham]], Lea meets up with [[Luke|Lukas]], who has also been trapped in the area. The two are forced to form a party and take part in a mandatory quest, [[The Southern Trial Building]], which reveals a strange office building. After the quest, Lukas realizes he is unable to log out or remove his [[CrossWorlds Technology|Cross Gear]], and he doesn't remember his life outside the game. The two have no choice but to return to their rooms and sleep. | |||
The next day, Lea and Lukas are prevented from starting the next quest, so Lukas takes Lea on a tour of the area instead. | |||
The following day, Lea is confronted by [[Shizuka Sakai|Shizuka]], who reveals the truth about her: she is actually an AI. Lea suffers a severe mental breakdown from this revelation, and pushes Sergey away. She meets up with Lukas again, and the two start the next mandatory quest, [[The Northern Trial Building]], with Lukas realizing something is seriously wrong with Lea, but being unable to help her given her speech synchronization issues. Eventually, Lea breaks down in tears over the realization that she does not exist outside the game, and will be trapped there forever. Lukas is finally able to get through to her, and in a heartfelt conversation reminds her of the friends she has made who are still waiting for and missing her. The two decide to leave the quest for another day. | |||
The following day, Lea and Lukas complete the quest, revealing a messy apartment that turns out to be a copy of Lukas's. The office building seen previously was Lukas's workplace, and the quests are revealed to be intended to help him regain his memory. With the second quest completed, a path to the [[Vermillion Dungeon]] opens, a place from which no players have ever returned. The two make plans to go there the next day. | |||
On the final day in the wasteland, [[Benedict Sidwell|Sidwell]] briefly meets with Lea and apologizes for Shizuka's actions. Lea and Lukas meet up, and after sneaking past many Shredders on a suspiciously intentional-seeming path, enter the Vermillion Dungeon. | |||
| | |||
In the [[Vermillion Raid]], near the end of the game, Lea and her friends return to Vermillion Wasteland. Their goal here is to inflict all the Evotars with a hitstun bug, which should cause the [[Evotar Server]] to crash, allowing Lea to retrieve it without Sidwell erasing the data. While they are ultimately successful, Sidwell reveals that he is still able to erase the dungeon instance the server is located in, physically destroying it. However, at this point Gautham intervenes, taking control of the environment server from Sidwell and challenging Lea to complete his Ultimate Experience in exchange for access to the Evotar Server. Lea accepts and enters the [[Vermillion Tower]], leaving her friends behind. | |||
[[ | |||
In the [[A New Home]] DLC, Lea, [[Toby Tremblay|C'tron]] and [[Emilie-Sophie de Belmond|Emilie]] return to Vermillion Wasteland one final time in an attempt to discover the final clue to C'tron's past. Entering a secret lab under the area, they find and defeat [[Sidwell (boss)|Sidwell]], or rather an enemy based on his avatar, leading C'tron to finally remember the events leading up to him ending up on the Evotar Server. | |||
== Trophies == | |||
{{Main|Trophies}} | |||
;Vermillion Scavenger | |||
:Obtain all chests in Vermillion Wasteland; see [[#Treasures]]. | |||
[[ | == Secrets == | ||
[[Fan Cameos#Code Knight|Code Knight]] can be encountered for the third time in East Town, either during the Vermillion Raid or the [[A New Home]] DLC. On encountering her for the third time, she gives Lea a {{ItemLink|Cross Sandwich}}. | |||
Latest revision as of 19:03, 20 July 2022
| This article contains SPOILERS for the main story of CrossCode. Proceed at your own risk! |
Vermillion Wasteland is a location that is an unofficial area of CrossWorlds. It's a dark and strange region designed and built early in CrossWorlds' development, but was later put on hold. It's located in the right tip of the Croissant, separated from the rest of the Playground.
Layout
Most of the region is immediately accessible. The South and North Challenges are unlocked during The Southern Trial Building and The Northern Trial Building quests respectively. The storage rooms are unlocked later in the plot, on the way to the Vermillion Dungeon.
Connecting regions
- Vermillion Dungeon via Vermillion Tower
- Sapphire Ridge via Spiral Cliff (endgame)
- Vermillion Tower via Vermillion Tower (endgame)
Area map
The Town Center landmark becomes accessible towards the end of the game.

| # | Room/Landmark Name | Floor |
|---|---|---|
| 1 | East Town | GF |
| 2 | West Town
Landmark: Town Center |
GF |
| 3 | Crimson Lake | GF |
| 4 | Scarlet River | GF |
| 5 | River Delta | GF |
| 6 | Spiral Cliff | GF |
| 7 | Ebony Forest | GF |
| 8 | Vermillion Tower | GF |
| 9 | Dormitory Entrance | GF |
| 10 | Dormitory Floor 1 | GF |
| 11 | Dormitory Room 4 | GF |
| 12 | Tradehut | GF |
| 13 | Store | GF |
| 14 | Quest Hub | GF |
| 15 | South Challenge | GF |
| 16 | South Challenge B1 | U1 |
| 17 | Strange Lobby | U1 |
| 18 | North Challenge | GF |
| 19 | North Challenge B1 | U1 |
| 20 | Strange Flat | U1 |
| 21 | Storage Room 1 | GF |
| 22 | Storage Room 2 | GF |
| 23 | Storage Basement | U1 |
Treasures
There are limited opportunities to collect the treasures in Vermillion Wasteland, and some of them may be inaccessible in the A New Home DLC. It is recommended to collect them all either during the initial visit to Vermillion Wasteland, or right before entering Vermillion Tower at the end of the main game.
| Acc. | Type | Contains | Location | Info |
|---|---|---|---|---|
| 1 | 3 × |
East Town | ||
| 2 | 2 × |
East Town | ||
| 3 | 3 × |
West Town | ||
| 4 | 2 × |
West Town | ||
| 5 | 3 × |
West Town | ||
| 6 | 1 × LV41 |
East Town | Enter on the north path from West Town to reach this. | |
| 7 | 5 × |
Crimson Lake | ||
| 8 | 6 × |
Crimson Lake | ||
| 9 | 2 × |
Spiral Cliff | ||
| 10 | 4 × |
Spiral Cliff | ||
| 11 | 4 × |
Storage Basement |
Enemies
| Name | Sprite | Drops | Locations |
|---|---|---|---|
| Neutral Virus | Crimson Lake, Ebony Forest, River Delta, Scarlet River, Spiral Cliff, South Challenge B1<ref name="south-challenge" />, North Challenge B1<ref name="north-challenge" />, Storage Basement<ref name="respawn" /> | ||
| Heat Virus | Crimson Lake, Ebony Forest, Spiral Cliff<ref name="respawn"/>, South Challenge B1<ref name="south-challenge" />, North Challenge B1<ref name="north-challenge" />, Storage Basement<ref name="respawn" /> | ||
| Cold Virus | Ebony Forest, River Delta, Spiral Cliff<ref name="respawn"/>, North Challenge B1<ref name="north-challenge" />, Storage Basement<ref name="respawn" /> | ||
| Furious Security Brute | None | East Town, West Town, Vermillion Tower, Storage Basement | |
| Cool Security Brute | None | East Town, West Town, Vermillion Tower, Storage Basement | |
| Tense Security Brute | None | East Town, West Town, Vermillion Tower, Storage Basement, Spiral Cliff<ref name="raid" />, Crimson Lake<ref name="raid" /> | |
| Groovy Security Brute | None | East Town, West Town, Vermillion Tower, Storage Basement, Spiral Cliff<ref name="raid" />, Crimson Lake<ref name="raid" /> | |
| Laser of Doom | None | East Town, West Town, Vermillion Tower | |
| Arengee | None | South Challenge<ref name="south-challenge" /> | |
| Failed Rhino | None | North Challenge<ref name="north-challenge" /> |
<references> <ref name="respawn">Does not respawn</ref> <ref name="south-challenge">Spawns during The Southern Trial Building quest</ref> <ref name="north-challenge">Spawns during The Northern Trial Building quest</ref> <ref name="raid">During the chapter 10 raid of Vermillion Wasteland</ref> </references>
Shops
Vermillion Wasteland has basic equipment and item shops located in the Vermillion Town store.

- Vermillion Equipment – Located in Store.
| Item | Credits |
|---|---|
| LV27 |
15850 |
| LV34 |
29450 |
| LV27 |
15800 |
| LV34 |
29375 |
| LV27 |
16100 |
| LV34 |
29725 |
| LV27 |
15950 |
| LV34 |
29450 |

- Vermillion Consumables – Located in Store.
| Item | Credits |
|---|---|
| 100 | |
| 300 | |
| 250 | |
| 222 | |
| 200 | |
| 200 | |
| 200 | |
| 200 |
Traders
Vermillion Wasteland has a small group of basic traders located in the Vermillion Town tradehut.
- Vermillion Heals – Located in Tradehut
| Offered Item | Credits | Requisite Items |
|---|---|---|
| 950 | 2x | |
| 1050 |
- Vermillion Buffs – Located in Tradehut
| Offered Item | Credits | Requisite Items |
|---|---|---|
| 550 | 2x | |
| 550 | 2x | |
| 550 | 2x | |
| 550 | 2x |
- Vermillion Sets & Metal – Located in Tradehut
| Offered Item | Credits | Requisite Items |
|---|---|---|
| 100 | ||
| 100 | ||
| 250 | ||
| 90 | ||
| 450 | 2x |
- Vermillion Weapons – Located in Tradehut
| Offered Item | Credits | Requisite Items |
|---|---|---|
| LV37 |
31313 | LV27 |
| LV38 |
35800 | LV27 |
- Vermillion Torso – Located in Tradehut
| Offered Item | Credits | Requisite Items |
|---|---|---|
| LV37 |
32700 | LV27 |
| LV38 |
36630 | LV27 |
- Vermillion Head – Located in Tradehut
| Offered Item | Credits | Requisite Items |
|---|---|---|
| LV37 |
32450 | LV27 |
| LV38 |
36001 | LV27 |
- Vermillion Legs – Located in Tradehut
| Offered Item | Credits | Requisite Items |
|---|---|---|
| LV37 |
32050 | LV27 |
| LV38 |
35760 | LV27 |
Quests
Only two mandatory quests are associated with this area, and they have to be completed to progress the story.
A New Home DLC Changes
The A New Home DLC's main addition to Vermillion Wasteland is Sidwell's secret lab, which is infiltrated during the final chapter.
Area Map
| # | Room/Landmark Name | Floor |
|---|---|---|
| 1 | East Town | GF |
| 2 | West Town
Landmark: Town Center |
GF |
| 3 | Crimson Lake | GF |
| 4 | Scarlet River | GF |
| 5 | River Delta | GF |
| 6 | Spiral Cliff | GF |
| 7 | Ebony Forest | GF |
| 8 | Vermillion Tower | GF |
| 9 | Dormitory Entrance | GF |
| 10 | Dormitory Floor 1 | GF |
| 11 | Dormitory Room 4 | GF |
| 12 | Tradehut | GF |
| 13 | Store | GF |
| 14 | Quest Hub | GF |
| 15 | South Challenge | GF |
| 16 | South Challenge B1 | U1 |
| 17 | Strange Lobby | U1 |
| 18 | North Challenge | GF |
| 19 | North Challenge B1 | U1 |
| 20 | Strange Flat | U1 |
| 21 | Storage Room 1 | GF |
| 22 | Storage Room 2 | GF |
| 23 | Storage Basement | U1 |
| 24 | ??? | GF |
| 25 | Lab Entrance | F?? |
| 26 | Hallway H03 | F?? |
| 27 | Meeting Room M04-01 | F?? |
| 28 | Meeting Room M04-02 | F?? |
| 29 | Junction J03-01 | F?? |
| 30 | Sidwell's Office | F?? |
Enemies
A few more enemies are encountered while exploring the secret lab. As the game ends immediately after this, none of these enemies respawn.
| Name | Sprite | Drops | Location |
|---|---|---|---|
| Neutral Virus | Lab Entrance, Junction J03-01 | ||
| Heat Virus | Lab Entrance, Junction J03-01 | ||
| Cold Virus | Lab Entrance, Junction J03-01 | ||
| Arengee | None | Junction J03-01 | |
| Failed Rhino | None | Lab Entrance | |
| Sidwell (Boss) | None | Sidwell's Office |
Role in the Plot
Vermillion Wasteland is a planned but abandoned area of CrossWorlds. Sidwell somehow obtained control over the area, and turned it into the central location of the Evotar interrogation project. Newly-created Evotars are introduced here, and spend time in the area recovering their memories before entering the Vermillion Dungeon where they are interrogated.
After being abducted by the Designer during the Para island raid, Lea finds herself in Vermillion Wasteland. Sergey seems unable to bring her back to the main playground, and advises her to explore the area for now. After a brief encounter with Gautham, Lea meets up with Lukas, who has also been trapped in the area. The two are forced to form a party and take part in a mandatory quest, The Southern Trial Building, which reveals a strange office building. After the quest, Lukas realizes he is unable to log out or remove his Cross Gear, and he doesn't remember his life outside the game. The two have no choice but to return to their rooms and sleep.
The next day, Lea and Lukas are prevented from starting the next quest, so Lukas takes Lea on a tour of the area instead.
The following day, Lea is confronted by Shizuka, who reveals the truth about her: she is actually an AI. Lea suffers a severe mental breakdown from this revelation, and pushes Sergey away. She meets up with Lukas again, and the two start the next mandatory quest, The Northern Trial Building, with Lukas realizing something is seriously wrong with Lea, but being unable to help her given her speech synchronization issues. Eventually, Lea breaks down in tears over the realization that she does not exist outside the game, and will be trapped there forever. Lukas is finally able to get through to her, and in a heartfelt conversation reminds her of the friends she has made who are still waiting for and missing her. The two decide to leave the quest for another day.
The following day, Lea and Lukas complete the quest, revealing a messy apartment that turns out to be a copy of Lukas's. The office building seen previously was Lukas's workplace, and the quests are revealed to be intended to help him regain his memory. With the second quest completed, a path to the Vermillion Dungeon opens, a place from which no players have ever returned. The two make plans to go there the next day.
On the final day in the wasteland, Sidwell briefly meets with Lea and apologizes for Shizuka's actions. Lea and Lukas meet up, and after sneaking past many Shredders on a suspiciously intentional-seeming path, enter the Vermillion Dungeon.
In the Vermillion Raid, near the end of the game, Lea and her friends return to Vermillion Wasteland. Their goal here is to inflict all the Evotars with a hitstun bug, which should cause the Evotar Server to crash, allowing Lea to retrieve it without Sidwell erasing the data. While they are ultimately successful, Sidwell reveals that he is still able to erase the dungeon instance the server is located in, physically destroying it. However, at this point Gautham intervenes, taking control of the environment server from Sidwell and challenging Lea to complete his Ultimate Experience in exchange for access to the Evotar Server. Lea accepts and enters the Vermillion Tower, leaving her friends behind.
In the A New Home DLC, Lea, C'tron and Emilie return to Vermillion Wasteland one final time in an attempt to discover the final clue to C'tron's past. Entering a secret lab under the area, they find and defeat Sidwell, or rather an enemy based on his avatar, leading C'tron to finally remember the events leading up to him ending up on the Evotar Server.
Trophies
- Vermillion Scavenger
- Obtain all chests in Vermillion Wasteland; see #Treasures.
Secrets
Code Knight can be encountered for the third time in East Town, either during the Vermillion Raid or the A New Home DLC. On encountering her for the third time, she gives Lea a ![]() Cross Sandwich.
Cross Sandwich.