Bergen Trail: Difference between revisions
m (Bolded Bergen Trail) |
SomeMalady (talk | contribs) (Got to the Legendary Bunny and Seed without Heat. The pillar rocks have a small walkable area around them to allow jumping.) |
||
| (76 intermediate revisions by 17 users not shown) | |||
| Line 1: | Line 1: | ||
{{Location_Card | {{Location_Card | ||
| name=Bergen Trail | | name = Bergen Trail | ||
| image=File:Bergen_Trail.png | | color = {{Loc color|grey}} | ||
| description= | | image = File:Bergen_Trail.png | ||
| room_count= | | description = A rural area leading up to the cold town of Bergen. | ||
| | | room_count = 34 | ||
| | | trader_count = 6 | ||
| quest_count = 8 | |||
| treasure_default = 25 | |||
| treasure_key = 0 | |||
| treasure_masterkey = 0 | |||
| treasure_bronze = 2 | |||
| treasure_silver = 2 | |||
| treasure_gold = 1 | |||
}} | |||
'''Bergen Trail''' is a [[Locations|location]] in [[CrossWorlds]]. It is a high, snow-filled, mountainous area with steep cliffs and long views. It can be found north of [[Autumn's Rise]]. It must be crossed to reach [[Bergen Village]] and the [[Temple Mine]]. | |||
{{Encyclopedia|title=Bergen Trail | |||
|contents=Bergen Trail is a way up Mount Bergen from [[Autumn's Rise]], leading to [[Bergen Village]]. | |||
At the foot of the mountain, the path begins with a green, temperate forest of coniferous hardwood trees, though it will inevitably start to snow when moving towards the top. | |||
It is home to a lot of [[White Frobbit]]s who can hide below snow to attack with a surprise attack. You might also find some [[Pengpeng]]s along the way. | |||
Closer to Bergen you can also find [[Horny Goat]]s and [[Karotto]]s which are tough foes if not prepared. | |||
|source=Encyclopedia entry | |||
}} | }} | ||
== Layout == | == Layout == | ||
Bergen Trail extends north from [[Autumn's Rise]] to the village of Bergen. Multiple paths can be followed to traverse the area. At the bottom of the trail is a resting spot with several traders; it is mentioned in-game that there used to be a meeting place here, but it was removed in anticipation of a future update. This is where [[Lea]] has her first duel with [[Apollo]]. Halfway up the trail is the Hermit's House, a pub and waypoint for travellers. A few caves can be found throughout the area. | |||
{{Encyclopedia|title=Hermit's House | |||
|contents=The Hermit's House in Bergen Trail is a small pub located roughly in the middle of the climb. Before the path to the [[Temple Mine]] was established this house was the first built by human hands on Bergen Trail. It was named after the owner, who ironically was called Hermit by everyone. He was a founding member of the [[Factions#Venture Alliance|Venture Alliance]] faction and set out to explore the mountain all by himself. | |||
As [[Shadoon]] was explored more and more, he too ventured forth and left the house. In an effort to provide provisions to [[Seeker]]s on their way to Bergen and the Temple Mine some villagers opened a pub inside the house which has never closed since it's opened. | |||
|source=Encyclopedia entry | |||
}} | |||
=== Connecting Regions === | === Connecting Regions === | ||
The locations reachable from Bergen Trail are [[Autumn's Rise]] via Entrance, and [[Bergen Village]] via Rising Path 5. | |||
=== | === Rooms === | ||
{| class="wikitable" | Most parts of Bergen Trail can be accessed immediately. However, Abandoned Ground requires the Heat element to enter. The Horncave only unlocks during {{QuestLink|The Goatfather}} quest. The Hermit's Basement only unlocks during the [[Heating the Hermit]] quest. The secret lab in this area is XBox exclusive and unlocks during the {{QuestLink|Out of the Box}} quest. Finally, Excluded Mountain Top is accessed much later on in the plot. | ||
| | [[File:Bergen-trail-map.png| upright=1.8 | thumb | left | link=https://gamepedia.cursecdn.com/crosscode_gamepedia/1/1c/Bergen-trail-map.png | Click the map for a full-resolution image.]] | ||
{| class="wikitable sortable" | |||
|+ Rooms of Bergen Trail | |||
|- | |- | ||
! | ! # | ||
! Area Name | ! Area Name | ||
! Floor | |||
|- | |- | ||
| 1 || Entrance | | 1 || Entrance | ||
'''Landmark: Resting Spot''' | |||
| GF | |||
|- | |- | ||
| 2 || Rising Path 1 | | 2 || Rising Path 1 || GF | ||
|- | |- | ||
| 3 || Rising Path 2 | | 3 || Rising Path 2 || GF | ||
|- | |- | ||
| 4 || Old Plateau | | 4 || Old Plateau || GF | ||
|- | |- | ||
| 5 || Rising Path 3 | | 5 || Rising Path 3 || GF | ||
|- | |- | ||
| 6 || Off Road 1 | | 6 || Off Road 1 || GF | ||
|- | |- | ||
| 7 || Off Road 2 | | 7 || Off Road 2 || GF | ||
|- | |- | ||
| 8 || Off Road 3 | | 8 || Off Road 3 || GF | ||
|- | |- | ||
| 9 || Spike Heights | | 9 || Spike Heights | ||
'''Landmark: Hermit's House''' | |||
| GF | |||
|- | |- | ||
| 10 || Bergen Waterfalls | | 10 || Bergen Waterfalls || GF | ||
|- | |- | ||
| 11 || | | 11 || Icy Cauldron || GF | ||
|- | |- | ||
| 12 || Rising Path 4 | | 12 || Rising Path 4 || GF | ||
|- | |- | ||
| 13 || Rising Path 5 | | 13 || Rising Path 5 | ||
'''Landmark: Outlook''' | |||
| GF | |||
|- | |||
| 14 || Windy Climb || GF | |||
|- | |||
| 15 || Lofty Heights || GF | |||
|- | |||
| 16 || Abandoned Ground || GF | |||
|- | |||
| 17 || Old Testing Ground || GF | |||
|- | |||
| 18 || Pengpeng's Den || GF | |||
|- | |||
| 19 || Hermit's House || GF | |||
|- | |||
| 20 || Hermit's Basement || U1 | |||
|- | |||
| 21 || Frozen Cave || GF | |||
|- | |||
| 22 || Horncave 1 || U1 | |||
|- | |||
| 23 || Horncave 2 || U1 | |||
|- | |||
| 24 || Horncave 3 || U1 | |||
|- | |||
| 25 || Abandoned Cave || GF | |||
|- | |||
| 26 || Excluded Mountain Top || GF | |||
|- | |||
| 27 || HH Reception || U1 | |||
|- | |||
| 28 || Pipe Systems || U1 | |||
|- | |||
| 29 || Old Office || U1 | |||
|- | |||
| 30 || Crossing Office || U2 | |||
|- | |||
| 31 || Cross Boxing Chamber || U2 | |||
|- | |||
| 32 || X-treme Test Chamber || U2 | |||
|- | |||
| 33 || 360 Y2 Test Chamber || U2 | |||
|- | |||
| 34 || Lead Office || U2 | |||
|} | |} | ||
{{clear}} | |||
== | === Chests === | ||
Bergen Trail has 30 chests in total. | |||
[[File:BergenTrailTreasureMap.png | upright=1.8 | thumb | left | link=https://gamepedia.cursecdn.com/crosscode_gamepedia/9/95/BergenTrailTreasureMap.png | Click the map for a full-resolution image.]] | |||
{{TreasureList| | |||
{{TreasureList/entry|acc=1|type=default|item=Veggie Burger|amount=4|loc=Entrance}} | |||
{{TreasureList/entry|acc=2|type=default|item=Raw Meat|amount=3|loc=Entrance}} | |||
{{TreasureList/entry|acc=3|type=default|item=Sweet Berry Tea|amount=5|loc=Rising Path 1}} | |||
{{TreasureList/entry|acc=4|type=default|item=Veggie Set|amount=5|loc=Rising Path 2}} | |||
{{TreasureList/entry|acc=5|type=gold|item=Echo Roll|amount=5|loc=Old Plateau}} | |||
{{TreasureList/entry|acc=6|type=default|item=Refined Metal|amount=2|loc=Frozen Cave|info=The Heat element is needed to reach this. Leave some Ice Walls intact to use them as a bridge.}} | |||
{{TreasureList/entry|acc=7|type=default|item=Winter Thorn|amount=3|loc=Rising Path 3|info=Enter from Old Plateau to reach this.}} | |||
{{TreasureList/entry|acc=8|type=default|item=Rusty Bits|amount=6|loc=Rising Path 3}} | |||
{{TreasureList/entry|acc=9|type=default|item=Diabolic Horns|amount=4|loc=Windy Climb|info=Enter from Rising Path 3 to open the path to here.}} | |||
{{TreasureList/entry|acc=10|type=default|item=Perforated Tophat|amount=1|loc=Rising Path 4}} | |||
{{TreasureList/entry|acc=11|type=default|item=Chef Sandwich|amount=6|loc=Rising Path 4}} | |||
{{TreasureList/entry|acc=12|type=default|item=Blazing Bun|amount=4|loc=Off Road 1}} | |||
{{TreasureList/entry|acc=13|type=default|item=Pike Wood|amount=6|loc=Off Road 1}} | |||
{{TreasureList/entry|acc=14|type=default|item=Purple Ore Lump|amount=5|loc=Off Road 2}} | |||
{{TreasureList/entry|acc=15|type=default|item=Cheese Cracker|amount=4|loc=Off Road 2}} | |||
{{TreasureList/entry|acc=16|type=default|item=Golden Satchel|amount=3|loc=Off Road 2|info=Frobbits will attack.}} | |||
{{TreasureList/entry|acc=17|type=default|item=Winter Thorn|amount=4|loc=Off Road 3}} | |||
{{TreasureList/entry|acc=18|type=default|item=Dropped Mic|amount=3|loc=Off Road 3}} | |||
{{TreasureList/entry|acc=19|type=default|item=Fruit Pie|amount=4|loc=Spike Heights}} | |||
{{TreasureList/entry|acc=20|type=bronze|item=Ginger Tom. Salad|amount=5|loc=Spike Heights|info=Requires the Heat element and the {{ItemLink|Thief's Key}} to open.}} | |||
{{TreasureList/entry|acc=21|type=default|item=Golden Triangle|amount=1|loc=Bergen Waterfalls|info=Enter on the upper path from Rising Path 4 to reach the path to this chest.}} | |||
{{TreasureList/entry|acc=22|type=default|item=Rocksplitter|amount=1|loc=Rising Path 5}} | |||
{{TreasureList/entry|acc=23|type=normal|item=Refined Metal|amount=2|loc=Abandoned Cave}} | |||
{{TreasureList/entry|acc=24|type=default|item=Vanilla Ice Cream|amount=2|loc=Horncave 2|info=Get {{QuestLink|The Goatfather}} quest to enter the cave.}} | |||
{{TreasureList/entry|acc=25|type=default|item=GIT|amount=1|loc=Horncave 3|info=Collected during {{QuestLink|The Goatfather}} quest.}} | |||
{{TreasureList/entry|acc=26|type=silver|item=Golden Bars|amount=4|loc=Icy Cauldron}} | |||
{{TreasureList/entry|acc=27|type=silver|item=Precious Metal|amount=2|loc=Abandoned Ground}} | |||
{{TreasureList/entry|acc=28|type=normal|item=Broken Shield|amount=1|loc=Pengpeng's Den}} | |||
{{TreasureList/entry|acc=29|type=bronze|item=Heaven's Seed|amount=1|loc=Lofty Heights|info=Requires the {{ItemLink|Thief's Key}} to open, and use of the Heat element makes reaching it much easier.}} | |||
{{TreasureList/entry|acc=30|type=default|item=T.A.N.K.|amount=1|loc=Lead Office|info=Formerly XBox Exclusive. Reached during the {{QuestLink|Out of the Box}} quest.}} | |||
}} | |||
{{clear}} | |||
== Enemies == | |||
{| class="wikitable" | {| class="wikitable" | ||
|+ [[Enemies]] of Bergen Trail | |||
! Name | ! Name | ||
! Sprite | |||
! Drops | |||
! Locations | ! Locations | ||
|- | |- | ||
| [[Old Hedgehag]] | | [[Old Hedgehag]] | ||
| 1,2 | | [[File:red-hedgehog-sprite.png|center|frameless|75x75px]] | ||
| {{ItemLink|Metal Needles}}, {{ItemLink|Chili Con Carne}}, {{ItemLink|Ruby}}<ref name="trailboost" /> | |||
| Rising Path 1 | |||
|- | |||
| [[Red Eyed Bovine]] | |||
| [[File:iron-buffalo-sprite.png|center|frameless|75x75px]] | |||
| {{ItemLink|Bovine Skin}}, {{ItemLink|Raw Meat}}, {{ItemLink|Ruby}}<ref name="trailboost" /> | |||
| Rising Path 1, Off Road 2 | |||
|- | |- | ||
| [[Young Frobbit]] | | [[Young Frobbit]] | ||
| 1,2, | | [[File:frobbit-sprite.png|center|frameless|75x75px]] | ||
| {{ItemLink|Fluffy Fur}}, {{ItemLink|Tofu Cracker}}, {{ItemLink|Moonstone}}<ref name="trailboost" /> | |||
| Entrance, Rising Path 1, Rising Path 2, Off Road 1, Off Road 2, Off Road 3 | |||
|- | |- | ||
| [[White Frobbit]] | | [[White Frobbit]] | ||
| 3, | | [[File:Monster-Blue-Frobbit.png|center|frameless|75x75px]] | ||
| {{ItemLink|Fluffy Fur}}, {{ItemLink|Frosted Carrot}}, {{ItemLink|Diamond}}<ref name="trailboost" /> | |||
| Rising Path 2, Old Plateau, Rising Path 3, Spike Heights, Bergen Waterfalls, Windy Climb, Rising Path 4, Rising Path 5 | |||
|- | |||
| [[Dirty Frobbit]] | |||
| [[File:Monster-Blue-Frobbit.png|center|frameless|75x75px]] | |||
| {{ItemLink|Fluffy Fur}}, {{ItemLink|Frosted Carrot}} | |||
| Rising Path 2<ref name="filthy" /> | |||
|- | |- | ||
| [[Legendary Frobbit]] | | [[Legendary Frobbit]] | ||
| | | [[File:frobbit-sprite.png|center|frameless|75x75px]] | ||
| {{ItemLink|Captured Bunny}} | |||
| Windy Climb<ref name="legendary" /> | |||
|- | |- | ||
| [[File: | | [[Seafly]] | ||
| | | [[File:seaskito-sprite.png|center|frameless|75x75px]] | ||
| 2, | | {{ItemLink|Solid Bubble}}, {{ItemLink|Salty Ice Cream}}, {{ItemLink|Moonstone}}<ref name="trailboost" /> | ||
| Rising Path 2, Rising Path 3, Off Road 1, Off Road 2, Off Road 3, Spike Heights, Bergen Waterfalls, Windy Climb, Rising Path 4, Rising Path 5 | |||
|- | |- | ||
| [[Pengpeng]] | | [[Pengpeng]] | ||
| | | [[File:Monster-Penguin.png|center|frameless|75x75px]] | ||
| {{ItemLink|Rock Beak}}, {{ItemLink|Bergen Ice Cream}}, {{ItemLink|Diamond}}<ref name="trailboost" /> | |||
| Old Plateau, Off Road 3, Spike Heights, Bergen Waterfalls, Icy Cauldron, Pengpeng's Den<ref name="respawn" /> | |||
|- | |- | ||
| [[File: | | [[Horny Goat]] | ||
| | | [[File:herpy-sprite.png|center|frameless|75x75px]] | ||
| | | {{ItemLink|Diabolic Horns}}, {{ItemLink|Raw Meat}}, {{ItemLink|Moonstone}}<ref name="trailboost" /> | ||
| Old Plateau, Off Road 1, Spike Heights, Rising Path 4, Rising Path 5 | |||
|- | |- | ||
| [[File: | | [[Horny Cavegoat]] | ||
| | | [[File:Horny-cavegoat-sprite.png|center|frameless|75x75px]] | ||
| 4, | | {{ItemLink|Diabolic Horns}}, {{ItemLink|Raw Meat}} | ||
| Rising Path 4<ref name="goatfather" />, Horncave 1<ref name="respawnstop" />, Horncave 2<ref name="respawnstop" />, Horncave 3<ref name="respawnstop" /> | |||
|- | |- | ||
| [[Karotto]] | | [[Karotto]] | ||
| | | [[File:karotto-sprite.png|center|frameless|75x75px]] | ||
| {{ItemLink|Frosted Carrot}}, {{ItemLink|Perforated Tophat}}, {{ItemLink|Diamond}}<ref name="trailboost" /> | |||
| Bergen Waterfalls, Rising Path 4, Rising Path 5 | |||
|- | |||
| [[Karrotank]] | |||
| [[File:Karottank.png|center|frameless|75x75px]] | |||
| {{ItemLink|Frosted Carrot}} | |||
| Old Plateau<ref name="box" />, Bergen Waterfalls<ref name="box" />, Cross Boxing Chamber<ref name="box" /> | |||
|- | |||
| [[Apollo]] | |||
| [[File:Apollo-sprite.png|center|frameless|75x75px]] | |||
| None | |||
| Entrance<ref name="respawn" /> | |||
|- | |||
| [[Peng King Dakara]] ([[boss]]) | |||
| [[File:Peng-king-dakara-sprite.png|center|frameless|75x75px]] | |||
| {{ItemLink|Polished Mic}} | |||
| Pengpeng's Den<ref name="respawn" /> | |||
|- | |||
| [[Designer|???]] (boss) | |||
| [[File:EMF-sprite.png|center|frameless|75x75px]] | |||
| None | |||
| Excluded Mountain Top<ref name="respawn" /> | |||
|- | |||
| [[General Rootser]] (boss) | |||
| [[File:General-Rootser-Sprite.png|center|frameless|75x75px]] | |||
| {{ItemLink|Snowtank Datachip}} | |||
| 360 Y2 Test Chamber<ref name="box" /> | |||
|} | |} | ||
<references> | |||
<ref name="trailboost">With {{ItemLink|Trail Booster}} enabled</ref> | |||
<ref name="legendary">During {{QuestLink|The Legendary Bunny}} quest</ref> | |||
<ref name="filthy">During [[Filthy Frobbits]] quest</ref> | |||
<ref name="respawn">Does not respawn</ref> | |||
<ref name="goatfather">During {{QuestLink|The Goatfather}} quest</ref> | |||
<ref name="respawnstop">Stops respawning once the [[Wrath of Goat]] quest is started</ref> | |||
<ref name="box">XBox exclusive, during {{QuestLink|Out of the Box}} quest</ref> | |||
</references> | |||
== Destroyable | == Botanics == | ||
There are 13 types of [[botanic]] destructibles found in Bergen Trail. | |||
{| class="wikitable" | |||
! colspan="2" style="text-align:center" | Destroyable | |||
! Contents | |||
{{ItemDestroyable|name=Alpha Feather Bush | |||
|image=[[File:BergenTrail-Grass-1.png|center]] | |||
|location=Commonly found everywhere where no snow falls. | |||
|unlockLocation=10 | |||
|items= | |||
* {{ItemLink|Feather Leaf}} (12 %) | |||
* {{ItemLink|Rusty Bits}} (8 %) | |||
|unlockDrops=20}} | |||
{{ItemDestroyable|name=Beta Feather Bush | |||
|image=[[File:BergenTrail-Grass-2.png|center]] | |||
|location=Commonly found everywhere where no snow falls. | |||
|unlockLocation=10 | |||
|items= | |||
* {{ItemLink|Feather Leaf}} (12 %) | |||
* {{ItemLink|Rusty Bits}} (7 %) | |||
* {{ItemLink|Frozen Tear}} (1 %) | |||
|unlockDrops=20}} | |||
{{ItemDestroyable|name=Omega Feather Bush | |||
|image=[[File:BergenTrail-Grass-Rare.png|center]] | |||
|location=Rarely found in lower parts where no snow falls. | |||
|unlockLocation=4 | |||
|items= | |||
* {{ItemLink|Frozen Tear}} (45 %) | |||
* {{ItemLink|Rusty Bits}} (55 %) | |||
|unlockDrops=8}} | |||
{{ItemDestroyable|name=Alpha Pike Shrub | |||
|image=[[File:BergenTrail-Dry-1.png|center]] | |||
|location=Commonly found everywhere where no snow falls. | |||
|unlockLocation=10 | |||
|items= | |||
* {{ItemLink|Pike Wood}} (12 %) | |||
* {{ItemLink|Purple Ore Lump}} (8 %) | |||
|unlockDrops=20}} | |||
{{ItemDestroyable|name=Beta Pike Shrub | |||
|image=[[File:BergenTrail-Dry-2.png|center]] | |||
|location=Commonly found everywhere where no snow falls. | |||
|unlockLocation=10 | |||
|items= | |||
* {{ItemLink|Pike Wood}} (12 %) | |||
* {{ItemLink|Purple Ore Lump}} (7 %) | |||
* {{ItemLink|Winter Thorn}} (1 %) | |||
|unlockDrops=20}} | |||
{{ItemDestroyable|name=Omega Pike Shrub | |||
|image=[[File:BergenTrail-Dry-Rare.png|center]] | |||
|location=Rarely found in lower parts where no snow falls. | |||
|unlockLocation=4 | |||
|items= | |||
* {{ItemLink|Winter Thorn}} (45 %) | |||
* {{ItemLink|Purple Ore Lump}} (55 %) | |||
|unlockDrops=8}} | |||
{{ItemDestroyable|name=Alpha Plume Bush | |||
|image=[[File:BergenTrail-Grass-Snow-1.png|center]] | |||
|location=Commonly found everywhere where snow falls. | |||
|unlockLocation=10 | |||
|items= | |||
* {{ItemLink|Feather Leaf}} (12 %) | |||
* {{ItemLink|Rusty Bits}} (8 %) | |||
|unlockDrops=20}} | |||
{{ItemDestroyable|name=Beta Plume Bush | |||
|image=[[File:BergenTrail-Grass-Snow-2.png|center]] | |||
|location=Commonly found everywhere where snow falls. | |||
|unlockLocation=10 | |||
|items= | |||
* {{ItemLink|Feather Leaf}} (12 %) | |||
* {{ItemLink|Rusty Bits}} (7 %) | |||
* {{ItemLink|Frozen Tear}} (1 %) | |||
|unlockDrops=20}} | |||
{{ItemDestroyable|name=Omega Plume Bush | |||
|image=[[File:BergenTrail-Grass-Snow-Rare.png|center]] | |||
|location=Rarely found on high grounds where snow falls. | |||
|unlockLocation=4 | |||
|items= | |||
* {{ItemLink|Frozen Tear}} (45 %) | |||
* {{ItemLink|Rusty Bits}} (55 %) | |||
|unlockDrops=8}} | |||
{{ItemDestroyable|name=Alpha Lance Shrub | |||
|image=[[File:BergenTrail-Dry-Snow-1.png|center]] | |||
|location=Commonly found everywhere where snow falls. | |||
|unlockLocation=10 | |||
|items= | |||
* {{ItemLink|Pike Wood}} (12 %) | |||
* {{ItemLink|Purple Ore Lump}} (8 %) | |||
|unlockDrops=20}} | |||
{{ItemDestroyable|name=Beta Lance Shrub | |||
|image=[[File:BergenTrail-Dry-Snow-2.png|center]] | |||
|location=Commonly found everywhere where snow falls. | |||
|unlockLocation=10 | |||
|items= | |||
* {{ItemLink|Pike Wood}} (12 %) | |||
* {{ItemLink|Purple Ore Lump}} (7 %) | |||
* {{ItemLink|Winter Thorn}} (1 %) | |||
|unlockDrops=20}} | |||
{{ItemDestroyable|name=Omega Lance Shrub | |||
|image=[[File:BergenTrail-Dry-Snow-Rare.png|center]] | |||
|location=Rarely found on high grounds where snow falls. | |||
|unlockLocation=4 | |||
|items= | |||
* {{ItemLink|Winter Thorn}} (45 %) | |||
* {{ItemLink|Purple Ore Lump}} (55 %) | |||
|unlockDrops=8}} | |||
{{ItemDestroyable|name=Diamond Ice | |||
|image=[[File:ice-pile.png|center]] | |||
|location=Found sporadically in Rising Path 3. | |||
|unlockLocation=5 | |||
|items= | |||
* {{ItemLink|Bergen Ice}} (70 %) | |||
|unlockDrops=10}} | |||
|} | |||
==Traders== | |||
There are six player [[traders]] in Bergen Trail, all based at the Entrance. | |||
* '''Player Trader (equipment)''' — Located in Entrance. | |||
{| class="wikitable" | {| class="wikitable" | ||
! | ! Offered Item | ||
! | ! Credits | ||
! | ! Requisite Items | ||
|- | |- | ||
| | | {{ItemLink|Battered Fist}} | ||
| | | 4100 | ||
| | | 2x {{ItemLink|Refined Metal}}, 11x {{ItemLink|Feather Leaf}} 1x {{ItemLink|Frozen Tear}} 5x {{ItemLink|Purple Ore Lump}} | ||
|- | |- | ||
| | | {{ItemLink|Climbing Pick}} | ||
| | | 5050 | ||
| | | 17x {{ItemLink|Purple Ore Lump}}, 21x {{ItemLink|Pike Wood}}, 3x {{ItemLink|Winter Thorn}}, 2x {{ItemLink|Solid Bubble}} | ||
| | |||
|} | |} | ||
* '''Player Trader (healing consumables)''' — Located in Entrance. | |||
{| class="wikitable" | {| class="wikitable" | ||
! Offered Item | |||
! Credits | |||
! Requisite Items | |||
|- | |- | ||
| {{ItemLink|Chef Sandwich|showFoodIcon=1}} | |||
| 950 | |||
| 2x {{ItemLink|Veggie Set}}, 2x {{ItemLink|Fruit Set}} | |||
|- | |- | ||
| | | {{ItemLink|Sweet Berry Tea|showFoodIcon=1}} | ||
| | | 1050 | ||
| | | 1x {{ItemLink|Veggie Set}}, 1x {{ItemLink|Fruit Set}}, 1x {{ItemLink|Spice Set}} | ||
| | |||
|} | |} | ||
* '''Player Trader (enemy drops)''' — Located in Entrance. | |||
{| class="wikitable | {| class="wikitable" | ||
! Offered Item | |||
! Credits | |||
! Requisite Items | |||
|- | |- | ||
| {{ItemLink|Rock Beak}} | |||
| 350 | |||
| 2x {{ItemLink|Fluffy Fur}}, 2x {{ItemLink|Feather Leaf}} | |||
|- | |- | ||
| | | {{ItemLink|Solid Bubble}} | ||
| | | 400 | ||
| | | 2x {{ItemLink|Fluffy Fur}}, 2x {{ItemLink|Pike Wood}} | ||
|- | |- | ||
| | | {{ItemLink|Diabolic Horns}} | ||
| | | 500 | ||
| | | 1x {{ItemLink|Rock Beak}}, 1x {{ItemLink|Solid Bubble}} 2x {{ItemLink|Purple Ore Lump}}, 2x {{ItemLink|Rusty Bits}} | ||
|- | |- | ||
| | | {{ItemLink|Frosted Carrot}} | ||
| | | 650 | ||
| | | 2x {{ItemLink|Diabolic Horns}}, 1x {{ItemLink|Frozen Tear}}, 1x {{ItemLink|Winter Thorn}} | ||
|} | |} | ||
* '''Player Trader (stat consumables)''' — Located in Entrance. | |||
{| class="wikitable" | {| class="wikitable" | ||
! | ! Offered Item | ||
! Credits | |||
! Requisite Items | |||
|- | |- | ||
| | | {{ItemLink|Flaming Bun|showFoodIcon=1}} | ||
| | | 550 | ||
| 2x {{ItemLink|Fruit Set}} | |||
| | |||
| | |||
|- | |- | ||
| | | {{ItemLink|Fruit Salad|showFoodIcon=1}} | ||
| 550 | |||
| 2x {{ItemLink|Fruit Set}} | |||
|- | |- | ||
| | | {{ItemLink|Tofu Cracker|showFoodIcon=1}} | ||
| 550 | |||
| 2x {{ItemLink|Veggie Set}} | |||
|- | |- | ||
| | | {{ItemLink|Veggie Wraps|showFoodIcon=1}} | ||
| | | 550 | ||
| 2x {{ItemLink|Veggie Set}} | |||
* | |} | ||
* '''Player Trader (metal)''' — Located in Entrance. | |||
{| class="wikitable" | |||
! Offered Item | |||
! Credits | |||
! Requisite Items | |||
| | |||
|- | |- | ||
| | | {{ItemLink|Junk Metal}} | ||
| 90 | |||
| 2x {{ItemLink|Feather Leaf}}, 2x {{ItemLink|Pike Wood}} | |||
|- | |- | ||
| | | {{ItemLink|Refined Metal}} | ||
| 450 | |||
| 2x {{ItemLink|Junk Metal}}, 2x {{ItemLink|Rusty Bits}}, 2x {{ItemLink|Purple Ore Lump}} | |||
|} | |} | ||
* '''Player Trader (food sets)''' — Located in Entrance. | |||
{| class="wikitable" | |||
! Offered Item | |||
{| | ! Credits | ||
! | ! Requisite Items | ||
! | |||
! | |||
|- | |- | ||
| | | {{ItemLink|Veggie Set}} | ||
| | | 100 | ||
| | | 2x {{ItemLink|Feather Leaf}}, 1x {{ItemLink|Purple Ore Lump}} | ||
| | |||
|- | |- | ||
| | | {{ItemLink|Fruit Set}} | ||
| | | 100 | ||
| | | 2x {{ItemLink|Pike Wood}}, 1x {{ItemLink|Rusty Bits}} | ||
| | |||
|- | |- | ||
| [[File: | | {{ItemLink|Spice Set}} | ||
| | | 250 | ||
| | | 1x {{ItemLink|Frozen Tear}}, 1x {{ItemLink|Winter Thorn}} | ||
|} | |||
==Shops== | |||
[[File:Hermit House Shop.png|thumb|right|Hermit's House]] | |||
Note that unlike most [[shops]], the Hermit's House shop marks up items to substantially more than twice the selling price, and does not allow you to sell items. You get a discount at the shop after completing the {{QuestLink|Heating the Hermit}} quest. | |||
* '''Hermit's House''' — Located in Hermit's House. | |||
{| class="wikitable sortable" | |||
! Item | |||
! Credits | |||
! Discounted Credits | |||
|- | |- | ||
| | | {{ItemLink|Sweet Berry Tea|showFoodIcon=1}} || 3299 || 2999 | ||
| | |||
| | |||
| | |||
|- | |- | ||
| | | {{ItemLink|Chili Con Carne|showFoodIcon=1}} || 1099 || 999 | ||
| | |||
| | |||
| | |||
|- | |- | ||
| [[ | | {{ItemLink|Sweet Lemonjuice|showFoodIcon=1}} || 2199 || 1999 | ||
| | |} | ||
| | |||
== Quests == | |||
The [[quests]] that can be started in Bergen Trail are: | |||
* {{QuestLink|You've Got Mail?}} | |||
* {{QuestLink|Round and Round 2}} | |||
* {{QuestLink|The Legendary Bunny}} | |||
* {{QuestLink|Bergen Trailblazing}} | |||
** {{QuestLink|Bergen Trail Collect}} | |||
** {{QuestLink|Bergen Trail Defeat}} | |||
** {{QuestLink|Bergen Trail Landmarks}} | |||
** {{QuestLink|Bergen Trail Data Probe}} | |||
== A New Home DLC Changes == | |||
Bergen Trail does not have many changes during the [[A New Home]] DLC. Some new quests visit the area, and [[Sao]] can also be fought here. | |||
=== Enemies === | |||
{| class="wikitable" | |||
|+ [[Enemies]] of Bergen Trail | |||
! Name | |||
! Sprite | |||
! Drops | |||
! Locations | |||
|- | |- | ||
| [[File: | | [[Hedgehag]] | ||
| | | [[File:Hedgehag-sprite.png|center]] | ||
| | | {{ItemLink|Metal Needles}}<ref name="norank" /> | ||
| Spike Heights<ref name="ontherun" /> | |||
| | |||
|- | |- | ||
| [[ | | [[Old Hedgehag]] | ||
| [[File:red-hedgehog-sprite.png|center]] | |||
| {{ItemLink|Metal Needles}}<ref name="norank" /> | |||
| Spike Heights<ref name="ontherun" /> | |||
| [[File: | |||
| | |||
| | |||
| | |||
| | |||
|- | |- | ||
| [[File: | | [[Goat Worker]] | ||
| | | [[File:Horny-cavegoat-sprite.png|center]] | ||
| | | {{ItemLink|Diabolic Horns}}<ref name="norank" /> | ||
| Horncave 3<ref name="goat" />, Windy Climb<ref name="goat" /> | |||
|- | |- | ||
| [[File: | | [[Papagangster Nutbuster]] | ||
| | | [[File:Papagangster-muscle-sprite.png|center]] | ||
| | | {{ItemLink|Huge Nut}} | ||
| Horncave 3<ref name="goat" />, Windy Climb<ref name="goat" /> | |||
| | |||
|- | |- | ||
| [[ | | [[Sao]] | ||
| [[File:Sao-sprite.png|center]] | |||
| None | |||
| Rising Path 1<ref name="sao" /> | |||
| [[File: | |||
| | |||
| | |||
|} | |} | ||
<references> | |||
<ref name="norank">Additional drops not possible due to combat rank being disabled in this encounter</ref> | |||
<ref name="ontherun">Spawns during the [[Lost and On the Run]] quest</ref> | |||
<ref name="goat">Spawns during the [[Wrath of Goat]] quest</ref> | |||
<ref name="sao">Spawns after speaking to him in [[Bergen Village]]</ref> | |||
</references> | |||
== Role in the Plot == | |||
=== In CrossWorlds === | |||
[[Seeker]]s must pass through Bergen Trail on their way to [[Bergen Village]] and the [[Temple Mine]]. | |||
=== In CrossCode === | |||
[[Lea]] and [[Emilie-Sophie de Belmond|Emilie]] arrive at the bottom of Bergen Trail, ready for Lea's duel against [[Apollo]]. The two duel, and regardless of the outcome, Apollo accuses Lea of not unlocking the true potential of the [[Spheromancer]] class before leaving. Lea and Emilie then log off. The next day, Lea continues up the mountain to [[Bergen Village]], optionally inviting Emilie to her party. | |||
Later, when Lea is pulled out of the [[Para Island raid]] by the [[Designer|Blue Avatar]], he takes her to an isolated location in Bergen Trail for a duel. Although [[Sergey Asimov|Sergey]] tries to help Lea escape, the Blue Avatar counters his attempts, and eventually cancels the duel, replacing it with an unbeatable challenge before teleporting Lea away to [[Vermillion Wasteland]]. | |||
== Trophies == | |||
{{Main|Trophies}} | |||
;There is no Cow Level | |||
:Visit the Perfectly Normal Rock in Bergen Waterfall. | |||
;Drop the Beat | |||
:Defeat the [[Peng King Dakara]]. | |||
;Showdown at Bergen | |||
:Win the PVP battle against [[Apollo]]. | |||
;True Spheromancer | |||
:Win the PVP battle against [[Apollo]] without losing a single round. | |||
;Bergen Landmarks | |||
:Find all landmarks in Bergen Trail. | |||
;Bergen Scavenger | |||
:Obtain all chests in Bergen Trail; see [[#Chests]]. | |||
[[ | == Secrets and Challenges == | ||
*Lofty Heights is a secret area located to the northeast of Windy Climb. The path to get here is invisible until you step onto the ledge at the very edge of the map. | |||
*By returning with the Heat element, the player can enter the Abandoned Ground and fight [[Peng King Dakara]], an optional miniboss. This fight is required for the {{QuestLink|A Promise Is a Promise 2}} quest, but can be completed without the quest. | |||
Latest revision as of 17:10, 24 September 2022
Bergen Trail is a location in CrossWorlds. It is a high, snow-filled, mountainous area with steep cliffs and long views. It can be found north of Autumn's Rise. It must be crossed to reach Bergen Village and the Temple Mine.
| Bergen Trail |
|---|
|
Bergen Trail is a way up Mount Bergen from Autumn's Rise, leading to Bergen Village. At the foot of the mountain, the path begins with a green, temperate forest of coniferous hardwood trees, though it will inevitably start to snow when moving towards the top. It is home to a lot of White Frobbits who can hide below snow to attack with a surprise attack. You might also find some Pengpengs along the way. Closer to Bergen you can also find Horny Goats and Karottos which are tough foes if not prepared. |
| -Encyclopedia entry |
Layout
Bergen Trail extends north from Autumn's Rise to the village of Bergen. Multiple paths can be followed to traverse the area. At the bottom of the trail is a resting spot with several traders; it is mentioned in-game that there used to be a meeting place here, but it was removed in anticipation of a future update. This is where Lea has her first duel with Apollo. Halfway up the trail is the Hermit's House, a pub and waypoint for travellers. A few caves can be found throughout the area.
| Hermit's House |
|---|
|
The Hermit's House in Bergen Trail is a small pub located roughly in the middle of the climb. Before the path to the Temple Mine was established this house was the first built by human hands on Bergen Trail. It was named after the owner, who ironically was called Hermit by everyone. He was a founding member of the Venture Alliance faction and set out to explore the mountain all by himself. As Shadoon was explored more and more, he too ventured forth and left the house. In an effort to provide provisions to Seekers on their way to Bergen and the Temple Mine some villagers opened a pub inside the house which has never closed since it's opened. |
| -Encyclopedia entry |
Connecting Regions
The locations reachable from Bergen Trail are Autumn's Rise via Entrance, and Bergen Village via Rising Path 5.
Rooms
Most parts of Bergen Trail can be accessed immediately. However, Abandoned Ground requires the Heat element to enter. The Horncave only unlocks during The Goatfather quest. The Hermit's Basement only unlocks during the Heating the Hermit quest. The secret lab in this area is XBox exclusive and unlocks during the Out of the Box quest. Finally, Excluded Mountain Top is accessed much later on in the plot.
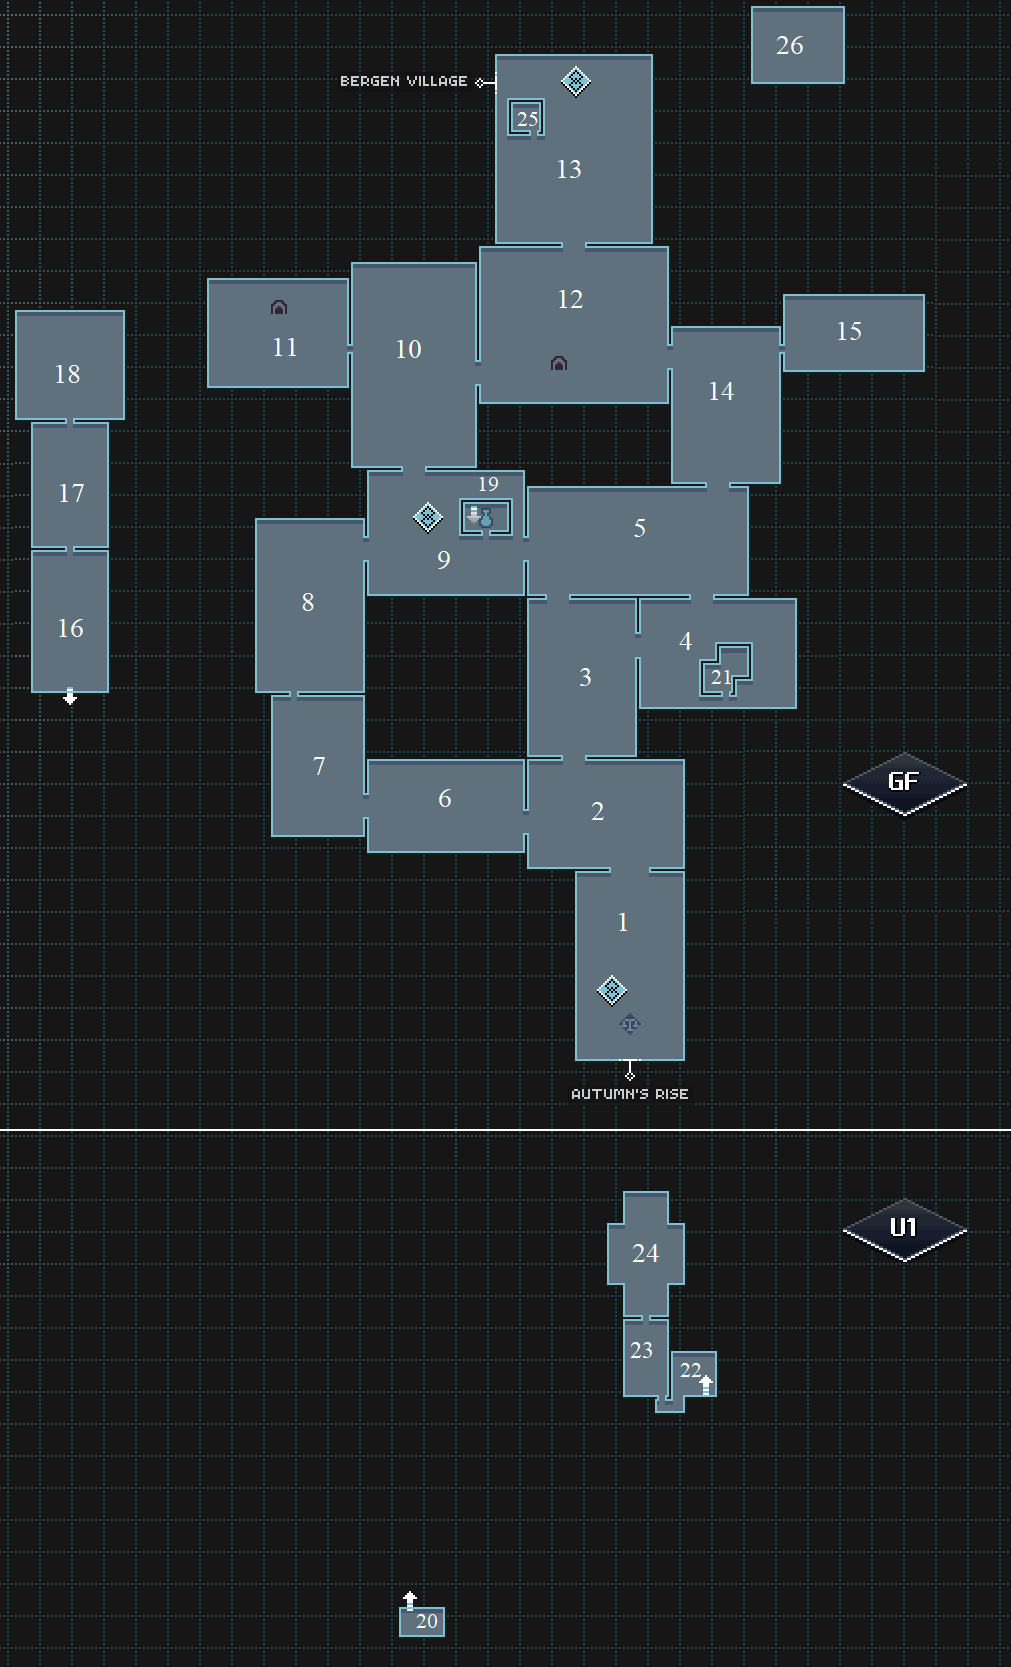
| # | Area Name | Floor |
|---|---|---|
| 1 | Entrance
Landmark: Resting Spot |
GF |
| 2 | Rising Path 1 | GF |
| 3 | Rising Path 2 | GF |
| 4 | Old Plateau | GF |
| 5 | Rising Path 3 | GF |
| 6 | Off Road 1 | GF |
| 7 | Off Road 2 | GF |
| 8 | Off Road 3 | GF |
| 9 | Spike Heights
Landmark: Hermit's House |
GF |
| 10 | Bergen Waterfalls | GF |
| 11 | Icy Cauldron | GF |
| 12 | Rising Path 4 | GF |
| 13 | Rising Path 5
Landmark: Outlook |
GF |
| 14 | Windy Climb | GF |
| 15 | Lofty Heights | GF |
| 16 | Abandoned Ground | GF |
| 17 | Old Testing Ground | GF |
| 18 | Pengpeng's Den | GF |
| 19 | Hermit's House | GF |
| 20 | Hermit's Basement | U1 |
| 21 | Frozen Cave | GF |
| 22 | Horncave 1 | U1 |
| 23 | Horncave 2 | U1 |
| 24 | Horncave 3 | U1 |
| 25 | Abandoned Cave | GF |
| 26 | Excluded Mountain Top | GF |
| 27 | HH Reception | U1 |
| 28 | Pipe Systems | U1 |
| 29 | Old Office | U1 |
| 30 | Crossing Office | U2 |
| 31 | Cross Boxing Chamber | U2 |
| 32 | X-treme Test Chamber | U2 |
| 33 | 360 Y2 Test Chamber | U2 |
| 34 | Lead Office | U2 |
Chests
Bergen Trail has 30 chests in total.
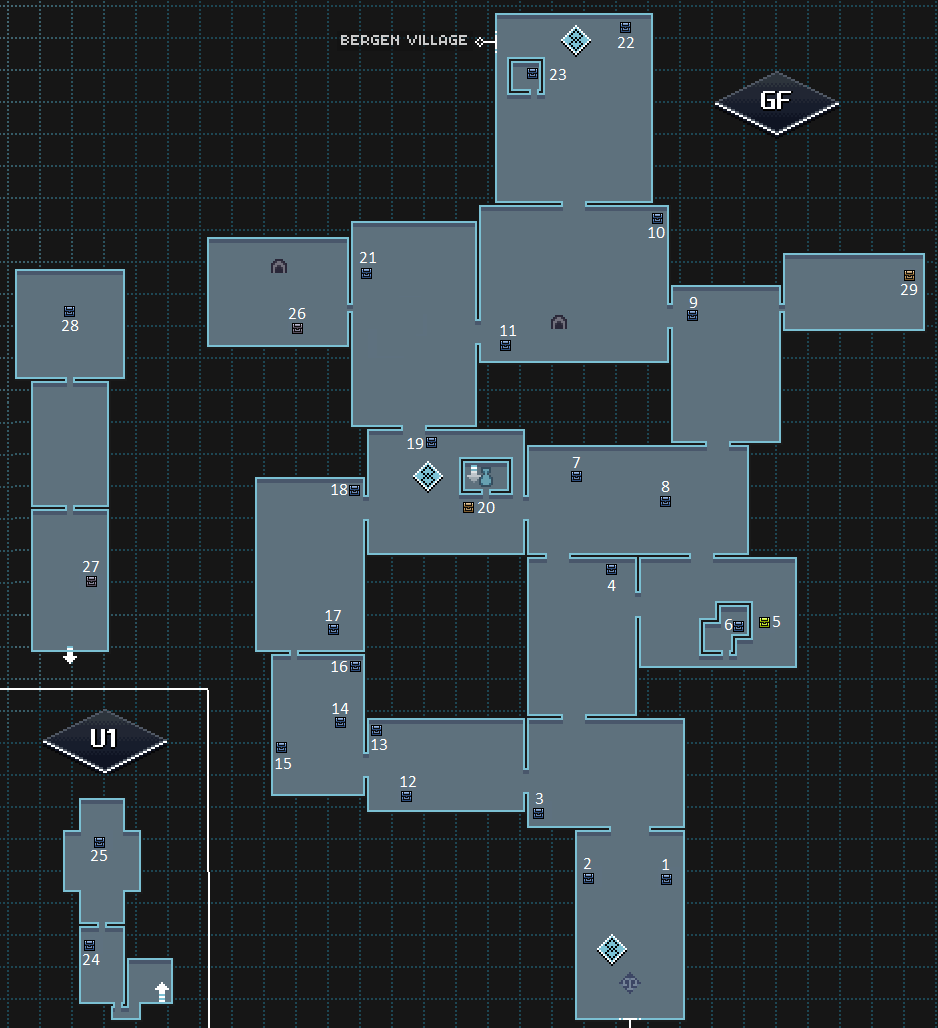
| Acc. | Type | Contains | Location | Info |
|---|---|---|---|---|
| 1 | 4 × |
Entrance | ||
| 2 | 3 × |
Entrance | ||
| 3 | 5 × |
Rising Path 1 | ||
| 4 | 5 × |
Rising Path 2 | ||
| 5 | 5 × |
Old Plateau | ||
| 6 | 2 × |
Frozen Cave | The Heat element is needed to reach this. Leave some Ice Walls intact to use them as a bridge. | |
| 7 | 3 × |
Rising Path 3 | Enter from Old Plateau to reach this. | |
| 8 | 6 × |
Rising Path 3 | ||
| 9 | 4 × |
Windy Climb | Enter from Rising Path 3 to open the path to here. | |
| 10 | 1 × |
Rising Path 4 | ||
| 11 | 6 × |
Rising Path 4 | ||
| 12 | 4 × |
Off Road 1 | ||
| 13 | 6 × |
Off Road 1 | ||
| 14 | 5 × |
Off Road 2 | ||
| 15 | 4 × |
Off Road 2 | ||
| 16 | 3 × |
Off Road 2 | Frobbits will attack. | |
| 17 | 4 × |
Off Road 3 | ||
| 18 | 3 × |
Off Road 3 | ||
| 19 | 4 × |
Spike Heights | ||
| 20 | 5 × |
Spike Heights | Requires the Heat element and the | |
| 21 | 1 × |
Bergen Waterfalls | Enter on the upper path from Rising Path 4 to reach the path to this chest. | |
| 22 | 1 × LV21 |
Rising Path 5 | ||
| 23 | 2 × |
Abandoned Cave | ||
| 24 | 2 × |
Horncave 2 | Get The Goatfather quest to enter the cave. | |
| 25 | 1 × |
Horncave 3 | Collected during The Goatfather quest. | |
| 26 | 4 × |
Icy Cauldron | ||
| 27 | 2 × |
Abandoned Ground | ||
| 28 | 1 × LV01 |
Pengpeng's Den | ||
| 29 | 1 × |
Lofty Heights | Requires the | |
| 30 | 1 × |
Lead Office | Formerly XBox Exclusive. Reached during the Out of the Box quest. |
Enemies
| Name | Sprite | Drops | Locations |
|---|---|---|---|
| Old Hedgehag | Rising Path 1 | ||
| Red Eyed Bovine | Rising Path 1, Off Road 2 | ||
| Young Frobbit | Entrance, Rising Path 1, Rising Path 2, Off Road 1, Off Road 2, Off Road 3 | ||
| White Frobbit |  |
Rising Path 2, Old Plateau, Rising Path 3, Spike Heights, Bergen Waterfalls, Windy Climb, Rising Path 4, Rising Path 5 | |
| Dirty Frobbit | |
Rising Path 2<ref name="filthy" /> | |
| Legendary Frobbit | Windy Climb<ref name="legendary" /> | ||
| Seafly | Rising Path 2, Rising Path 3, Off Road 1, Off Road 2, Off Road 3, Spike Heights, Bergen Waterfalls, Windy Climb, Rising Path 4, Rising Path 5 | ||
| Pengpeng |  |
Old Plateau, Off Road 3, Spike Heights, Bergen Waterfalls, Icy Cauldron, Pengpeng's Den<ref name="respawn" /> | |
| Horny Goat | Old Plateau, Off Road 1, Spike Heights, Rising Path 4, Rising Path 5 | ||
| Horny Cavegoat | Rising Path 4<ref name="goatfather" />, Horncave 1<ref name="respawnstop" />, Horncave 2<ref name="respawnstop" />, Horncave 3<ref name="respawnstop" /> | ||
| Karotto | Bergen Waterfalls, Rising Path 4, Rising Path 5 | ||
| Karrotank | Old Plateau<ref name="box" />, Bergen Waterfalls<ref name="box" />, Cross Boxing Chamber<ref name="box" /> | ||
| Apollo | None | Entrance<ref name="respawn" /> | |
| Peng King Dakara (boss) | Pengpeng's Den<ref name="respawn" /> | ||
| ??? (boss) | None | Excluded Mountain Top<ref name="respawn" /> | |
| General Rootser (boss) | 360 Y2 Test Chamber<ref name="box" /> |
<references>
<ref name="trailboost">With ![]() Trail Booster enabled</ref>
<ref name="legendary">During The Legendary Bunny quest</ref>
<ref name="filthy">During Filthy Frobbits quest</ref>
<ref name="respawn">Does not respawn</ref>
<ref name="goatfather">During The Goatfather quest</ref>
<ref name="respawnstop">Stops respawning once the Wrath of Goat quest is started</ref>
<ref name="box">XBox exclusive, during Out of the Box quest</ref>
</references>
Trail Booster enabled</ref>
<ref name="legendary">During The Legendary Bunny quest</ref>
<ref name="filthy">During Filthy Frobbits quest</ref>
<ref name="respawn">Does not respawn</ref>
<ref name="goatfather">During The Goatfather quest</ref>
<ref name="respawnstop">Stops respawning once the Wrath of Goat quest is started</ref>
<ref name="box">XBox exclusive, during Out of the Box quest</ref>
</references>
Botanics
There are 13 types of botanic destructibles found in Bergen Trail.
| Destroyable | Contents | ||||||
|---|---|---|---|---|---|---|---|
 |
Alpha Feather Bush |
| |||||
|
| |||||||
 |
Beta Feather Bush |
| |||||
|
| |||||||
 |
Omega Feather Bush |
| |||||
|
| |||||||
 |
Alpha Pike Shrub |
| |||||
|
| |||||||
 |
Beta Pike Shrub |
| |||||
|
| |||||||
 |
Omega Pike Shrub |
| |||||
|
| |||||||
 |
Alpha Plume Bush |
| |||||
|
| |||||||
 |
Beta Plume Bush |
| |||||
|
| |||||||
 |
Omega Plume Bush |
| |||||
|
| |||||||
 |
Alpha Lance Shrub |
| |||||
|
| |||||||
 |
Beta Lance Shrub |
| |||||
|
| |||||||
 |
Omega Lance Shrub |
| |||||
|
| |||||||
 |
Diamond Ice |
| |||||
|
| |||||||
Traders
There are six player traders in Bergen Trail, all based at the Entrance.
- Player Trader (equipment) — Located in Entrance.
| Offered Item | Credits | Requisite Items |
|---|---|---|
| LV17 |
4100 | 2x |
| LV19 |
5050 | 17x |
- Player Trader (healing consumables) — Located in Entrance.
| Offered Item | Credits | Requisite Items |
|---|---|---|
| 950 | 2x | |
| 1050 | 1x |
- Player Trader (enemy drops) — Located in Entrance.
| Offered Item | Credits | Requisite Items |
|---|---|---|
| 350 | 2x | |
| 400 | 2x | |
| 500 | 1x | |
| 650 | 2x |
- Player Trader (stat consumables) — Located in Entrance.
| Offered Item | Credits | Requisite Items |
|---|---|---|
| 550 | 2x | |
| 550 | 2x | |
| 550 | 2x | |
| 550 | 2x |
- Player Trader (metal) — Located in Entrance.
| Offered Item | Credits | Requisite Items |
|---|---|---|
| 90 | 2x | |
| 450 | 2x |
- Player Trader (food sets) — Located in Entrance.
| Offered Item | Credits | Requisite Items |
|---|---|---|
| 100 | 2x | |
| 100 | 2x | |
| 250 | 1x |
Shops

Note that unlike most shops, the Hermit's House shop marks up items to substantially more than twice the selling price, and does not allow you to sell items. You get a discount at the shop after completing the Heating the Hermit quest.
- Hermit's House — Located in Hermit's House.
| Item | Credits | Discounted Credits |
|---|---|---|
| 3299 | 2999 | |
| 1099 | 999 | |
| 2199 | 1999 |
Quests
The quests that can be started in Bergen Trail are:
A New Home DLC Changes
Bergen Trail does not have many changes during the A New Home DLC. Some new quests visit the area, and Sao can also be fought here.
Enemies
| Name | Sprite | Drops | Locations |
|---|---|---|---|
| Hedgehag | Spike Heights<ref name="ontherun" /> | ||
| Old Hedgehag | Spike Heights<ref name="ontherun" /> | ||
| Goat Worker | Horncave 3<ref name="goat" />, Windy Climb<ref name="goat" /> | ||
| Papagangster Nutbuster | Horncave 3<ref name="goat" />, Windy Climb<ref name="goat" /> | ||
| Sao | None | Rising Path 1<ref name="sao" /> |
<references> <ref name="norank">Additional drops not possible due to combat rank being disabled in this encounter</ref> <ref name="ontherun">Spawns during the Lost and On the Run quest</ref> <ref name="goat">Spawns during the Wrath of Goat quest</ref> <ref name="sao">Spawns after speaking to him in Bergen Village</ref> </references>
Role in the Plot
In CrossWorlds
Seekers must pass through Bergen Trail on their way to Bergen Village and the Temple Mine.
In CrossCode
Lea and Emilie arrive at the bottom of Bergen Trail, ready for Lea's duel against Apollo. The two duel, and regardless of the outcome, Apollo accuses Lea of not unlocking the true potential of the Spheromancer class before leaving. Lea and Emilie then log off. The next day, Lea continues up the mountain to Bergen Village, optionally inviting Emilie to her party.
Later, when Lea is pulled out of the Para Island raid by the Blue Avatar, he takes her to an isolated location in Bergen Trail for a duel. Although Sergey tries to help Lea escape, the Blue Avatar counters his attempts, and eventually cancels the duel, replacing it with an unbeatable challenge before teleporting Lea away to Vermillion Wasteland.
Trophies
- There is no Cow Level
- Visit the Perfectly Normal Rock in Bergen Waterfall.
- Drop the Beat
- Defeat the Peng King Dakara.
- Showdown at Bergen
- Win the PVP battle against Apollo.
- True Spheromancer
- Win the PVP battle against Apollo without losing a single round.
- Bergen Landmarks
- Find all landmarks in Bergen Trail.
- Bergen Scavenger
- Obtain all chests in Bergen Trail; see #Chests.
Secrets and Challenges
- Lofty Heights is a secret area located to the northeast of Windy Climb. The path to get here is invisible until you step onto the ledge at the very edge of the map.
- By returning with the Heat element, the player can enter the Abandoned Ground and fight Peng King Dakara, an optional miniboss. This fight is required for the A Promise Is a Promise 2 quest, but can be completed without the quest.