Autumn's Fall: Difference between revisions
(Fixing the link from #Chests to #Treasures) |
|||
| (37 intermediate revisions by 11 users not shown) | |||
| Line 1: | Line 1: | ||
{{Location_Card|name=Autumn's Fall | {{Location_Card|name=Autumn's Fall | ||
|color=#BF5900 | |||
|image=File:Autumn's Fall.png | |image=File:Autumn's Fall.png | ||
|description=Known for its many ponds and ruins, this area is the small brother of Autumn's Rise. | |description=Known for its many ponds and ruins, this area is the small brother of Autumn's Rise. | ||
|room_count= | |room_count=29 | ||
|treasure_default = | |quest_count=1 | ||
|treasure_default = 16 | |||
|treasure_key = 0 | |treasure_key = 0 | ||
|treasure_masterkey = 0 | |treasure_masterkey = 0 | ||
|treasure_bronze = | |treasure_bronze = 3 | ||
|treasure_silver = | |treasure_silver = 6 | ||
|treasure_gold = | |treasure_gold = 4 | ||
|trader_count=0}} | |trader_count=0}} | ||
'''Autumn's Fall''' is a [[Locations|location]] in [[CrossWorlds]]. It is a small extension to [[Autumn's Rise]] that serves to connect that area and [[Rookie Harbor]] to [[Gaia's Garden]]. It can only be accessed after completing [[Faj'ro Temple]]. | |||
{{Encyclopedia | |||
|title=Autumn's Fall | |||
|contents=The little sibling to [[Autumn's Rise]], Autumn's Fall is filled with old ruins that are believed to have once been part of a large city that stretched all across the area up to [[Gaia's Garden]] in the north and [[Sapphire Ridge]] to the east. | |||
|source=Encyclopedia entry | |||
}} | |||
== Layout == | == Layout == | ||
Autumn's Fall consists of four paths leading from the adjacent regions, that all meet in a rough X shape. | |||
Autumn's Fall | Only the core areas of Autumn's Fall are accessible immediately. Secluded Path and Great Lake are unlocked during the [[Chase of the Hologram Frobbit]] quest. The further parts of Para Island are only accessible during the [[Para Island raid]]. Ruby Tunnel requires the {{ItemLink|Star Shade}} to access. The Densewater Caverns are unlocked during the [[Bull on Fire]] quest. The secret lab here is Nintendo Switch exclusive and is unlocked during the [[A Switch in Altitude]] quest. | ||
=== Connecting Regions === | === Connecting Regions === | ||
This region connects to [[Rookie Harbor]] via Southern Exit, [[Autumn's Rise]] via Village Remains, [[Gaia's Garden]] via Northern Exit and [[Sapphire Ridge]] via Ruby Tunnel. | |||
=== | === Map === | ||
{| class="wikitable" | [[File:Autumns-fall-map.png|upright=1.8|thumb|left| link=https://static.wikia.nocookie.net/crosscode_gamepedia/images/2/26/Autumns-fall-map.png |For the full-resolution image, click the map.]] | ||
| | {| class="wikitable sortable" style="font-size: 90%;" | ||
|+ Rooms of Autumn's Fall | |||
|- | |||
! # | |||
! Room Name | |||
! Floor | |||
|- | |||
|1 | |||
|Village Remains | |||
'''Landmark: Ruined Village''' | |||
|GF | |||
|- | |||
|2 | |||
|Pillar Isle | |||
|GF | |||
|- | |||
|3 | |||
|Ancient Center | |||
|GF | |||
|- | |||
|4 | |||
|Southern Exit | |||
'''Landmark: Southern Exit''' | |||
|GF | |||
|- | |||
|5 | |||
|Ruined Path | |||
|GF | |||
|- | |||
|6 | |||
|Eastern Exit | |||
'''Landmark: Eastern Exit''' | |||
|GF | |||
|- | |||
|7 | |||
|Secluded Path | |||
|GF | |||
|- | |||
|8 | |||
|Great Lake | |||
|GF | |||
|- | |||
|9 | |||
|Northern Exit | |||
'''Landmark: Northern Exit''' | |||
|GF | |||
|- | |||
|10 | |||
|Ruby Tunnel | |||
|GF | |||
|- | |||
|11 | |||
|DenseWater Caverns | |||
|GF | |||
|- | |||
|12 | |||
|Stomping Den | |||
|GF | |||
|- | |||
|13 | |||
|Villa of Terror | |||
|GF | |||
|- | |||
|14 | |||
|Lake Cave 1 | |||
|U1 | |||
|- | |||
|15 | |||
|Lake Cave 2 | |||
|U1 | |||
|- | |||
|16 | |||
|Lake Cave 3 | |||
|U1 | |||
|- | |||
|17 | |||
|Lake Cave 4 | |||
|U1 | |||
|- | |- | ||
|18 | |||
|Para Island 1 | |||
'''Landmark: Para Island''' | |||
|GF | |||
|- | |- | ||
| | |19 | ||
|Para Island 2 | |||
|GF | |||
|- | |- | ||
| | |20 | ||
|Para Island 3 | |||
|GF | |||
|- | |- | ||
| | |21 | ||
|Para Island Cave | |||
|U1 | |||
|- | |- | ||
| | |22 | ||
|AA Reception | |||
|U1 | |||
|- | |- | ||
| | |23 | ||
|Central Hub | |||
|U1 | |||
|- | |- | ||
| | |24 | ||
|Red Office | |||
|U1 | |||
|- | |- | ||
| | |25 | ||
|Green Office | |||
|U1 | |||
|- | |- | ||
|26 | |||
|Central Test Chamber | |||
|U2 | |||
|- | |- | ||
| | |27 | ||
|Green Room | |||
|U2 | |||
|- | |- | ||
| | |28 | ||
|Red Room | |||
|U2 | |||
|- | |- | ||
| | |29 | ||
|Lead Office | |||
|U2 | |||
|} | |} | ||
{{clear}} | |||
== | === Treasures === | ||
[[File:Autumn Fall Treasure Map.png|upright=1.8|thumb|center|link=https://gamepedia.cursecdn.com/crosscode_gamepedia/c/c4/Autumns Fall Treasure Map.png|Click the map for a full-resolution image.]] | |||
{{clear}} | |||
{{TreasureList| | |||
{{TreasureList/entry|acc=1|type=default|item=Cross Sandwich|amount=4|loc=Southern Exit|info=Use the path hidden behind the trees near the exit on the upper right, follow the path down to get up, follow the upper part down and activate the switch by shooting through the small window}} | |||
{{TreasureList/entry|acc=2|type=default|item=Chili Dog|amount=3|loc=Southern Exit|info=Use the path hidden behind the trees near the exit on the upper right, activate the timer switch and follow the path on the left to reach the High Jump Panel}} | |||
{{TreasureList/entry|acc=3|type=default|item=Raw Meat|amount=4|loc=Southern Exit|info=Use the path hidden behind the trees near the exit on the upper right, follow the path down to get up to get the chest in the upper right}} | |||
{{TreasureList/entry|acc=4|type=default|item=Sunset Dew|amount=8|loc=Ruined Path|info=Start in Ancient Center, get up next to the west exit (ramp), make your way to the bottom right and use the hidden path at the bottom of the map to reach Ruined Path. Use the Long Jump Panel to reach the upper part. The chest is on the upper left (Activate the High Jump Panel in the upper right part as a shortcut)}} | |||
{{TreasureList/entry|acc=5|type=gold|item=Epic Metal|amount=2|loc=Ruined Path|info=From the High Jump Panel activated in the previous chest , jump on the ruined wall next to it and make your way to the south. {{ItemLink|Radiant Key}} needed}} | |||
{{TreasureList/entry|acc=6|type=default|item=Ripe Apples|amount=7|loc=Eastern Exit|info=From the previous High Jump Panel move the Block and use the walls to make your way to the upper right. Use the Long Jump Panel to get to the bottom. Follow the path to Eastern Exit and activate the Switch and follow the path to the top, use the Long Jump Panel and follow the upper path to the right and use the second Long Jump Panel to reach this chest in the bottom right corner}} | |||
{{TreasureList/entry|acc=7|type=silver|item=Sunset Claw|amount=1|loc=Eastern Exit|info=From the previous chest just follow the bottom path to the left}} | |||
{{TreasureList/entry|acc=8|type=silver|item=Cheese Spaetzle|amount=3|loc=Ancient Center|info=Get up next to the upper exit, shoot through the Orange Wall and follow the path to the right}} | |||
{{TreasureList/entry|acc=9|type=silver|item=King's Ring|amount=1|loc=Ancient Center|info=Get up next to the left exit and shoot through the small window}} | |||
{{TreasureList/entry|acc=10|type=default|item=Shrimp Risotto|amount=4|loc=Lake Cave 1|info=Shoot the switch in the upper right corner and make your way through the bottom path to reach the Long Jump Panel}} | |||
{{TreasureList/entry|acc=11|type=default|item=Tremor Engine|amount=1|loc=Lake Cave 2|info=In the middle of the cave go to the bottom and continue through the high ground to the end}} | |||
{{TreasureList/entry|acc=12|type=silver|item=Humming Razor|amount=1|loc=Lake Cave 3|info=From the bottom make a ball bounce to hit the switch and quickly jump into the appearing pillars and follow the path}} | |||
{{TreasureList/entry|acc=13|type=default|item=Cold Platter|amount=5|loc=Lake Cave 4|info=From the entrance jump into the small stalagmite in the water and make your way north jumping on the stalagmites}} | |||
{{TreasureList/entry|acc=14|type=default|item=Chef Sandwich|amount=6|loc=Para Island 1|info=Use the pillars on the western side to reach the high ground and make your way to the eastern side.{{ItemLink|Green Seed Shade}} needed}} | |||
{{TreasureList/entry|acc=15|type=default|item=Green Risotto|amount=3|loc=Secluded Path|info=Grab the two Blocks and put them in between the ruined walls. Start from the elvation in the upper left and make your way to the bottom right. (Activate the High Jump Panel on the way a shortcut)}} | |||
{{TreasureList/entry|acc=16|type=default|item=Wrap Roll|amount=4|loc=Secluded Path|info=From the previous chest make your way to the bottom left. Jump on the ruined wall to reach it}} | |||
{{TreasureList/entry|acc=17|type=gold|item=Mysterious Box|amount=1|loc=Secluded Path|info=Move the second Block and put it between the wall and the chest. Use the prevously activated High Jump Panel to reach it. {{ItemLink|Radiant Key}} needed}} | |||
{{TreasureList/entry|acc=18|type=default|item=Pepper Night Tea|amount=4|loc=Northern Exit|info=Use the wall next to the upper exit to get up. Follow the path down, use the walls to get to the east. Pull the block out of the edge, use both windows to activate the first switch and both windows on the right side to activate the second switch}} | |||
{{TreasureList/entry|acc=19|type=bronze|item=Fruit Pie|amount=3|loc=Northern Exit|info=Use the wall next to the upper exit to get up. Follow the path down, use the walls to get to the east activate the upper switch and follow the path to the top}} | |||
{{TreasureList/entry|acc=20|type=default|item=Sweet Berry Tea|amount=7|loc=Pillar Isle|info=Start on Village Remains, get up on the upper right part of the map and use the wall on the bottom left. Exit the area on the upper left cliff}} | |||
{{TreasureList/entry|acc=21|type=default|item=Mega-Sandwich|amount=6|loc=Pillar Isle|info=Move the Block on the upper left corner to reach the upper cliff by getting up on the right wall. Use the Long Jump Panel on the bottom left and follow the path to the right}} | |||
{{TreasureList/entry|acc=22|type=default|item=Wolf Cicada|amount=7|loc=Pillar Isle|info=Move the Block on the upper left corner to reach the upper cliff by getting up on the right wall. Use the Long Jump Panel on the bottom left and use the second Long Jump Panel. Jump down (behind the Blue Wall) and get up on the upper right next to the window. Use the walls to make your way to the right. Use the cliff on the bottom left to activate the switch. Step on the button. Shoot through both windows in the upper part to activate a switch step on the next button and shoot through the window on the right (bounce two times)}} | |||
{{TreasureList/entry|acc=23|type=gold|item=Full Course|amount=4|loc=Village Remains|info=Get up on the upper right part of the map and use the walls on the right. {{ItemLink|Radiant Key}} needed}} | |||
{{TreasureList/entry|acc=24|type=silver|item=Crimson Dragonfly|amount=7|loc=Village Remains|info=Use the wall on the bottom left to get up and make your way to the right. Use the walls next to the Blue Wall to make your way to the bottom. Use the pillars from the bottom exit to reach the left cliff}} | |||
{{TreasureList/entry|acc=25|type=bronze|item=Golden Bars|amount=3|loc=Village Remains|info=Use the wall on the bottom left to get up and make your way to the upper right}} | |||
{{TreasureList/entry|acc=26|type=silver|item=Portrait of Ruin|amount=1|loc=Villa of Terror|info=Move the Block and jump to the left, shoot through the window to activate the switches and gain access to the north }} | |||
{{TreasureList/entry|acc=27|type=bronze|item=Golden Ticket|amount=1|loc=Villa of Terror|info=Use the ruins next to the spiders to get up, run clockwise on the highground}} | |||
{{TreasureList/entry|acc=28|type=gold|item=Epic Metal|amount=2|loc=Ruby Tunnel|info=Near the entrance go down and jump onto the log to get into the upper platform, go north trough the bridge and follow the path}} | |||
{{TreasureList/entry|acc=29|type=default|item=Shy Fly|amount=1|loc=Lead Office|info=Formerly Nintendo Switch exclusive. Reached at the end of the [[A Switch in Altitude]] quest.}} | |||
}} | |||
== Enemies == | |||
{| class="wikitable" | {| class="wikitable" | ||
|+ [[Enemies]] of Autumn's Fall | |||
! Name | ! Name | ||
! Sprite | |||
! Drops | |||
! Locations | ! Locations | ||
|- | |- | ||
| [[Radical Hedgehag]] | |||
| [[File:Radical-hedgehag-sprite.png|center]] | | [[File:Radical-hedgehag-sprite.png|center]] | ||
| | | {{ItemLink|Metal Needles}}, {{ItemLink|Chili Dog}}, {{ItemLink|Garnet}}<ref name="booster" /> | ||
| | | Village Remains, Pillar Isle, Ancient Center, Southern Exit, Ruined Path, Secluded Path, Great Lake, Lake Cave 1, Lake Cave 3, Para Island 2<ref name="raid" />, Para Island 3<ref name="raid" /> | ||
|- | |||
| [[Flying Hedgehag]] | |||
| [[File:Flying-hedgehag-sprite.png|center]] | |||
| {{ItemLink|Metal Needles}}<ref name="norank" /> | |||
| Secluded Path<ref name="switch" />, Green Office<ref name="switch" />, Green Room<ref name="switch" />, Red Room<ref name="switch" /> | |||
|- | |- | ||
| [[Chillin' Hillkat]] | |||
| [[File:Chilln-hillkat-sprite.png|center]] | | [[File:Chilln-hillkat-sprite.png|center]] | ||
| | | {{ItemLink|Headphone Scraps}}, {{ItemLink|Tofu Cracker}}, {{ItemLink|Garnet}}<ref name="booster" /> | ||
| | | Village Remains, Pillar Isle, Ancient Center, Ruined Path, Eastern Exit, Northern Exit, Secluded Path, Great Lake, Lake Cave 1, Lake Cave 2, Lake Cave 3, Para Island 2<ref name="raid" />, Para Island 3<ref name="raid" /> | ||
|- | |- | ||
| [[Ivory Bovine]] | |||
| [[File:Ivory-buffalo-sprite.png|center]] | | [[File:Ivory-buffalo-sprite.png|center]] | ||
| | | {{ItemLink|Bovine Skin}}, {{ItemLink|Raw Meat}}, {{ItemLink|Garnet}}<ref name="booster" /> | ||
| | | Ancient Center, Southern Exit, Ruined Path, Eastern Exit, Northern Exit, Secluded Path, Great Lake, Para Island 2<ref name="raid" />, Para Island 3<ref name="raid" />, Ruby Tunnel | ||
|- | |- | ||
| [[Fallfly]] | |||
| [[File:Fallfly-sprite.png|center]] | | [[File:Fallfly-sprite.png|center]] | ||
| | | {{ItemLink|Solid Bubble}}, {{ItemLink|Salty Ice Cream}}, {{ItemLink|Garnet}}<ref name="booster" /> | ||
| | | Village Remains, Pillar Isle, Ancient Center, Southern Exit, Ruined Path, Northern Exit, Secluded Path, Great Lake, Lake Cave 3, Lake Cave 4, Para Island 2<ref name="raid" />, Para Island 3<ref name="raid" />, Densewater Caverns<ref name="bull" /> | ||
|- | |||
| [[Aranetarda]] | |||
| [[File:Aranetarda-sprite.png|center]] | |||
| {{ItemLink|Sticky Web}}, {{ItemLink|Wrap Roll}}, {{ItemLink|Lapis Lazuli}}<ref name="booster" /> | |||
| Villa of Terror<ref name="respawn" /> | |||
|- | |||
| [[Baby Pillar]] | |||
| [[File:Baby-pillar-sprite.png|center]] | |||
| None | |||
| Para Island 2<ref name="raid" />, Para Island 3<ref name="raid" />, Para Island Cave<ref name="raid" /> | |||
|- | |||
| [[Hologram Frobbit]] ([[boss]]) | |||
| [[File:Hologram-frobbit-sprite.png|center]] | |||
| None | |||
| Great Lake<ref name="frobbit" /> | |||
|- | |||
| [[Big Pillar]] (boss) | |||
| [[File:Big-pillar-sprite.png|center]] | |||
| None | |||
| Para Island 2<ref name="raid" />, Para Island 3<ref name="raid" />, Para Island Cave<ref name="raid" /> | |||
|- | |||
| [[Blazehoof]] (boss) | |||
| [[File:Blazehoof-sprite.png|center]] | |||
| {{ItemLink|Bovine Skin}}<ref name="norank" /> | |||
| Stomping Den<ref name="bull" /> | |||
|- | |||
| [[The Hedgelord]] (boss) | |||
| [[File:King-hedgehag-sprite.png|center]] | |||
| {{ItemLink|Supercrown}} | |||
| Red Room<ref name="switch" /> | |||
|} | |} | ||
<references> | |||
<ref name="booster">With {{ItemLink|Fall Booster}} enabled</ref> | |||
<ref name="raid">Spawns during the [[Para Island Raid]]</ref> | |||
<ref name="norank">Additional drops not obtainable because rank is disabled during this encounter</ref> | |||
<ref name="switch">Spawns during [[A Switch in Altitude]] quest</ref> | |||
<ref name="bull">Spawns during the [[Bull on Fire]] quest</ref> | |||
<ref name="respawn">Does not respawn</ref> | |||
<ref name="frobbit">Spawns during the [[Chase of the Hologram Frobbit]] quest</ref> | |||
</references> | |||
== | == Botanics == | ||
The differently-colored destroyable items are uncommon and tend to be found in hard-to-reach places, but are much more likely to drop rare items. | The differently-colored destroyable items are uncommon and tend to be found in hard-to-reach places, but are much more likely to drop rare items. | ||
| Line 90: | Line 276: | ||
! Contents | ! Contents | ||
{{ItemDestroyable|name=Alpha Sphere Plant | {{ItemDestroyable|name=Alpha Sphere Plant | ||
|image=[[File:Autumn-Ground-1.png|center]] | |image=[[File:Autumn-Fall-Ground-1.png|center]] | ||
|location=Commonly found everywhere. | |location=Commonly found everywhere. | ||
|unlockLocation= | |unlockLocation=13 | ||
|items= | |items= | ||
* {{ItemLink|Parched Leaves}} (12 %) | * {{ItemLink|Parched Leaves}} (12 %) | ||
* {{ItemLink|Ripe Apples}} (7 %) | * {{ItemLink|Ripe Apples}} (7 %) | ||
|unlockDrops= | |unlockDrops=25}} | ||
{{ItemDestroyable|name=Beta Sphere Plant | {{ItemDestroyable|name=Beta Sphere Plant | ||
|image=[[File:Autumn-Ground-2.png|center]] | |image=[[File:Autumn-Fall-Ground-2.png|center]] | ||
|location=Commonly found everywhere. | |location=Commonly found everywhere. | ||
|unlockLocation= | |unlockLocation=13 | ||
|items= | |items= | ||
* {{ItemLink|Parched Leaves}} (12 %) | * {{ItemLink|Parched Leaves}} (12 %) | ||
* {{ItemLink|Ripe Apples}} (7 %) | * {{ItemLink|Ripe Apples}} (7 %) | ||
* {{ItemLink|Wolf Cicada}} (1 %) | * {{ItemLink|Wolf Cicada}} (1 %) | ||
|unlockDrops= | |unlockDrops=25}} | ||
{{ItemDestroyable|name=Omega Sphere Plant | {{ItemDestroyable|name=Omega Sphere Plant | ||
|image=[[File:Autumn- | |image=[[File:Autumn-Fall-Ground-Rare.png|center]] | ||
|location=Rarely found on high grounds. | |location=Rarely found on high grounds. | ||
|unlockLocation= | |unlockLocation=5 | ||
|items= | |items= | ||
* {{ItemLink| | * {{ItemLink|Wolf Cicada}} (45 %) | ||
* {{ItemLink| | * {{ItemLink|Ripe Apples}} (55 %) | ||
|unlockDrops= | |unlockDrops=10}} | ||
{{ItemDestroyable|name=Alpha Water | {{ItemDestroyable|name=Alpha Water Cutlass | ||
|image=[[File:Autumn-Water-1.png|center]] | |image=[[File:Autumn-Fall-Water-1.png|center]] | ||
|location=Mostly found near Water. | |location=Mostly found near Water. | ||
|unlockLocation= | |unlockLocation=13 | ||
|items= | |items= | ||
* {{ItemLink|White Grain}} (12 %) | * {{ItemLink|White Grain}} (12 %) | ||
* {{ItemLink|Sunset Dew}} (7 %) | * {{ItemLink|Sunset Dew}} (7 %) | ||
|unlockDrops= | |unlockDrops=25}} | ||
{{ItemDestroyable|name=Beta Water | {{ItemDestroyable|name=Beta Water Cutlass | ||
|image=[[File:Autumn-Water-2.png|center]] | |image=[[File:Autumn-Fall-Water-2.png|center]] | ||
|location=Mostly found near Water. | |location=Mostly found near Water. | ||
|unlockLocation= | |unlockLocation=13 | ||
|items= | |items= | ||
* {{ItemLink|White Grain}} (12 %) | * {{ItemLink|White Grain}} (12 %) | ||
* {{ItemLink|Sunset Dew}} (7 %) | * {{ItemLink|Sunset Dew}} (7 %) | ||
* {{ItemLink|Crimson Dragonfly}} (1 %) | * {{ItemLink|Crimson Dragonfly}} (1 %) | ||
|unlockDrops= | |unlockDrops=25}} | ||
{{ItemDestroyable|name=Omega Water | {{ItemDestroyable|name=Omega Water Cutlass | ||
|image=[[File:Autumn-Water- | |image=[[File:Autumn-Fall-Water-Rare.png|center]] | ||
|location=Rarely found on hard to reach places near water. | |location=Rarely found on hard to reach places near water. | ||
|unlockLocation=5 | |unlockLocation=5 | ||
|items= | |items= | ||
* {{ItemLink| | * {{ItemLink|Crimson Dragonfly}} (45 %) | ||
* {{ItemLink| | * {{ItemLink|Sunset Dew}} (55 %) | ||
|unlockDrops=10}} | |unlockDrops=10}} | ||
|} | |} | ||
== | == Quests == | ||
Only one quest can be started in Autumn's Fall, the mandatory quest [[Chase of the Hologram Frobbit]]. | |||
== "A New Home" DLC Changes == | |||
{{Location_Card|name=Autumn's Fall | |||
|color=#BF5900 | |||
|image=File:Autumn's Fall.png | |||
|description=Known for its many ponds and ruins, this area is the small brother of Autumn's Rise. | |||
|room_count=32 | |||
|quest_count=1 | |||
|treasure_default = 16 | |||
|treasure_key = 0 | |||
|treasure_masterkey = 0 | |||
|treasure_bronze = 3 | |||
|treasure_silver = 6 | |||
|treasure_gold = 4 | |||
|trader_count=0}} | |||
In the [[A New Home]] DLC, the Para Island raid can be completed in Autumn's Fall. There is also an added battle against [[Sao]]. | |||
=== Map === | |||
[[File:Autumns-fall-map-A-New-Home.png|upright=1.8|thumb|left| link=https://gamepedia.cursecdn.com/crosscode_gamepedia/7/77/Autumns-fall-map-A-New-Home.png |For the full-resolution image, click the map.]] | |||
{| class="wikitable sortable" style="font-size: 90%;" | |||
|+ Rooms of Autumn's Fall | |||
|- | |||
! # | |||
! Room Name | |||
! Floor | |||
|- | |||
|1 | |||
|Village Remains | |||
'''Landmark: Ruined Village''' | |||
|GF | |||
|- | |||
|2 | |||
|Pillar Isle | |||
|GF | |||
|- | |||
|3 | |||
|Ancient Center | |||
|GF | |||
|- | |||
|4 | |||
|Southern Exit | |||
'''Landmark: Southern Exit''' | |||
|GF | |||
|- | |||
|5 | |||
|Ruined Path | |||
|GF | |||
|- | |||
|6 | |||
|Eastern Exit | |||
'''Landmark: Eastern Exit''' | |||
|GF | |||
|- | |||
|7 | |||
|Secluded Path | |||
|GF | |||
|- | |||
|8 | |||
|Great Lake | |||
|GF | |||
|- | |||
|9 | |||
|Northern Exit | |||
'''Landmark: Northern Exit''' | |||
|GF | |||
|- | |||
|10 | |||
|Ruby Tunnel | |||
|GF | |||
|- | |||
|11 | |||
|DenseWater Caverns | |||
|GF | |||
|- | |||
|12 | |||
|Stomping Den | |||
|GF | |||
|- | |||
|13 | |||
|Villa of Terror | |||
|GF | |||
|- | |||
|14 | |||
|Lake Cave 1 | |||
|U1 | |||
|- | |||
|15 | |||
|Lake Cave 2 | |||
|U1 | |||
|- | |||
|16 | |||
|Lake Cave 3 | |||
|U1 | |||
|- | |||
|17 | |||
|Lake Cave 4 | |||
|U1 | |||
|- | |||
|18 | |||
|Para Island 1 | |||
'''Landmark: Para Island''' | |||
|GF | |||
|- | |||
|19 | |||
|Para Island 2 | |||
|GF | |||
|- | |||
|20 | |||
|Para Island 3 | |||
|GF | |||
|- | |||
|21 | |||
|Para Island Cave ''(west)'' | |||
|U1 | |||
|- | |||
|22 | |||
|AA Reception | |||
|U1 | |||
|- | |||
|23 | |||
|Central Hub | |||
|U1 | |||
|- | |||
|24 | |||
|Red Office | |||
|U1 | |||
|- | |||
|25 | |||
|Green Office | |||
|U1 | |||
|- | |||
|26 | |||
|Central Test Chamber | |||
|U2 | |||
|- | |||
|27 | |||
|Green Room | |||
|U2 | |||
|- | |||
|28 | |||
|Red Room | |||
|U2 | |||
|- | |||
|29 | |||
|Lead Office | |||
|U2 | |||
|- | |||
|30 | |||
|Para Island Cave ''(east)'' | |||
|U1 | |||
|- | |||
|31 | |||
|Para Island Top | |||
|GF | |||
|- | |||
|32 | |||
|Para Island Vista | |||
|GF | |||
|} | |||
{{clear}} | |||
=== Enemies === | |||
{ | {| class="wikitable" | ||
|+ [[Enemies]] of Autumn's Fall | |||
! Name | |||
! Sprite | |||
! Drops | |||
! Locations | |||
|- | |||
| [[Baby Pillar]] | |||
| [[File:Baby-pillar-sprite.png|center]] | |||
| None | |||
{{ | | Para Island Cave ''(East)''<ref name="raid2" /> | ||
|- | |||
| [[Slider]] | |||
| [[File:Slider-sprite.png|center]] | |||
| None | |||
| Para Island Top<ref name="raid2" /> | |||
|- | |||
| [[Big Slider]] | |||
| [[File:Big-slider-sprite.png|center]] | |||
| None | |||
| Para Island Top<ref name="raid2" /> | |||
|- | |||
| [[Sao]] | |||
| [[File:Sao-sprite.png|center]] | |||
| None | |||
| Eastern Exit<ref name="sao" /> | |||
|- | |||
| [[Big Pillar]] ([[Bosses|boss]]) | |||
| [[File:Big-pillar-sprite.png|center]] | |||
| None | |||
| Para Island Cave ''(East)''<ref name="raid2" /> | |||
|- | |||
| [[Para Island Boss]] (boss) | |||
| [[File:Para-island-boss-sprite.png|center|100x100px]] | |||
| None | |||
| Para Island Top<ref name="raid2" /> | |||
|} | |||
<references> | |||
<ref name="raid2">Only during the second Para Island raid. Does not respawn.</ref> | |||
<ref name="sao">After talking to Sao in [[Rookie Harbor]]. Does not respawn.</ref> | |||
</references> | |||
== Trophies == | |||
{{Main|Trophies}} | |||
;The Trickster | |||
:Defeat [[Hologram Frobbit]] in Autumn's Fall. | |||
;Autumn Landmarks | |||
:Find all landmarks in Autumn's Fall. | |||
;Autumn's Scavenger | |||
:Obtain all chests in Autumn's Fall; see [[#Treasures]]. | |||
== Role in the Plot == | |||
=== In CrossWorlds === | |||
After completing the [[Faj'ro Temple]], [[Seeker]]s are granted access to Autumn's Fall. Here, they find their progress blocked by a Guardian of the [[Track of the Ancients]], the [[Hologram Frobbit]]. They are challenged to the mandatory quest [[Chase of the Hologram Frobbit]], where they must follow the Frobbit on a long parkour path and defeat several rounds of enemies before defeating the Frobbit itself in combat, proving their mastery of [[Heat]] and [[Cold]]. In return for this, they are granted the {{ItemLink|Green Seed Shade}}, which unlocks access to [[Gaia's Garden]]. | |||
Autumn's Fall is also home to the [[Para island raid]], an optional challenge for groups of six Seekers to prove their teamwork to the Track. | |||
=== In CrossCode === | |||
[[Lea]] arrives in Autumn's Fall to complete the [[Chase of the Hologram Frobbit]] quest, either alone or with [[Emilie-Sophie de Belmond|Emilie]] and [[Toby Tremblay|C'tron]], who have already completed the quest. She collects the {{ItemLink|Green Seed Shade}}, which allows her to access the [[Para island raid]], which the [[First Scholars]] are planning to run. | |||
The next day, Lea meets up with her friends in Autumn's Fall again, and they go to the start of the Raid, meeting with [[Linda Palmer|Hlin]], [[Lukas Fink|Schneider]] and [[Raphael Luiz Vega|Buggy]]. The six of them traverse the challenges, defeating enemies, until just before the final boss. Unexpectedly, someone manages to interfere with the game and teleports Lea away, much to the confusion of her friends. | |||
Later in CrossCode, Lea must briefly pass through Autumn's Fall twice, first to reach [[Gaia's Garden]] and then again to reach [[Sapphire Ridge]]. | |||
During the [[A New Home]] DLC, Lea returns to Autumn's Fall with Emilie, Hlin, Schneider, Buggy and [[Luke]]. The six of them once again attempt the Para island raid, but it quickly becomes obvious that Luke is too worried about his identity and future to enjoy the raid. At Emilie's insistence they push onward and finally manage to defeat the boss. They then have a heartfelt conversation about Luke's worries and the future of [[Evotar]]s. | |||
== Challenges and secrets == | |||
Villa of Terror is a hidden area containing enemies that are vastly overleveled for this point in the game. The entrance to this area is in the top left of Pillar Isle. You have to move the block to jump to the left ledge, and then walk to the left under the tree. | |||
Latest revision as of 00:33, 6 December 2022
Autumn's Fall is a location in CrossWorlds. It is a small extension to Autumn's Rise that serves to connect that area and Rookie Harbor to Gaia's Garden. It can only be accessed after completing Faj'ro Temple.
| Autumn's Fall |
|---|
|
The little sibling to Autumn's Rise, Autumn's Fall is filled with old ruins that are believed to have once been part of a large city that stretched all across the area up to Gaia's Garden in the north and Sapphire Ridge to the east. |
| -Encyclopedia entry |
Layout
Autumn's Fall consists of four paths leading from the adjacent regions, that all meet in a rough X shape.
Only the core areas of Autumn's Fall are accessible immediately. Secluded Path and Great Lake are unlocked during the Chase of the Hologram Frobbit quest. The further parts of Para Island are only accessible during the Para Island raid. Ruby Tunnel requires the ![]() Star Shade to access. The Densewater Caverns are unlocked during the Bull on Fire quest. The secret lab here is Nintendo Switch exclusive and is unlocked during the A Switch in Altitude quest.
Star Shade to access. The Densewater Caverns are unlocked during the Bull on Fire quest. The secret lab here is Nintendo Switch exclusive and is unlocked during the A Switch in Altitude quest.
Connecting Regions
This region connects to Rookie Harbor via Southern Exit, Autumn's Rise via Village Remains, Gaia's Garden via Northern Exit and Sapphire Ridge via Ruby Tunnel.
Map
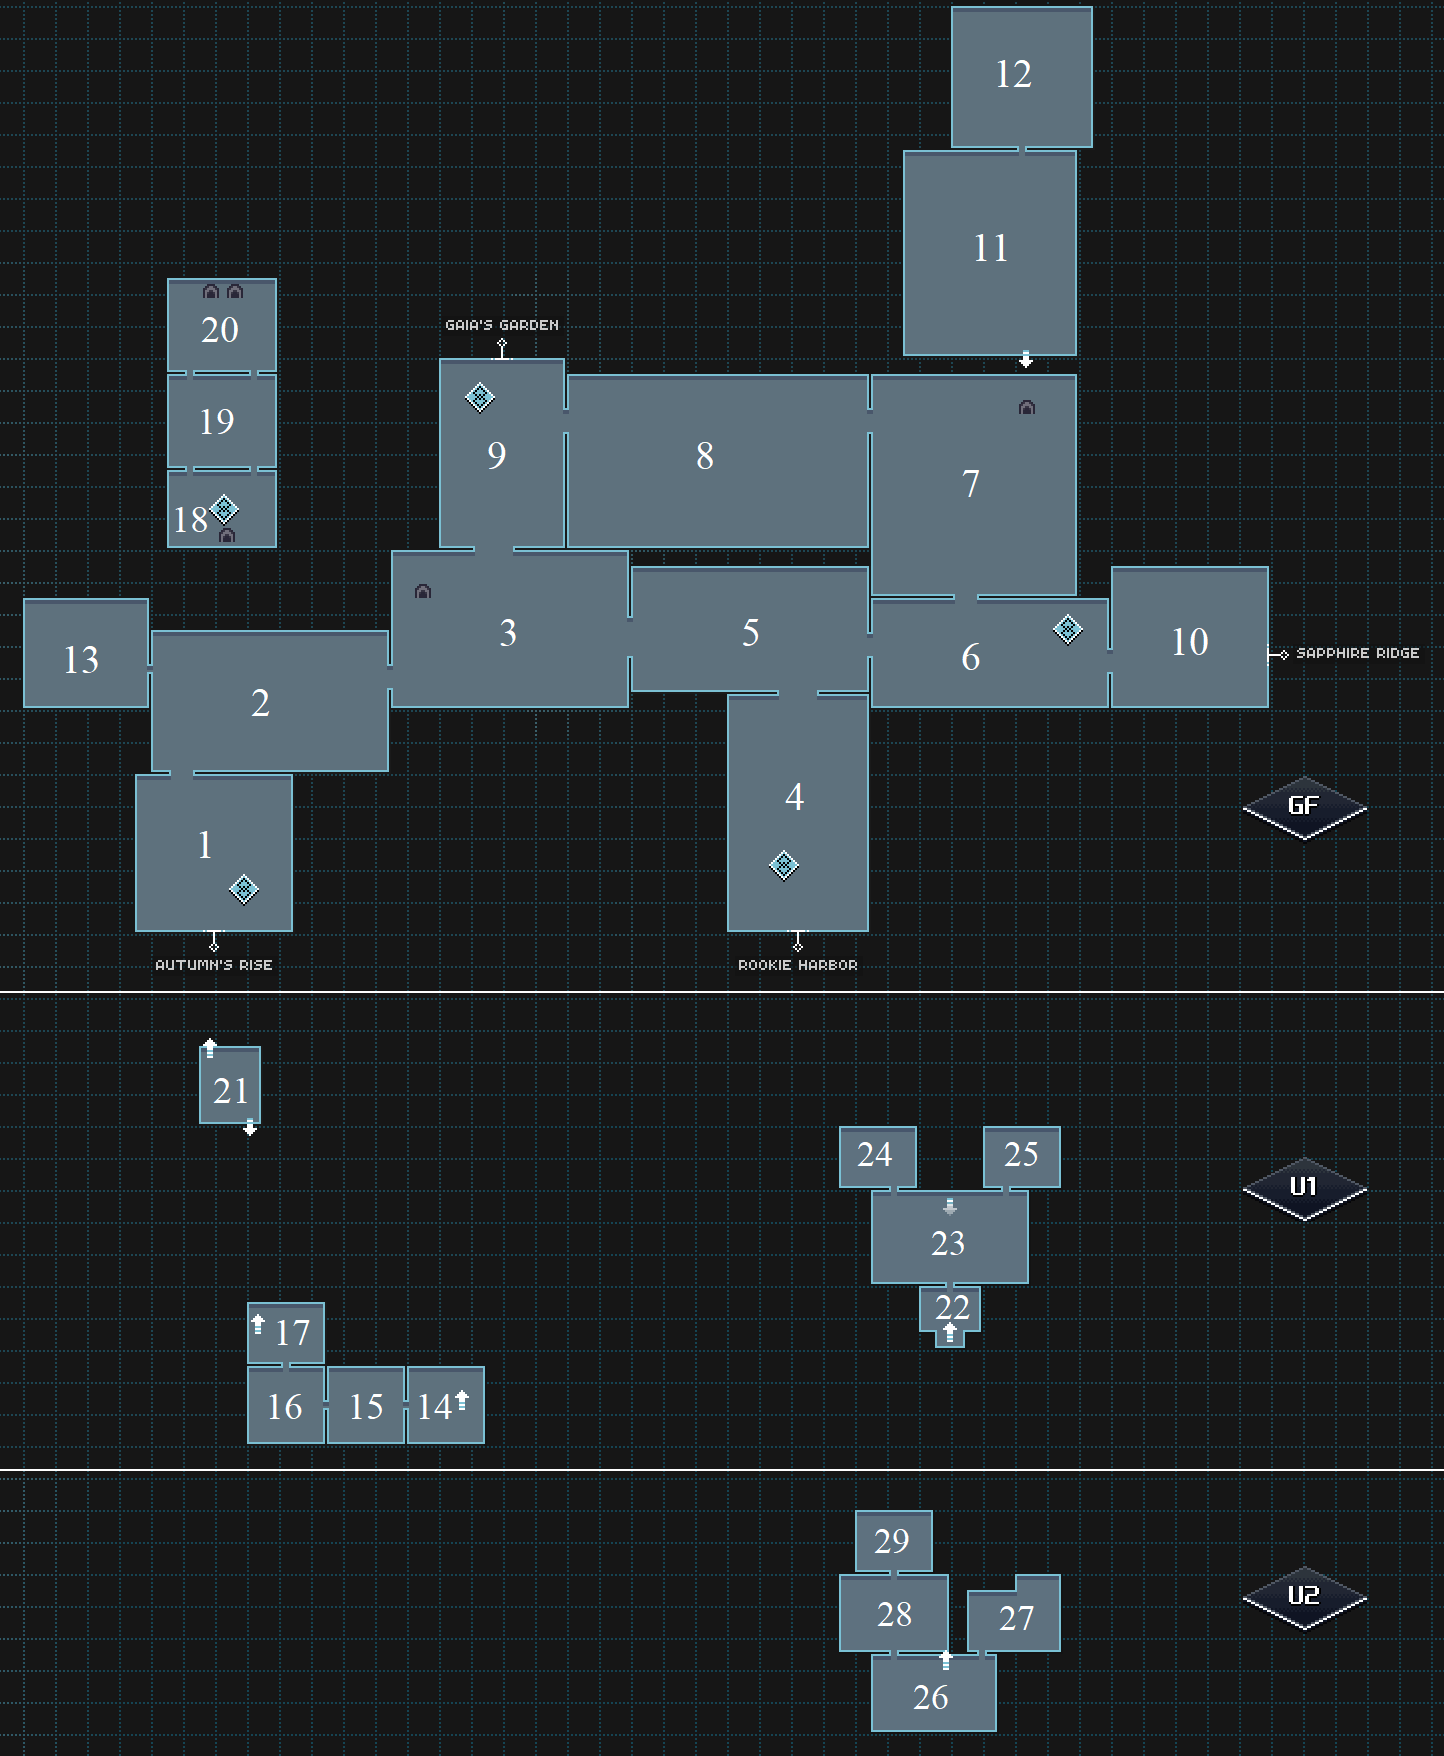
| # | Room Name | Floor |
|---|---|---|
| 1 | Village Remains
Landmark: Ruined Village |
GF |
| 2 | Pillar Isle | GF |
| 3 | Ancient Center | GF |
| 4 | Southern Exit
Landmark: Southern Exit |
GF |
| 5 | Ruined Path | GF |
| 6 | Eastern Exit
Landmark: Eastern Exit |
GF |
| 7 | Secluded Path | GF |
| 8 | Great Lake | GF |
| 9 | Northern Exit
Landmark: Northern Exit |
GF |
| 10 | Ruby Tunnel | GF |
| 11 | DenseWater Caverns | GF |
| 12 | Stomping Den | GF |
| 13 | Villa of Terror | GF |
| 14 | Lake Cave 1 | U1 |
| 15 | Lake Cave 2 | U1 |
| 16 | Lake Cave 3 | U1 |
| 17 | Lake Cave 4 | U1 |
| 18 | Para Island 1
Landmark: Para Island |
GF |
| 19 | Para Island 2 | GF |
| 20 | Para Island 3 | GF |
| 21 | Para Island Cave | U1 |
| 22 | AA Reception | U1 |
| 23 | Central Hub | U1 |
| 24 | Red Office | U1 |
| 25 | Green Office | U1 |
| 26 | Central Test Chamber | U2 |
| 27 | Green Room | U2 |
| 28 | Red Room | U2 |
| 29 | Lead Office | U2 |
Treasures

| Acc. | Type | Contains | Location | Info |
|---|---|---|---|---|
| 1 | 4 × |
Southern Exit | Use the path hidden behind the trees near the exit on the upper right, follow the path down to get up, follow the upper part down and activate the switch by shooting through the small window | |
| 2 | 3 × |
Southern Exit | Use the path hidden behind the trees near the exit on the upper right, activate the timer switch and follow the path on the left to reach the High Jump Panel | |
| 3 | 4 × |
Southern Exit | Use the path hidden behind the trees near the exit on the upper right, follow the path down to get up to get the chest in the upper right | |
| 4 | 8 × |
Ruined Path | Start in Ancient Center, get up next to the west exit (ramp), make your way to the bottom right and use the hidden path at the bottom of the map to reach Ruined Path. Use the Long Jump Panel to reach the upper part. The chest is on the upper left (Activate the High Jump Panel in the upper right part as a shortcut) | |
| 5 | 2 × |
Ruined Path | From the High Jump Panel activated in the previous chest , jump on the ruined wall next to it and make your way to the south. | |
| 6 | 7 × |
Eastern Exit | From the previous High Jump Panel move the Block and use the walls to make your way to the upper right. Use the Long Jump Panel to get to the bottom. Follow the path to Eastern Exit and activate the Switch and follow the path to the top, use the Long Jump Panel and follow the upper path to the right and use the second Long Jump Panel to reach this chest in the bottom right corner | |
| 7 | 1 × LV38 |
Eastern Exit | From the previous chest just follow the bottom path to the left | |
| 8 | 3 × |
Ancient Center | Get up next to the upper exit, shoot through the Orange Wall and follow the path to the right | |
| 9 | 1 × |
Ancient Center | Get up next to the left exit and shoot through the small window | |
| 10 | 4 × |
Lake Cave 1 | Shoot the switch in the upper right corner and make your way through the bottom path to reach the Long Jump Panel | |
| 11 | 1 × |
Lake Cave 2 | In the middle of the cave go to the bottom and continue through the high ground to the end | |
| 12 | 1 × LV36 |
Lake Cave 3 | From the bottom make a ball bounce to hit the switch and quickly jump into the appearing pillars and follow the path | |
| 13 | 5 × |
Lake Cave 4 | From the entrance jump into the small stalagmite in the water and make your way north jumping on the stalagmites | |
| 14 | 6 × |
Para Island 1 | Use the pillars on the western side to reach the high ground and make your way to the eastern side. | |
| 15 | 3 × |
Secluded Path | Grab the two Blocks and put them in between the ruined walls. Start from the elvation in the upper left and make your way to the bottom right. (Activate the High Jump Panel on the way a shortcut) | |
| 16 | 4 × |
Secluded Path | From the previous chest make your way to the bottom left. Jump on the ruined wall to reach it | |
| 17 | 1 × |
Secluded Path | Move the second Block and put it between the wall and the chest. Use the prevously activated High Jump Panel to reach it. | |
| 18 | 4 × |
Northern Exit | Use the wall next to the upper exit to get up. Follow the path down, use the walls to get to the east. Pull the block out of the edge, use both windows to activate the first switch and both windows on the right side to activate the second switch | |
| 19 | 3 × |
Northern Exit | Use the wall next to the upper exit to get up. Follow the path down, use the walls to get to the east activate the upper switch and follow the path to the top | |
| 20 | 7 × |
Pillar Isle | Start on Village Remains, get up on the upper right part of the map and use the wall on the bottom left. Exit the area on the upper left cliff | |
| 21 | 6 × |
Pillar Isle | Move the Block on the upper left corner to reach the upper cliff by getting up on the right wall. Use the Long Jump Panel on the bottom left and follow the path to the right | |
| 22 | 7 × |
Pillar Isle | Move the Block on the upper left corner to reach the upper cliff by getting up on the right wall. Use the Long Jump Panel on the bottom left and use the second Long Jump Panel. Jump down (behind the Blue Wall) and get up on the upper right next to the window. Use the walls to make your way to the right. Use the cliff on the bottom left to activate the switch. Step on the button. Shoot through both windows in the upper part to activate a switch step on the next button and shoot through the window on the right (bounce two times) | |
| 23 | 4 × |
Village Remains | Get up on the upper right part of the map and use the walls on the right. | |
| 24 | 7 × |
Village Remains | Use the wall on the bottom left to get up and make your way to the right. Use the walls next to the Blue Wall to make your way to the bottom. Use the pillars from the bottom exit to reach the left cliff | |
| 25 | 3 × |
Village Remains | Use the wall on the bottom left to get up and make your way to the upper right | |
| 26 | 1 × |
Villa of Terror | Move the Block and jump to the left, shoot through the window to activate the switches and gain access to the north | |
| 27 | 1 × |
Villa of Terror | Use the ruins next to the spiders to get up, run clockwise on the highground | |
| 28 | 2 × |
Ruby Tunnel | Near the entrance go down and jump onto the log to get into the upper platform, go north trough the bridge and follow the path | |
| 29 | 1 × |
Lead Office | Formerly Nintendo Switch exclusive. Reached at the end of the A Switch in Altitude quest. |
Enemies
| Name | Sprite | Drops | Locations |
|---|---|---|---|
| Radical Hedgehag | Village Remains, Pillar Isle, Ancient Center, Southern Exit, Ruined Path, Secluded Path, Great Lake, Lake Cave 1, Lake Cave 3, Para Island 2<ref name="raid" />, Para Island 3<ref name="raid" /> | ||
| Flying Hedgehag | Secluded Path<ref name="switch" />, Green Office<ref name="switch" />, Green Room<ref name="switch" />, Red Room<ref name="switch" /> | ||
| Chillin' Hillkat | Village Remains, Pillar Isle, Ancient Center, Ruined Path, Eastern Exit, Northern Exit, Secluded Path, Great Lake, Lake Cave 1, Lake Cave 2, Lake Cave 3, Para Island 2<ref name="raid" />, Para Island 3<ref name="raid" /> | ||
| Ivory Bovine | Ancient Center, Southern Exit, Ruined Path, Eastern Exit, Northern Exit, Secluded Path, Great Lake, Para Island 2<ref name="raid" />, Para Island 3<ref name="raid" />, Ruby Tunnel | ||
| Fallfly | Village Remains, Pillar Isle, Ancient Center, Southern Exit, Ruined Path, Northern Exit, Secluded Path, Great Lake, Lake Cave 3, Lake Cave 4, Para Island 2<ref name="raid" />, Para Island 3<ref name="raid" />, Densewater Caverns<ref name="bull" /> | ||
| Aranetarda | Villa of Terror<ref name="respawn" /> | ||
| Baby Pillar | None | Para Island 2<ref name="raid" />, Para Island 3<ref name="raid" />, Para Island Cave<ref name="raid" /> | |
| Hologram Frobbit (boss) | None | Great Lake<ref name="frobbit" /> | |
| Big Pillar (boss) | None | Para Island 2<ref name="raid" />, Para Island 3<ref name="raid" />, Para Island Cave<ref name="raid" /> | |
| Blazehoof (boss) | Stomping Den<ref name="bull" /> | ||
| The Hedgelord (boss) | Red Room<ref name="switch" /> |
<references>
<ref name="booster">With ![]() Fall Booster enabled</ref>
<ref name="raid">Spawns during the Para Island Raid</ref>
<ref name="norank">Additional drops not obtainable because rank is disabled during this encounter</ref>
<ref name="switch">Spawns during A Switch in Altitude quest</ref>
<ref name="bull">Spawns during the Bull on Fire quest</ref>
<ref name="respawn">Does not respawn</ref>
<ref name="frobbit">Spawns during the Chase of the Hologram Frobbit quest</ref>
</references>
Fall Booster enabled</ref>
<ref name="raid">Spawns during the Para Island Raid</ref>
<ref name="norank">Additional drops not obtainable because rank is disabled during this encounter</ref>
<ref name="switch">Spawns during A Switch in Altitude quest</ref>
<ref name="bull">Spawns during the Bull on Fire quest</ref>
<ref name="respawn">Does not respawn</ref>
<ref name="frobbit">Spawns during the Chase of the Hologram Frobbit quest</ref>
</references>
Botanics
The differently-colored destroyable items are uncommon and tend to be found in hard-to-reach places, but are much more likely to drop rare items.
| Destroyable | Contents | ||||||
|---|---|---|---|---|---|---|---|
 |
Alpha Sphere Plant |
| |||||
|
| |||||||
 |
Beta Sphere Plant |
| |||||
|
| |||||||
 |
Omega Sphere Plant |
| |||||
|
| |||||||
 |
Alpha Water Cutlass |
| |||||
|
| |||||||
 |
Beta Water Cutlass |
| |||||
|
| |||||||
 |
Omega Water Cutlass |
| |||||
|
| |||||||
Quests
Only one quest can be started in Autumn's Fall, the mandatory quest Chase of the Hologram Frobbit.
"A New Home" DLC Changes
In the A New Home DLC, the Para Island raid can be completed in Autumn's Fall. There is also an added battle against Sao.
Map

| # | Room Name | Floor |
|---|---|---|
| 1 | Village Remains
Landmark: Ruined Village |
GF |
| 2 | Pillar Isle | GF |
| 3 | Ancient Center | GF |
| 4 | Southern Exit
Landmark: Southern Exit |
GF |
| 5 | Ruined Path | GF |
| 6 | Eastern Exit
Landmark: Eastern Exit |
GF |
| 7 | Secluded Path | GF |
| 8 | Great Lake | GF |
| 9 | Northern Exit
Landmark: Northern Exit |
GF |
| 10 | Ruby Tunnel | GF |
| 11 | DenseWater Caverns | GF |
| 12 | Stomping Den | GF |
| 13 | Villa of Terror | GF |
| 14 | Lake Cave 1 | U1 |
| 15 | Lake Cave 2 | U1 |
| 16 | Lake Cave 3 | U1 |
| 17 | Lake Cave 4 | U1 |
| 18 | Para Island 1
Landmark: Para Island |
GF |
| 19 | Para Island 2 | GF |
| 20 | Para Island 3 | GF |
| 21 | Para Island Cave (west) | U1 |
| 22 | AA Reception | U1 |
| 23 | Central Hub | U1 |
| 24 | Red Office | U1 |
| 25 | Green Office | U1 |
| 26 | Central Test Chamber | U2 |
| 27 | Green Room | U2 |
| 28 | Red Room | U2 |
| 29 | Lead Office | U2 |
| 30 | Para Island Cave (east) | U1 |
| 31 | Para Island Top | GF |
| 32 | Para Island Vista | GF |
Enemies
| Name | Sprite | Drops | Locations |
|---|---|---|---|
| Baby Pillar | None | Para Island Cave (East)<ref name="raid2" /> | |
| Slider | None | Para Island Top<ref name="raid2" /> | |
| Big Slider | None | Para Island Top<ref name="raid2" /> | |
| Sao | None | Eastern Exit<ref name="sao" /> | |
| Big Pillar (boss) | None | Para Island Cave (East)<ref name="raid2" /> | |
| Para Island Boss (boss) | None | Para Island Top<ref name="raid2" /> |
<references> <ref name="raid2">Only during the second Para Island raid. Does not respawn.</ref> <ref name="sao">After talking to Sao in Rookie Harbor. Does not respawn.</ref> </references>
Trophies
- The Trickster
- Defeat Hologram Frobbit in Autumn's Fall.
- Autumn Landmarks
- Find all landmarks in Autumn's Fall.
- Autumn's Scavenger
- Obtain all chests in Autumn's Fall; see #Treasures.
Role in the Plot
In CrossWorlds
After completing the Faj'ro Temple, Seekers are granted access to Autumn's Fall. Here, they find their progress blocked by a Guardian of the Track of the Ancients, the Hologram Frobbit. They are challenged to the mandatory quest Chase of the Hologram Frobbit, where they must follow the Frobbit on a long parkour path and defeat several rounds of enemies before defeating the Frobbit itself in combat, proving their mastery of Heat and Cold. In return for this, they are granted the ![]() Green Seed Shade, which unlocks access to Gaia's Garden.
Green Seed Shade, which unlocks access to Gaia's Garden.
Autumn's Fall is also home to the Para island raid, an optional challenge for groups of six Seekers to prove their teamwork to the Track.
In CrossCode
Lea arrives in Autumn's Fall to complete the Chase of the Hologram Frobbit quest, either alone or with Emilie and C'tron, who have already completed the quest. She collects the ![]() Green Seed Shade, which allows her to access the Para island raid, which the First Scholars are planning to run.
Green Seed Shade, which allows her to access the Para island raid, which the First Scholars are planning to run.
The next day, Lea meets up with her friends in Autumn's Fall again, and they go to the start of the Raid, meeting with Hlin, Schneider and Buggy. The six of them traverse the challenges, defeating enemies, until just before the final boss. Unexpectedly, someone manages to interfere with the game and teleports Lea away, much to the confusion of her friends.
Later in CrossCode, Lea must briefly pass through Autumn's Fall twice, first to reach Gaia's Garden and then again to reach Sapphire Ridge.
During the A New Home DLC, Lea returns to Autumn's Fall with Emilie, Hlin, Schneider, Buggy and Luke. The six of them once again attempt the Para island raid, but it quickly becomes obvious that Luke is too worried about his identity and future to enjoy the raid. At Emilie's insistence they push onward and finally manage to defeat the boss. They then have a heartfelt conversation about Luke's worries and the future of Evotars.
Challenges and secrets
Villa of Terror is a hidden area containing enemies that are vastly overleveled for this point in the game. The entrance to this area is in the top left of Pillar Isle. You have to move the block to jump to the left ledge, and then walk to the left under the tree.