So'najiz Temple: Difference between revisions
Plaguerized (talk | contribs) mNo edit summary |
Plaguerized (talk | contribs) No edit summary |
||
| Line 1: | Line 1: | ||
{{Location_Card|name=So'najiz Temple | {{Location_Card|name=So'najiz Temple | ||
|color=#00734F | |||
|image=File:So'najiz temple.png | |image=File:So'najiz temple.png | ||
|description=An ancient underwater | |description=An ancient underwater Shad temple, home to many bouncing foes. | ||
|room_count=25 | |room_count=25 | ||
|treasure_default = 5 | |treasure_default = 5 | ||
|treasure_key = 5 | |treasure_key = 5 | ||
|treasure_silver = 1 | |treasure_silver = 1 | ||
|treasure_gold = 1 | |treasure_gold = 1 | ||
|trader_count=0}} | |trader_count=0}} | ||
'''So'najiz Temple''', or the '''Wave Dungeon''', is a [[Locations|location]] in [[CrossWorlds]]. It is one of three [[Ancients|Ancient]] temples located in the centre of [[Gaia's Garden]], along with [[Zir'vitar Temple]] and the [[Grand Krys'kajo]]. So'najiz can be completed either before or after Zir'vitar, making it the fourth or fifth dungeon in the game. The [[Shock]] element is obtained here, along with the {{ItemLink|Radiant Key}}, which allows the player to open Gold Chests. The temple makes use of enemies based on the [[Wave]] element, and gives the player access to its opposite, the [[Shock]] element, in order to progress. | '''So'najiz Temple''', or the '''Wave Dungeon''', is a [[Locations|location]] in [[CrossWorlds]]. It is one of three [[Ancients|Ancient]] temples located in the centre of [[Gaia's Garden]], along with [[Zir'vitar Temple]] and the [[Grand Krys'kajo]]. So'najiz can be completed either before or after Zir'vitar, making it the fourth or fifth dungeon in the game. The [[Shock]] element is obtained here, along with the {{ItemLink|Radiant Key}}, which allows the player to open Gold Chests. The temple makes use of enemies based on the [[Wave]] element, and gives the player access to its opposite, the [[Shock]] element, in order to progress. | ||
| Line 28: | Line 26: | ||
=== Map === | === Map === | ||
{| class="wikitable" | [[File:Sonajiz_temple-map.png|thumb|upright=1.8|left|In-game map of So'najiz Temple]] | ||
{| class="wikitable sortable" | |||
|+ Areas of So'najiz Temple | |||
|- | |- | ||
! # | ! # | ||
! Area Name | ! Area Name | ||
|- | |- | ||
| 1 || Entry Test | | 1 || Entry Test | ||
|- | |- | ||
| 2 || Principle of Conveyance | | 2 || Principle of Conveyance | ||
| Line 85: | Line 83: | ||
| 25 || Bouncing Surprise | | 25 || Bouncing Surprise | ||
|} | |} | ||
{{clear}} | |||
== Enemies == | == Enemies == | ||
| Line 136: | Line 134: | ||
The dungeon contains 12 treasures, many of which are well hidden. The most notable is the {{ItemLink|Radiant Key}}, needed to open golden chests. | The dungeon contains 12 treasures, many of which are well hidden. The most notable is the {{ItemLink|Radiant Key}}, needed to open golden chests. | ||
[[File:SonajizTempleTreasures.png]] | [[File:SonajizTempleTreasures.png|thumb|upright=1.8|left|Map of chests in So'najiz Temple]] | ||
{{TreasureList| | {{TreasureList| | ||
| Line 152: | Line 150: | ||
{{TreasureList/entry|acc=12|type=gold|item=Epic Metal|amount=1|loc=Trial of Persistence|info=Collect the {{ItemLink|Radiant Key}} to unlock this chest}} | {{TreasureList/entry|acc=12|type=gold|item=Epic Metal|amount=1|loc=Trial of Persistence|info=Collect the {{ItemLink|Radiant Key}} to unlock this chest}} | ||
}} | }} | ||
{{clear}} | |||
==Other notable information== | ==Other notable information== | ||
To maintain your pride as Spheromancer ("Lea wait!") you have only 60 mins to win the race against [[Emilie]], so get a move on. | To maintain your pride as Spheromancer ("Lea wait!") you have only 60 mins to win the race against [[Emilie]], so get a move on. | ||
[[Category:Location]] | [[Category:Location]] | ||
Revision as of 17:43, 5 March 2019
So'najiz Temple, or the Wave Dungeon, is a location in CrossWorlds. It is one of three Ancient temples located in the centre of Gaia's Garden, along with Zir'vitar Temple and the Grand Krys'kajo. So'najiz can be completed either before or after Zir'vitar, making it the fourth or fifth dungeon in the game. The Shock element is obtained here, along with the ![]() Radiant Key, which allows the player to open Gold Chests. The temple makes use of enemies based on the Wave element, and gives the player access to its opposite, the Shock element, in order to progress.
Radiant Key, which allows the player to open Gold Chests. The temple makes use of enemies based on the Wave element, and gives the player access to its opposite, the Shock element, in order to progress.
The intended pronunciation of the temple's name gives the 'j' a 'y' sound, as is common in German, making the name a pun on "so nice".
| So'najiz Temple |
|---|
|
This temple is the third or fourth challenge a Seeker needs to master in order to progress on the Track of the Ancients. Other than the previous temples, both this one and the Zir'vitar Temple can be completed in any order. In this Temple the Seeker can acquire the element: Shock. |
| -Encyclopedia entry |
Layout
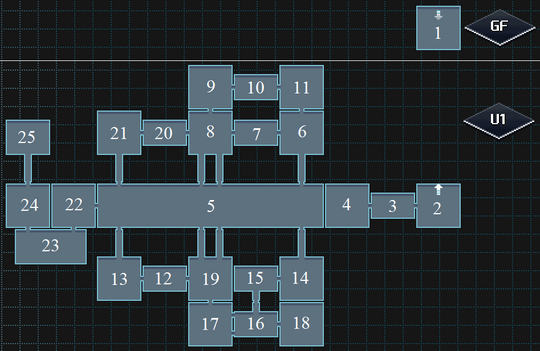
The temple technically has two floors, although the ground floor consists only of an entrance room. The rest of the temple is located underwater on floor U1. After descending to U1 and passing through a few puzzle rooms, Lea will reach the end of the very long Trial of Persistence, most of which is blocked off. Here, Lea finds a key, which can open one of two paths leading north and south. The paths are mirrors of each other, and both lead to a tangle of puzzle rooms where a second key can be found, which is used to continue on, crossing over the Trial of Persistence on a high bridge. A few more puzzle rooms will lead Lea to a high balcony at the end of the Trial of Persistence, where she can activate a switch and teleport back to the start of the Trial, where a second key to unlock the other path can be found. After activating both switches, the path into the actual Trial of Persistence will open.
The Trial of Persistence is a long gauntlet of enemies that must be fought sequentially, without leaving battle and with no autosaves. Like the similar gauntlet in Zir'vitar Temple, this serves in place of what would be a mid-boss in the larger temples. At the end, Lea finds both the ![]() Radiant Key and the Shock element. From here, only the dungeon's final bounce puzzle and one last battle stand between Lea and the boss room.
Radiant Key and the Shock element. From here, only the dungeon's final bounce puzzle and one last battle stand between Lea and the boss room.
Connecting regions
Map

| # | Area Name |
|---|---|
| 1 | Entry Test |
| 2 | Principle of Conveyance |
| 3 | Trial of Fishing |
| 4 | Principle of Attraction |
| 5 | Trial of Persistence |
| 6 | Moving Attraction |
| 7 | Trial of Attraction |
| 8 | Slowing Attraction |
| 9 | Captivated Conveyance |
| 10 | Trial of Wobble |
| 11 | Standing Attraction |
| 12 | Trial of Conveyance |
| 13 | Conveyable Attraction |
| 14 | Chaining Conveyance |
| 15 | Trial of Base Colors |
| 16 | Trial of Impulses |
| 17 | Standing Conveyance |
| 18 | Fast Conveyance |
| 19 | Flaming Conveyance |
| 20 | Trial of Channels |
| 21 | Attracting Conveyance |
| 22 | Chamber of Shock |
| 23 | Conclusion of Conveyance |
| 24 | Trial of Conduct |
| 25 | Bouncing Surprise |
Enemies
'
| Name | Locations | |
|---|---|---|
| Angler |
| |
| Gelleric |
| |
| Jelleric |
| |
| Ocubepus |
| |
| Argeby |
| |
| Blue Ray |
| |
| Sir Blobus Starnikus (boss) |
|
Treasures
The dungeon contains 12 treasures, many of which are well hidden. The most notable is the ![]() Radiant Key, needed to open golden chests.
Radiant Key, needed to open golden chests.

| Acc. | Type | Contains | Location | Info |
|---|---|---|---|---|
| 1 | 4 × |
Principle of Conveyance | Activate the tesla coil to spawn the chest | |
| 2 | 1 × |
Trial of Persistence | Defeat the first group of enemies to spawn the chest | |
| 3 | 1 × LV47 |
Standing Attraction | Chest is partially hidden behind a wall | |
| 4 | 1 × |
Moving Attraction | Enter from Standing Attraction to access | |
| 5 | 6 × |
Slowing Attraction | ||
| 6 | 1 × |
Trial of Persistence | Activate the tesla coil at the end of the north path to spawn the chest | |
| 7 | 1 × |
Fast Conveyance | ||
| 8 | 3 × |
Flaming Conveyance | Activate the tesla coil to spawn the chest | |
| 9 | 3 × |
Attracting Conveyance | Activate the tesla coil to spawn the chest | |
| 10 | 1 × |
Trial of Persistence | Activate the tesla coil at the end of the south path to spawn the chest | |
| 11 | 1 × |
Trial of Persistence | ||
| 12 | 1 × |
Trial of Persistence | Collect the |
Other notable information
To maintain your pride as Spheromancer ("Lea wait!") you have only 60 mins to win the race against Emilie, so get a move on.


