Autumn's Fall: Difference between revisions
Plaguerized (talk | contribs) m (→Monsters) |
Oneiros108 (talk | contribs) m (→Treasures) |
||
| Line 218: | Line 218: | ||
== Treasures == | == Treasures == | ||
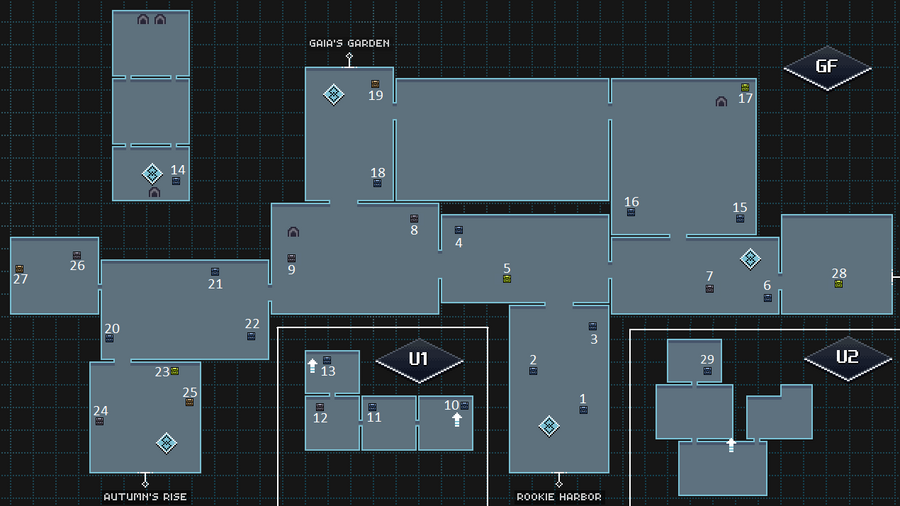
[[File:Autumn Fall Treasure Map.png| | [[File:Autumn Fall Treasure Map.png|900px]] | ||
{{TreasureList| | {{TreasureList| | ||
Revision as of 02:37, 23 February 2019
Autumn's Fall is a Location in CrossWorlds. It is a small extension to Autumn's Rise that serves to connect that area and Rookie Harbor to Gaia's Garden. It can only be accessed after completing the Faj'ro Temple.
Layout
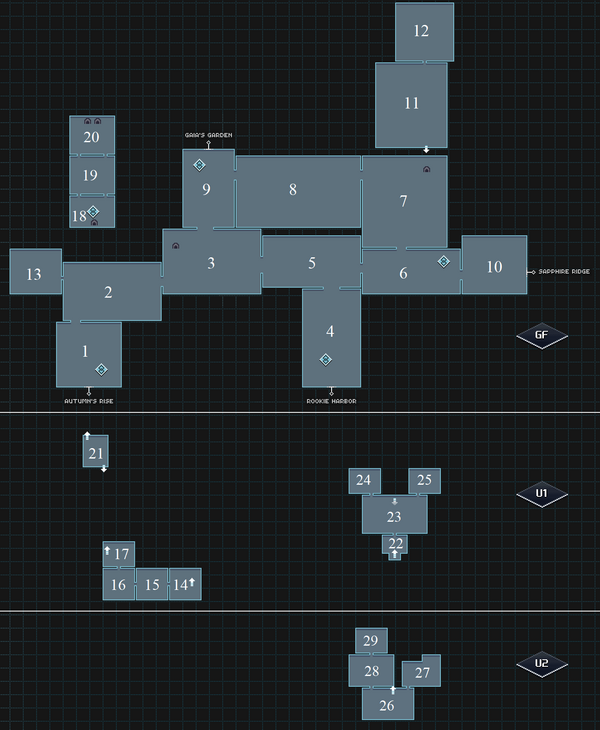
Autumn's Fall consists of four paths leading from the adjacent regions, that all meet in a rough X shape.
Connecting Regions
Maps
Enemies
'
| Name | Locations | |
|---|---|---|
| Radical Hedgehag |
| |
| Chillin' Hillkat |
| |
| Ivory Bovine |
| |
| Fallfly |
|
Botanics
The differently-colored destroyable items are uncommon and tend to be found in hard-to-reach places, but are much more likely to drop rare items.
| Destroyable | Contents | ||||||
|---|---|---|---|---|---|---|---|
| Alpha Sphere Plant |
| ||||||
| Beta Sphere Plant |
| ||||||
| Omega Sphere Plant |
| ||||||
| Alpha Water Cutlass |
| ||||||
| Beta Water Cutlass |
| ||||||
| Omega Water Cutlass |
| ||||||
Quests
There is only one quest associated with this area, that has to be complete to progress the story.
| LVL 33 | Chase of the Hologram Frobbit | |
|---|---|---|
| Ancient Center | Unlock Conditions: None | |
| Di'orbis | Follow the mysterious hologram Frobbit throughout Autumn's Fall | |
|
| |
Treasures
| Acc. | Type | Contains | Location | Info |
|---|---|---|---|---|
| 1 | 4 × |
Southern Exit | Use the path hidden behind the trees near the exit on the upper right, follow the path down to get up, follow the upper part down and activate the switch by shooting through the small window | |
| 2 | 3 × |
Southern Exit | Use the path hidden behind the trees near the exit on the upper right, activate the timer switch and follow the path on the left to reach the High Jump Panel | |
| 3 | 4 × |
Southern Exit | Use the path hidden behind the trees near the exit on the upper right, follow the path down to get up to get the chest in the upper right | |
| 4 | 8 × |
Ruined Path | Start in Ancient Center, get up next to the west exit (ramp), make your way to the bottom right and use the hidden path at the bottom of the map to reach Ruined Path. Use the Long Jump Panel to reach the upper part. The chest is on the upper left (Activate the High Jump Panel in the upper right part as a shortcut) | |
| 5 | 2 × |
Ruined Path | From the High Jump Panel activated in the previous chest , jump on the ruined wall next to it and make your way to the south. | |
| 6 | 7 × |
Eastern Exit | From the previous High Jump Panel move the Block and use the walls to make your way to the upper right. Use the Long Jump Panel to get to the bottom. Follow the path to Eastern Exit and activate the Switch and follow the path to the top, use the Long Jump Panel and follow the upper path to the right and use the second Long Jump Panel to reach this chest in the bottom right corner | |
| 7 | 1 × LV38 |
Eastern Exit | From the previous chest just follow the bottom path to the left | |
| 8 | 3 × |
Ancient Center | Get up next to the upper exit, shoot through the Orange Wall and follow the path to the right | |
| 9 | 1 × |
Ancient Center | Get up next to the left exit and shoot through the small window | |
| 10 | 4 × |
Lake Cave 1 | Shoot the switch in the upper right corner and make your way through the bottom path to reach the Long Jump Panel | |
| 11 | 1 × |
Lake Cave 2 | In the middle of the cave go to the bottom and continue through the high ground to the end | |
| 12 | 1 × LV36 |
Lake Cave 3 | From the bottom make a ball bounce to hit the switch and quickly jump into the appearing pillars and follow the path | |
| 13 | 5 × |
Lake Cave 4 | From the entrance jump into the small stalagmite in the water and make your way north jumping on the stalagmites | |
| 14 | 6 × |
Para Island 1 | Use the pillars on the western side to reach the high ground and make your way to the eastern side. | |
| 15 | 3 × |
Secluded Path | Grab the two Blocks and put them in between the ruined walls. Start from the elvation in the upper left and make your way to the bottom right. (Activate the High Jump Panel on the way a shortcut) | |
| 16 | 4 × |
Secluded Path | From the previous chest make your way to the bottom left. Jump on the ruined wall to reach it | |
| 17 | 1 × |
Secluded Path | Move the second Block and put it between the wall and the chest. Use the prevously activated High Jump Panel to reach it. | |
| 18 | 4 × |
Northern Exit | Use the wall next to the upper exit to get up. Follow the path down, use the walls to get to the east. Pull the block out of the edge, use both windows to activate the first switch and both windows on the right side to activate the second switch | |
| 19 | 3 × |
Northern Exit | Use the wall next to the upper exit to get up. Follow the path down, use the walls to get to the east activate the upper switch and follow the path to the top | |
| 20 | 7 × |
Pillar Isle | Start on Village Remains, get up on the upper right part of the map and use the wall on the bottom left. Exit the area on the upper left cliff | |
| 21 | 6 × |
Pillar Isle | Move the Block on the upper left corner to reach the upper cliff by getting up on the right wall. Use the Long Jump Panel on the bottom left and follow the path to the right | |
| 22 | 7 × |
Pillar Isle | Move the Block on the upper left corner to reach the upper cliff by getting up on the right wall. Use the Long Jump Panel on the bottom left and use the second Long Jump Panel. Jump down (behind the Blue Wall) and get up on the upper right next to the window. Use the walls to make your way to the right. Use the cliff on the bottom left to activate the switch. Step on the button. Shoot through both windows in the upper part to activate a switch step on the next button and shoot through the window on the right (bounce two times) | |
| 23 | 4 × |
Village Remains | Get up on the upper right part of the map and use the walls on the right. | |
| 24 | 7 × |
Village Remains | Use the wall on the bottom left to get up and make your way to the right. Use the walls next to the Blue Wall to make your way to the bottom. Use the pillars from the bottom exit to reach the left cliff | |
| 25 | 3 × |
Village Remains | Use the wall on the bottom left to get up and make your way to the upper right | |
| 26 | 1 × |
Villa of Terror | Move the Block and jump to the left, shoot through the window to activate the switches and gain access to the north | |
| 27 | 1 × |
Villa of Terror | Use the ruins next to the spiders to get up, run clockwise on the highground | |
| 28 | 2 × |
Ruby Tunnel | Near the entrance go down and jump onto the log to get into the upper platform, go north trough the bridge and follow the path |
Notes
Villa of Terror is connected to Pillar Isle. It's on the top left of the map, in a secret spot. You have to move the block to jump to the left ledge, and then walk to the left under the tree.


