Faj'ro Temple: Difference between revisions
Oneiros108 (talk | contribs) No edit summary |
Oneiros108 (talk | contribs) (→Treasures: Corrected chest info) |
||
| Line 233: | Line 233: | ||
{{clear}} | {{clear}} | ||
{{TreasureList| | {{TreasureList| | ||
{{TreasureList/entry|acc=1|type=key|item=Faj'ro Key|amount=1|loc=Left Chamber 1 | {{TreasureList/entry|acc=1|type=key|item=Faj'ro Key|amount=1|loc=Left Chamber 1}} | ||
{{TreasureList/entry|acc=2|type=default|item=Jelly Extract|amount=3|loc=Fire and Sand 2 | {{TreasureList/entry|acc=2|type=default|item=Jelly Extract|amount=3|loc=Fire and Sand 2}} | ||
{{TreasureList/entry|acc=3|type=default|item= | {{TreasureList/entry|acc=3|type=default|item=Vanilla Ice Cream|amount=4|loc=Balance Room 2}} | ||
{{TreasureList/entry|acc=4|type=default|item= | {{TreasureList/entry|acc=4|type=default|item=Crystal Water|amount=3|loc=Balance Room 2}} | ||
{{TreasureList/entry|acc=5|type=key|item=Faj'ro Key|amount=1|loc=Test of Memory 1 | {{TreasureList/entry|acc=5|type=key|item=Faj'ro Key|amount=1|loc=Test of Memory 1|info=Defeat the enemies}} | ||
{{TreasureList/entry|acc=6|type=key|item=Faj'ro Key|amount=1|loc=Test of Memory 2 | {{TreasureList/entry|acc=6|type=key|item=Faj'ro Key|amount=1|loc=Test of Memory 2|info=Defeat the enemies}} | ||
{{TreasureList/entry|acc=7|type=default|item=Chef Sandwich|amount=5|loc=Right Chamber 1 | {{TreasureList/entry|acc=7|type=default|item=Chef Sandwich|amount=5|loc=Right Chamber 1}} | ||
{{TreasureList/entry|acc=8|type=key|item=Faj'ro Key|amount=1|loc=Right Chamber 2 | {{TreasureList/entry|acc=8|type=key|item=Faj'ro Key|amount=1|loc=Right Chamber 2}} | ||
{{TreasureList/entry|acc=9|type=default|item=Butter Silk|amount=4|loc=Right Chamber | {{TreasureList/entry|acc=9|type=default|item=Butter Silk|amount=4|loc=Right Chamber}} | ||
{{TreasureList/entry|acc=10|type=default|item=Magma Residue|amount=2|loc=Bottom Chamber | {{TreasureList/entry|acc=10|type=default|item=Magma Residue|amount=2|loc=Bottom Chamber}} | ||
{{TreasureList/entry|acc=11|type=default|item=Laser Eyes|amount=1|loc=West Pathway | {{TreasureList/entry|acc=11|type=default|item=Laser Eyes|amount=1|loc=West Pathway}} | ||
{{TreasureList/entry|acc=12|type=key|item=Faj'ro Key|amount=1|loc=Test of Surpise | {{TreasureList/entry|acc=12|type=key|item=Faj'ro Key|amount=1|loc=Test of Surpise|info=Defeat the enemies}} | ||
{{TreasureList/entry|acc=13|type=key|item=Faj'ro Key|amount=1|loc=West Chamber 1 | {{TreasureList/entry|acc=13|type=key|item=Faj'ro Key|amount=1|loc=West Chamber 1)}} | ||
{{TreasureList/entry|acc=14|type=bronze|item=White Key|amount=1|loc=Large Fire Chamber | {{TreasureList/entry|acc=14|type=bronze|item=White Key|amount=1|loc=Large Fire Chamber}} | ||
{{TreasureList/entry|acc=15|type=silver|item=Precious Metal|amount=2|loc=Large Fire Chamber | {{TreasureList/entry|acc=15|type=silver|item=Precious Metal|amount=2|loc=Large Fire Chamber|info={{ItemLink|White Key}} needed to open this chest}} | ||
{{TreasureList/entry|acc=16|type=key|item=Faj'ro Key|amount=1|loc=East Chamber 1 | {{TreasureList/entry|acc=16|type=key|item=Faj'ro Key|amount=1|loc=East Chamber 1}} | ||
{{TreasureList/entry|acc=17|type=silver|item=Dented Crown|amount=1|loc=East Pathway | {{TreasureList/entry|acc=17|type=silver|item=Dented Crown|amount=1|loc=East Pathway|info=Solve the Puzzle (bottom) with the Heat Element}} | ||
{{TreasureList/entry|acc=18|type=key|item=Faj'ro Key|amount=1|loc=Test of Memory | {{TreasureList/entry|acc=18|type=key|item=Faj'ro Key|amount=1|loc=Test of Memory|info=Defeat the enemies}} | ||
{{TreasureList/entry|acc=19|type=key|item=Faj'ro Key|amount=1|loc=Test of Wisdom | {{TreasureList/entry|acc=19|type=key|item=Faj'ro Key|amount=1|loc=Test of Wisdom|info=Defeat the enemies}} | ||
{{TreasureList/entry|acc=20|type=masterkey|item=Faj'ro Master Key|amount=1|loc=Chamber of Prosperity | {{TreasureList/entry|acc=20|type=masterkey|item=Faj'ro Master Key|amount=1|loc=Chamber of Prosperity|info=Defeat the enemies}} | ||
}} | }} | ||
Revision as of 21:59, 14 April 2019
The Faj'ro Temple, also known as the Hourglass or the Heat Dungeon, is a location in CrossWorlds. This is where Seekers obtain the Cold element, as well as the ![]() White Key, allowing them to open Silver Chests.
White Key, allowing them to open Silver Chests.
| Faj'ro Temple |
|---|
|
This temple stands in a large ravine right before Ba'kii Kum and is the second challenge a Seeker can acquire the second element: Cold. To enter the dungeon, however, a Seeker must visit Ba'kii Kum, hom to the Shad. Only there can they find the key to gain access to the temple. Its unique shape granted it the nickname: Hourglass. Steam-powered furnaces, water blocks, and poles that can hold elemental charges are what Seekers must use to overcome the puzzles inside. In contrast to the infested Temple Mine, Faj'ro Temple is home to moths, floating jellyfish, and fierce Golems. |
| -Encyclopedia entry |
Layout
Faj'ro Temple is shaped like an hourglass. It has five floors, with the middle one being the smallest, consisting of only a single room. The path through the temple is described here:
Lea enters the temple, arriving at Balance Room 1. From here, she must pass through the Left Chambers, obtaining a key to unlock the West Ground Floor path to Balance Room 2. Here, Lea must collect three keys: one in each of the Tests of Memory, and one in the East Ground Floor path that loops back to Balance Room 1. Two of these keys are used to unlock the paths leaving the upper floor of Balance Room 2. These both lead to high ledges in Balance Room 1, and reaching both of these will allow Lea to unlock the path onward, which also requires the third key. From here, Lea will fight the midboss in the Sand Terror room and obtain the Cold element on the small Floor 2.
On reaching Floor 3, the only open path leads west to the Test of Strength. Lea must then travel through Floor 4's west pathway, the Large Fire Chamber on floor 3 (where the ![]() White Key is found) and Floor 4's east pathway to reach the east rooms on Floor 3, which contain a key. Four side rooms along this path offer four additional keys, and all five keys are required to unlock the final puzzle in the South Corridor. Lea must then fight through the Chamber of Prosperity to obtain the
White Key is found) and Floor 4's east pathway to reach the east rooms on Floor 3, which contain a key. Four side rooms along this path offer four additional keys, and all five keys are required to unlock the final puzzle in the South Corridor. Lea must then fight through the Chamber of Prosperity to obtain the ![]() Faj'ro Master Key and unlock the boss room.
Faj'ro Master Key and unlock the boss room.
Connecting regions
Map
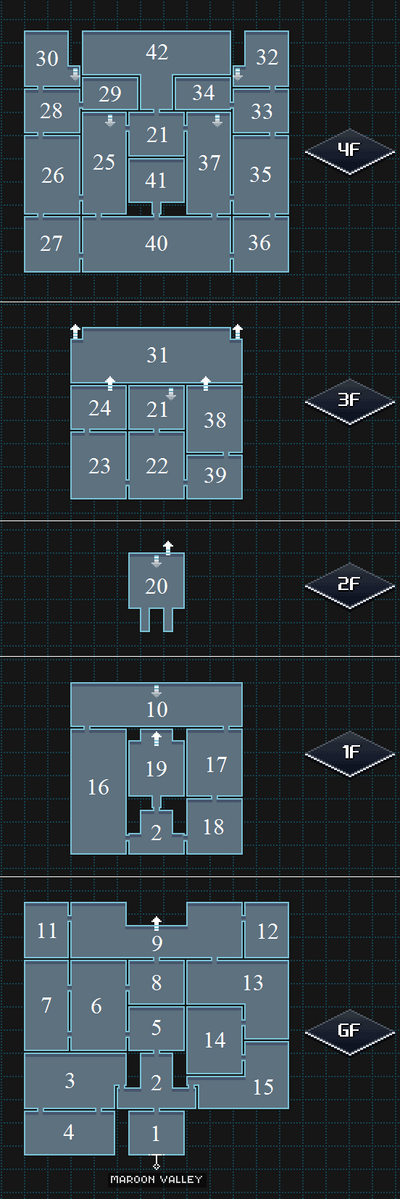
| # | Area Name |
|---|---|
| 1 | Entry Test |
| 2 | Balance Room 1 |
| 3 | Left Chamber 1 (GF) |
| 4 | Left Chamber 2 (GF) |
| 5 | Test of Tri |
| 6 | Fire and Sand 1 |
| 7 | Fire and Sand 2 |
| 8 | Test of Fire |
| 9 | Balance Room 2 (GF) |
| 10 | Balance Room 2 (1F) |
| 11 | Test of Memory 2 |
| 12 | Test of Memory 1 |
| 13 | Right Chamber 1 (GF) |
| 14 | Test of Vigor |
| 15 | Right Chamber 2 (GF) |
| 16 | Left Chamber 1 (1F) |
| 17 | Right Chamber 1 (1F) |
| 18 | Test of Distraction |
| 19 | Sand Terror |
| 20 | Chamber of Ice |
| 21 | Gateway |
| 22 | Bottom Chamber |
| 23 | Left Chamber (3F) |
| 24 | Test of Strength |
| 25 | West Corridor |
| 26 | West Pathway |
| 27 | Test of Surpise |
| 28 | Test of Endurance |
| 29 | West Chamber 1 |
| 30 | West Chamber 2 |
| 31 | Large Fire Chamber |
| 32 | East Chamber 2 |
| 33 | Test of Focus |
| 34 | East Chamber 1 |
| 35 | East Pathway |
| 36 | Test of Memory |
| 37 | East Corridor |
| 38 | Right Chamber (3F) |
| 39 | Test of Wisdom |
| 40 | South Corridor |
| 41 | Chamber of Prosperity |
| 42 | Blazing Lair |
Enemies
'
| Name | Locations | |
|---|---|---|
| Boss Pincer |
| |
| Sharkster |
| |
| Tim |
| |
| Trijelly |
| |
| Pada Moth |
| |
| Darth Moth |
| |
| Magmanizer |
| |
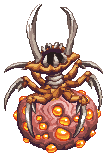
| Pinzo'jrahrrrn (Boss) |
| |
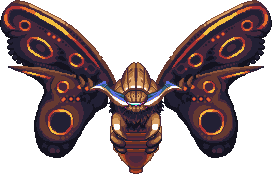
| Master Magmoth (Boss) |
|
Quests
There are currently no quests involving the Faj'ro Temple.
Treasures
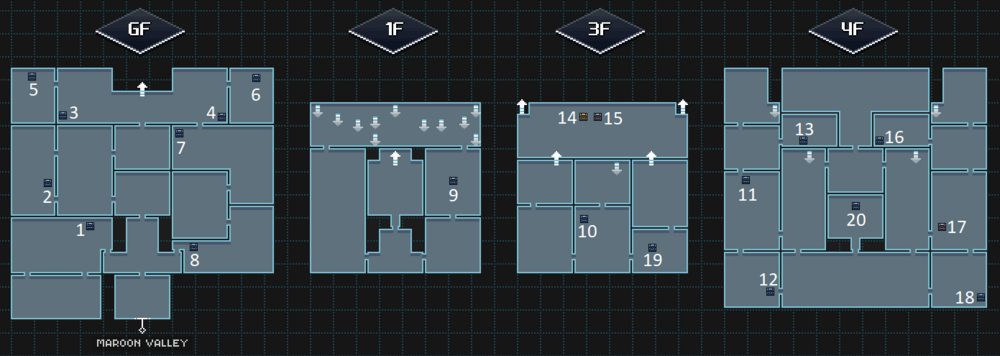
| Acc. | Type | Contains | Location | Info |
|---|---|---|---|---|
| 1 | 1 × |
Left Chamber 1 | ||
| 2 | 3 × |
Fire and Sand 2 | ||
| 3 | 4 × |
Balance Room 2 | ||
| 4 | 3 × |
Balance Room 2 | ||
| 5 | 1 × |
Test of Memory 1 | Defeat the enemies | |
| 6 | 1 × |
Test of Memory 2 | Defeat the enemies | |
| 7 | 5 × |
Right Chamber 1 | ||
| 8 | 1 × |
Right Chamber 2 | ||
| 9 | 4 × |
Right Chamber | ||
| 10 | 2 × |
Bottom Chamber | ||
| 11 | 1 × |
West Pathway | ||
| 12 | 1 × |
Test of Surpise | Defeat the enemies | |
| 13 | 1 × |
West Chamber 1) | ||
| 14 | 1 × |
Large Fire Chamber | ||
| 15 | 2 × |
Large Fire Chamber | ||
| 16 | 1 × |
East Chamber 1 | ||
| 17 | 1 × LV35 |
East Pathway | Solve the Puzzle (bottom) with the Heat Element | |
| 18 | 1 × |
Test of Memory | Defeat the enemies | |
| 19 | 1 × |
Test of Wisdom | Defeat the enemies | |
| 20 | 1 × |
Chamber of Prosperity | Defeat the enemies |
Other notable information
It is possible to be the last or the second at the Balcony depending from the time you need for the lower part of the temple. If you need more than 60 min you will be the last at the Balcony. You lose the race against Emilie if you need more than 60 min for the upper part.


