Autumn's Rise
Autumn's Rise is a location in CrossWorlds. It is a large, forested area crisscrossed by rivers where it appears to be permanently autumn. This is the first area Seekers explore when they exit Rookie Harbor.
| Autumn's Rise |
|---|
|
Autumn's Rise is a temperate area that seems to be in a state of permanent autumn. It's the first area a Seeker has to travel through. The Fauna mainly consists of Hedgehags and Rockin' Hillkats but the area also contains some rather nasty Mad Bovines to deal with. Going off-path in Autumn's Rise might lead to interesting places such as the Old Observatory in the south-west of the area. |
| -Encyclopedia entry |
Layout
Autumn's Rise stretches in a roughly east-west direction between Rookie Harbor and Bergen Trail. The halfway point of the area is Obelisk Lake, where a large obelisk serves as a waypoint and hosts a small group of traders. In the southwest stands a mysterious abandoned observatory. To the north is a small guild village known as Autumn Residences.
Most of the area can be accessed immediately, with the exception of Autumn Residences, which is unlocked when you meet the First Scholars after reaching Bergen Village, and the Inner Observatory, which is opened during The Observatory.
Connecting Regions
The regions adjacent to Autumn's Rise are Rookie Harbor via Entrance, Bergen Trail via Ending Pathway, and Autumn's Fall later on via Normal Clearing. A connection to Homestedt is added via Pathway 5 once the main story is completed and A New Home's events begin.
Rooms
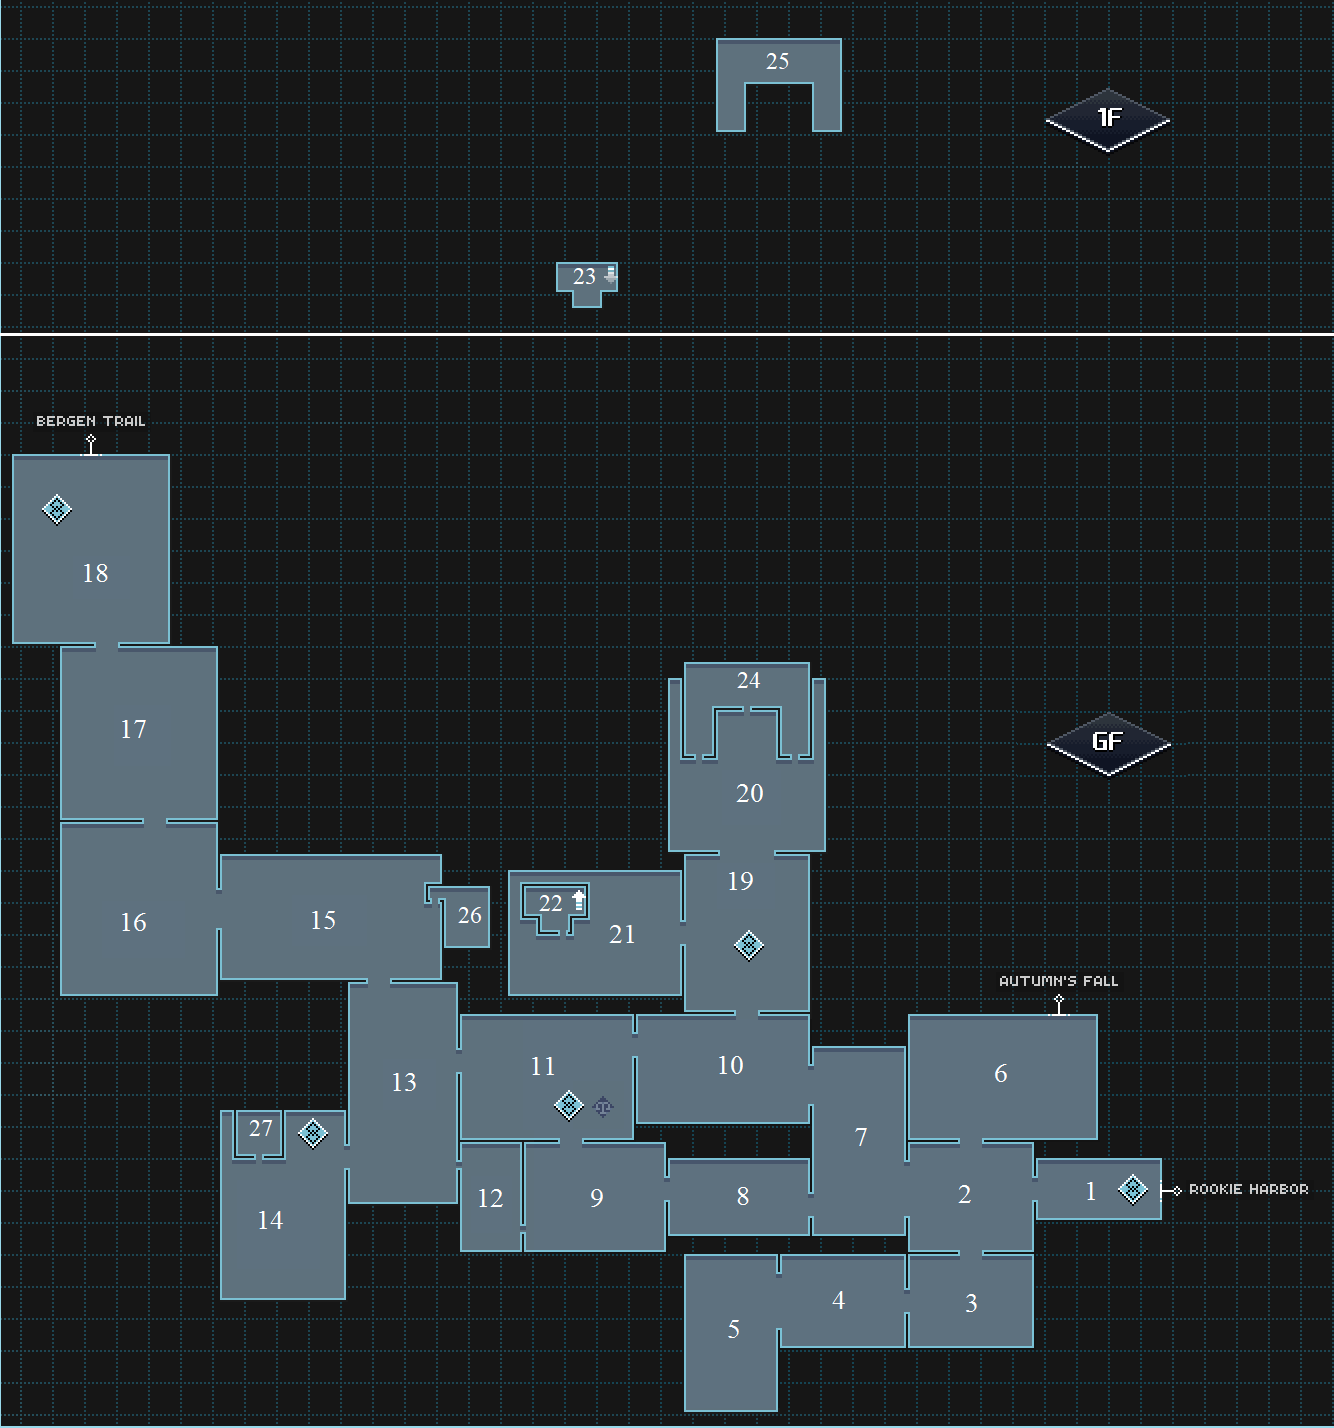
| # | Room/Landmark Name | Floor |
|---|---|---|
| 1 | Entrance
Landmark: Western Exit |
GF |
| 2 | Pathway 1 | GF |
| 3 | Quiet Passage 1 | GF |
| 4 | Quiet Passage 2 | GF |
| 5 | Hedgehag's Den | GF |
| 6 | Normal Clearing | GF |
| 7 | Pathway 2 | GF |
| 8 | Off Road 1 | GF |
| 9 | Off Road 2 | GF |
| 10 | Pathway 3 | GF |
| 11 | Obelisk Lake
Landmark: Old Obelisk |
GF |
| 12 | Drippy Den | GF |
| 13 | Pathway 4 | GF |
| 14 | Old Observatory
Landmark: Old Observatory |
GF |
| 15 | Pathway 5 | GF |
| 16 | Pathway 6 | GF |
| 17 | Pathway 7 | GF |
| 18 | Ending Pathway
Landmark: Northern Exit |
GF |
| 19 | Autumn Residences
Landmark: Autumn Residences |
GF |
| 20 | Last Minute Heroes Plaza | GF |
| 21 | First Scholars Home | GF |
| 22 | First Scholars HQ (GF) | GF |
| 23 | First Scholars HQ (1F) | 1F |
| 24 | Last Minute Heroes HQ GF | GF |
| 25 | Last Minute Heroes HQ 1F | 1F |
| 26 | Hillkat Cave | GF |
| 27 | Inner Observatory | GF |
Treasures

| Acc. | Type | Contains | Location | Info |
|---|---|---|---|---|
| 1 | 5 × |
Entrance | ||
| 2 | 3 × |
Pathway 1 | Trying to open the chest aggros the nearby Hedgehags. Defeat them to open it. | |
| 3 | 5 × |
Normal Clearing | ||
| 4 | 1 × |
Normal Clearing | Step on the button in the northwest corner to spawn the chest. | |
| 5 | 3 × |
Quiet Passage 1 | ||
| 6 | 4 × |
Quiet Passage 2 | Enter from Quiet Passage 1 on the south upper ledge to reach here. | |
| 7 | 1 × LV01 |
Hedgehag's Den | Spawn and defeat the Blue Hedgehag to find this chest. | |
| 8 | 3 × |
Pathway 2 | ||
| 9 | 3 × |
Pathway 3 | ||
| 10 | 4 × |
Obelisk Lake | Use the south entrance from Pathway 3 to reach here. | |
| 11 | 1 × |
Obelisk Lake | Get the | |
| 12 | 3 × |
Off Road 1 | ||
| 13 | 1 × |
Off Road 1 | Spawns as part of the Digging for Data quest | |
| 14 | 1 × LV11 |
Off Road 2 | ||
| 15 | 4 × |
Pathway 4 | ||
| 16 | 6 × |
Pathway 4 | ||
| 17 | 3 × |
Pathway 4 | ||
| 18 | 1 × |
Old Observatory | ||
| 19 | 1 × LV13 |
Pathway 5 | ||
| 20 | 1 × |
Pathway 5 | ||
| 21 | 1 × |
Pathway 5 | Chest spawns as part of the Bull Grab quest | |
| 22 | 1 × |
Hillkat Cave | Chest spawns as part of the It can dig, but it can't hide! quest | |
| 23 | 3 × |
Pathway 6 | Enter from Pathway 7 on upper ledge to reach this | |
| 24 | 6 × |
Pathway 6 | Enter from Pathway 7 on upper ledge to reach this | |
| 25 | 1 × LV13 |
Pathway 6 | Hit the set of linked switches to spawn. Both switches and chest are reached from Pathway 7 on the upper ledge | |
| 26 | 2 × |
Pathway 7 | Take the west ledge to Pathway 6 and return on the east ledge to reach this | |
| 27 | 3 × |
Pathway 7 | Take the west ledge to Pathway 6 and return on the east ledge to reach this | |
| 28 | 3 × |
Ending Pathway | Start on the upper right side (height level of the exit) and activate the timer switch on the upper left part | |
| 29 | 1 × |
Drippy Den | Visit the cave first from the left and solve the puzzle to gain access on the right side |
Enemies
| Name | Sprite | Drops | Locations |
|---|---|---|---|
| Hedgehag | Entrance, Pathway 1, Normal Clearing, Quiet Passage 1, Quiet Passage 2, Hedgehag's Den, Pathway 2, Pathway 3, Off Road 1, Off Road 2, Obelisk Lake, Pathway 4, Old Observatory, Pathway 5 | ||
| Old Hedgehag | Quiet Passage 1, Quiet Passage 2, Hedgehag's Den, Pathway 3<ref name="intensive" />, Obelisk Lake, Pathway 4, Old Observatory, Pathway 5, Pathway 6, Pathway 7, Ending Pathway | ||
| Flying Hedgehag | Off Road 2<ref name="switch" /> | ||
| Rockin' Hillkat | Pathway 1, Normal Clearing, Quiet Passage 1, Pathway 2, Pathway 3, Off Road 1, Off Road 2, Obelisk Lake, Pathway 4, Hillkat Cave<ref name="itcandig" /> | ||
| Flamin' Hillkat | Pathway 4, Old Observatory, Pathway 5, Pathway 6, Pathway 7, Ending Pathway, Hillkat Cave | ||
| Chillin' Hillkat | Normal Clearing<ref name="pointsofpower" /> | ||
| Mad Bovine | Pathway 3, Off Road 2, Obelisk Lake | ||
| Red Eyed Bovine | Pathway 3<ref name="intensive" />, Old Observatory, Pathway 5, Pathway 6, Pathway 7, Ending Pathway | ||
| Blue Hedgehag (boss) | 2x |
Hedgehag's Den<ref name="dendefeat" /> | |
| Hillkat Bandleader (boss) | Hillkat Cave<ref name="itcandig" /> |
<references>
<ref name="booster">With ![]() Rise Booster enabled</ref>
<ref name="intensive">Spawns during Intensive Tree Care quest</ref>
<ref name="itcandig">Spawns during It can dig, but it can't hide! quest</ref>
<ref name="dendefeat">Spawns after defeating all Hedgehags in Hedgehag's Den, then attempting to open the chest that appears</ref>
<ref name="norank">Additional drops not obtainable because rank is disabled during this encounter</ref>
<ref name="pointsofpower">Spawns during Points of Power quest</ref>
<ref name="switch">Spawns during A Switch in Altitude quest (Switch exclusive)</ref>
</references>
Rise Booster enabled</ref>
<ref name="intensive">Spawns during Intensive Tree Care quest</ref>
<ref name="itcandig">Spawns during It can dig, but it can't hide! quest</ref>
<ref name="dendefeat">Spawns after defeating all Hedgehags in Hedgehag's Den, then attempting to open the chest that appears</ref>
<ref name="norank">Additional drops not obtainable because rank is disabled during this encounter</ref>
<ref name="pointsofpower">Spawns during Points of Power quest</ref>
<ref name="switch">Spawns during A Switch in Altitude quest (Switch exclusive)</ref>
</references>
Botanics
| Destroyable | Contents | ||||||
|---|---|---|---|---|---|---|---|
 |
Alpha Ball Plant |
| |||||
|
| |||||||
 |
Beta Ball Plant |
| |||||
|
| |||||||
 |
Omega Ball Plant |
| |||||
|
| |||||||
 |
Alpha Water Blades |
| |||||
|
| |||||||
 |
Beta Water Blades |
| |||||
|
| |||||||
 |
Omega Water Blades |
| |||||
|
| |||||||
Traders
A small group of traders is located by the obelisk in Obelisk Lake.
- Player Trader (consumables) — Located in Obelisk Lake.
| Offered Item | Credits | Requisite Items |
|---|---|---|
| 2x |
50 | 1x |
| 2x |
50 | 1x |
| 2x |
50 | 1x |
| 2x |
50 | 1x |
- Player Trader (equipment) — Located in Obelisk Lake.
| Offered Item | Credits | Requisite Items |
|---|---|---|
| LV11 |
1740 | 3x |
| LV11 |
1690 | 6x |
- Player Trader (enemy drops) — Located in Obelisk Lake.
| Offered Item | Credits | Requisite Items |
|---|---|---|
| 100 | 2x | |
| 150 | 2x | |
| 250 | 2x |
- Player Trader (trade components) — Located in Obelisk Lake.
| Offered Item | Credits | Requisite Items |
|---|---|---|
| 100 | 2x | |
| 100 | 2x | |
| 250 | 1x | |
| 90 | 2x |
Quests
The quests that can be started in Autumn's Rise are:
- The Observatory
- First Steps
- A Few Steps More
- Autumn's Rise Trailblazing
- Round and Round
- Crocus Pocus
Trophies
- There is no Cow Level
- Visit the Perfectly Normal Tree in Normal Clearing.
- Gotta go Fast
- Defeat the Blue Hedgehag.
- Autumn Landmarks
- Find all landmarks in Autumn's Rise.
- Autumn's Scavenger
- Obtain all chests in Autumn's Rise; see #Chests.
A New Home DLC Changes
The only change introduced to Autumn's Rise in the A New Home DLC is the addition of a new entrance leading to Homestedt.
Connecting Regions
- Homestedt (via Pathway 5)
Role in the Plot
In CrossWorlds
New Seekers pass through Autumn's Rise on their way to the Temple Mine. This is the first free-roam area in CrossWorlds, and therefore serves as a beginner's area with low-level enemies.
In CrossCode
As the First Scholars HQ is located in Autumn's Rise, Lea returns here numerous times over the course of CrossCode.
Lea initially passes through Autumn's Rise traveling with Emilie. Along the way, they are confronted by Apollo, who challenges Lea to a duel once she reaches Bergen Trail.
Lea and Emilie later return to Autumn's Rise to meet up with Schneider, who takes them to visit his guild, the First Scholars. Here, they meet Hlin, Albert and Buggy. Lea and Emilie decide to join the guild, but are told they must complete the Temple Mine and take part in a quiz first.
After completing the dungeon, Lea and Emilie return to the guild. Despite Lea's speech synchronization issues, both girls are able to pass the quiz and officially join the guild. Lea then logs off for the night, before heading to Maroon Valley the next day.
Later, after the Chase of the Hologram Frobbit quest, Lea returns to the First Scholars HQ for a briefing about the Para Island raid. She logs off for the night, and heads to the raid the next morning.
After escaping from Vermillion Wasteland, Lea goes to the guild to meet up with Emilie. However, Emilie seems to blame her for disappearing from the raid... Lukas then shows up, with no memory of Vermillion Wasteland, causing Lea to panic and run away. Sergey then reveals to her the truth he suspected about Luke.
After completing the first dungeon in Gaia's Garden, Lea returns to the guild to reunite with the other guild members. She logs out for the night, before leaving the next day to run the second dungeon.
After completing the Grand Krys'kajo, C'tron calls Lea back to the guild, where it is revealed that they are planning a second raid. However, Sergey reveals that a security vulnerability in the raid system was likely how Lea was abducted in the first place, so Lea reluctantly declines.
After finally meeting with Satoshi, Sergey gets Lea to return to the guild in order to confirm that he can use the projector there to create a hologram of himself. Lea logs off for the night. The next morning, C'tron reveals that he will be taking a break from the game. Hlin also shows up, and hints that Albert is meeting with someone in Rhombus Square...
During the good ending story line, Lea returns to the guild, and with much difficulty convinces Albert to meet with her. Sergey then reveals himself to him, and the two arrange to talk outside the game. Lea logs off, and the next day she returns to the news that Albert has been able to set up a meeting between Lea and Ivan.
After the final plans are made for the attack on Vermillion Wasteland, Lea returns to the First Scholars HQ and gathers all her friends together. Sergey then shows up as a hologram, and finally explains Lea's situation to them. Everyone agrees to help Lea recover the Evotar Server, and they leave to prepare for heading to Vermillion Wasteland.
A few months after the end of the main story, the members of the First Scholars gather in the guild house, and Sergey shares with them Lea's fate.
During the A New Home DLC, Lea returns to the First Scholars HQ for a briefing on their new attempt to run the Para Island raid.
Challenges and secrets
In the Hedgehag's Den area, defeating all enemies will cause the Blue Hedgehag miniboss to spawn. Defeating this enemy is necessary for the A Promise is a Promise sidequest.
The Autumn's Rise Observatory is located in the area. It can be accessed in the last part of the quest chain A Promise is a Promise.
There is a Perfectly Ordinary Tree located in the Normal Clearing area. Its presence is completely irrelevant. There seem to be similarly shaped things in different regions.
The Drippy Den is a hidden cave area accessible from Pathway 4 and Off Road 2 by jumping across the water.
To the south of First Scholars Home, there is a sign that can only be reached through long jumping or other exploits. The sign reads "There's no easter egg here".