Grand Krys'kajo: Difference between revisions
Plaguerized (talk | contribs) m (→Monsters) |
m (Remove redundant categories) |
||
| (7 intermediate revisions by 4 users not shown) | |||
| Line 1: | Line 1: | ||
{{Location_Card|name=Grand Krys'kajo | {{Location_Card|name=Grand Krys'kajo | ||
|color=#00734F | |||
|image=File:Grand Kryskajo.png | |image=File:Grand Kryskajo.png | ||
|description=Overgrown by a gigantic tree, this temple is guarded by an ancient entity. | |description=Overgrown by a gigantic tree, this temple is guarded by an ancient entity. | ||
|room_count= | |room_count=22 | ||
|treasure_default = 5 | |treasure_default = 5 | ||
|treasure_key = 2 | |treasure_key = 2 | ||
| Line 11: | Line 12: | ||
|trader_count=0}} | |trader_count=0}} | ||
'''Grand Krys'kajo''' is a [[Locations|location]] in [[CrossWorlds]]. It is a temple in the middle of [[Gaia's Garden]] which is built in and around the giant tree known as Gaia. This is the final of the jungle's three temples, in which the [[Shock]] and [[Wave]] elements must be used together in order to progress. | |||
'''Grand Krys'kajo''' is a [[ | |||
The name is also used to refer to the entire group of 3 temples, including the [[Zir'vitar Temple]] and the [[So'najiz Temple]]. | The name is also used to refer to the entire group of 3 temples, including the [[Zir'vitar Temple]] and the [[So'najiz Temple]]. | ||
{{Encyclopedia | |||
|title=Grand Krys'kajo | |||
|contents=This temple is built right into the name-giving tree at the heart of Gaia's Garden. It can only be accessed by first completing both the Zir'vitar Temple and So'najiz Temple. | |||
A [[Seeker]] needs to show that they have mastered both elements acquired in the temples to prove their worthiness. It is said a guardian tests every Seeker personally at the top of the tree. | |||
|source=Encyclopedia entry}} | |||
== Layout == | == Layout == | ||
The temple has six floors, including a sublevel and four upper levels. The path to progress through the temple is as follows: | The temple has six floors, including a sublevel and four upper levels. The path to progress through the temple is as follows: | ||
*Enter and continue forward to the Main Stream. | *Enter and continue forward to the Main Stream. | ||
| Line 27: | Line 30: | ||
*With the two keys, you can enter the middle door and complete the final bounce puzzle there to collect the Master Key. | *With the two keys, you can enter the middle door and complete the final bounce puzzle there to collect the Master Key. | ||
*Return to the mid-boss room to open the door to the boss room. | *Return to the mid-boss room to open the door to the boss room. | ||
*After the boss, continue up to the 5th floor for the conclusion of the dungeon. | |||
The only connected area is [[Gaia's Garden]], via Entry Test and a teleporter in Seeker's Conclusion. | |||
=== | === Rooms === | ||
[[File:Grand-kryskajo-map.png|upright=1.5|thumb|left|link=https://gamepedia.cursecdn.com/crosscode_gamepedia/f/f3/Grand-kryskajo-map.png|Click the map for a full-resolution image.]] | |||
| | {| class="wikitable sortable" | ||
|+ Areas of Grand Krys'kajo | |||
|- | |- | ||
! | ! # | ||
! Area Name | ! Area Name | ||
! Floor | |||
|- | |- | ||
| 1 || Entry Test | | 1 || Entry Test || GF | ||
|- | |- | ||
| 2 || Main Stream | | 2 || Main Stream || GF, 1F | ||
|- | |- | ||
| 3 || Magnetic Transit | | 3 || Magnetic Transit || GF | ||
|- | |- | ||
| 4 || Sticky Roots | | 4 || Sticky Roots || U1 | ||
|- | |- | ||
| 5 || Magnetic Attraction | | 5 || Magnetic Attraction || GF | ||
|- | |- | ||
| 6 || Mana Trees | | 6 || Mana Trees || 1F | ||
|- | |- | ||
| 7 || Trial of Trios | | 7 || Trial of Trios || GF | ||
|- | |- | ||
| 8 || Block Conveyance | | 8 || Block Conveyance || GF | ||
|- | |- | ||
| 9 || Geometry | | 9 || Geometry || GF | ||
|- | |- | ||
| 10 || Ghostly Lumber | | 10 || Ghostly Lumber || 1F | ||
|- | |- | ||
| 11 || Trial of the West | | 11 || Trial of the West || 2F | ||
|- | |- | ||
| 12 || Center Branch | | 12 || Center Branch || 2F, 3F | ||
|- | |- | ||
| 13 || Branch Transmit | | 13 || Branch Transmit || 3F | ||
|- | |- | ||
| 14 || West Branch | | 14 || West Branch || 3F | ||
|- | |- | ||
| 15 || Symmetry | | 15 || Symmetry || 3F | ||
|- | |- | ||
| 16 || Branch Conveyance | | 16 || Branch Conveyance || 3F | ||
|- | |- | ||
| 17 || East Branch | | 17 || East Branch || 3F | ||
|- | |- | ||
| 18 || Poetry | | 18 || Poetry || 3F | ||
|- | |- | ||
| 19 || Falling Leaves | | 19 || Falling Leaves || 3F | ||
|- | |- | ||
| 20 || Upstream | | 20 || Upstream || 2F | ||
|- | |- | ||
| 21 || Crowing Tops | | 21 || Crowing Tops || 4F | ||
|- | |||
| 22 || Seeker's Conclusion || 5F | |||
|} | |} | ||
{{clear}} | |||
=== Treasures === | |||
[[File:GrandKryskajoTreasures.png|thumb|upright=1.5|left|link=https://gamepedia.cursecdn.com/crosscode_gamepedia/5/5d/GrandKryskajoTreasures.png|Click the map for a full-resolution image.]] | |||
{{TreasureList| | |||
{{TreasureList/entry|acc=1|type=default|item=Werewolf Stick|amount=3|loc=West Branch}} | |||
{{TreasureList/entry|acc=2|type=default|item=Chef Sandwich|amount=4|loc=West Branch}} | |||
{{TreasureList/entry|acc=3|type=key|item=Krys'kajo Key|amount=1|loc=Branch Transmit}} | |||
{{TreasureList/entry|acc=4|type=default|item=Pepper Night Tea|amount=3|loc=Branch Transmit|info=Activate the Tesla coil in the northwest corner to spawn the chest.}} | |||
{{TreasureList/entry|acc=5|type=gold|item=Timeworn Belt|amount=1|loc=East Branch|info=Drop down from the puzzle area on the roof to reach this chest.}} | |||
{{TreasureList/entry|acc=6|type=default|item=Energy Espresso|amount=2|loc=East Branch}} | |||
{{TreasureList/entry|acc=7|type=default|item=Prime Pistachios|amount=2|loc=East Branch}} | |||
{{TreasureList/entry|acc=8|type=key|item=Krys'kajo Key|amount=1|loc=Branch Conveyance}} | |||
{{TreasureList/entry|acc=9|type=masterkey|item=Kajo Master Key|amount=1|loc=Falling Leaves|info=Complete the bounce puzzle to spawn the chest.}} | |||
}} | |||
{{clear}} | |||
== Enemies == | == Enemies == | ||
Unlike most dungeons, the Grand Krys'kajo lacks any respawning enemies, but all non-boss enemies encountered here can easily be found elsewhere. | Unlike most dungeons, the Grand Krys'kajo lacks any respawning enemies, but all non-boss enemies encountered here can easily be found elsewhere. | ||
{| class="wikitable" | {| class="wikitable" | ||
! Name | ! Name | ||
! | ! Sprite | ||
! Drops | |||
! Location | |||
|- | |- | ||
| [[Argeby]] | |||
| [[File:Argeby-sprite.png|center]] | | [[File:Argeby-sprite.png|center]] | ||
| | | {{ItemLink|Palette Blossom}}<ref name="rank" /> | ||
| | | | ||
: East Branch | : East Branch | ||
|- | |- | ||
| [[Papagun]] | |||
| [[File:Papagun-sprite.png|center]] | | [[File:Papagun-sprite.png|center]] | ||
| | | {{ItemLink|Huge Nut}}<ref name="rank" /> | ||
| | | | ||
: West Branch | : West Branch | ||
|- | |- | ||
| [[Jelleric]] | |||
| [[File:Jelleric-sprite.png|center]] | | [[File:Jelleric-sprite.png|center]] | ||
| | | {{ItemLink|Slime Drop}}<ref name="booster /> | ||
| | | | ||
: East Branch | : East Branch | ||
|- | |- | ||
| [[Angler]] | |||
| [[File:Angler-sprite.png|center]] | | [[File:Angler-sprite.png|center]] | ||
| | | {{ItemLink|Glow Pear}}<ref name="rank" /> | ||
| | | | ||
: Trial of Trios, Ghostly Lumber, West Branch | : Trial of Trios, Ghostly Lumber, West Branch | ||
|- | |- | ||
| [[Shokat]] | |||
| [[File:Shokat-sprite.png|center]] | | [[File:Shokat-sprite.png|center]] | ||
| | | {{ItemLink|Static Furball}}<ref name="rank" /> | ||
| | | | ||
: West Branch | : West Branch | ||
|- | |- | ||
| [[Behesloth]] | |||
| [[File:Behesloth-sprite.png|center]] | | [[File:Behesloth-sprite.png|center]] | ||
| | | {{ItemLink|Lazy Claw}}<ref name="rank" /> | ||
| | | | ||
: East Branch | : East Branch | ||
|- | |- | ||
| [[Rob0ck]] | |||
| [[File:Rob0ck-sprite.png|center]] | | [[File:Rob0ck-sprite.png|center]] | ||
| | | {{ItemLink|Metal Down}}<ref name="booster /> | ||
| | | | ||
: Trial of Trios | : Trial of Trios | ||
|- | |- | ||
| [[Powerplant]] | |||
| [[File:Powerplant-sprite.png|center]] | | [[File:Powerplant-sprite.png|center]] | ||
| | | {{ItemLink|Power Spinach}}<ref name="booster /> | ||
| | | | ||
: Sticky Roots, Mana Trees, East Branch | : Sticky Roots, Mana Trees, East Branch | ||
|- | |- | ||
| [[Ectovolt]] | |||
| [[File:Ectovolt-sprite.png|center]] | | [[File:Ectovolt-sprite.png|center]] | ||
| | | {{ItemLink|Living Bolt}}<ref name="booster /> | ||
| | | | ||
: Ghostly Lumber | : Ghostly Lumber | ||
|- | |- | ||
| [[Ocubepus]] | |||
| [[File:Octcubus-sprite.png|center]] | | [[File:Octcubus-sprite.png|center]] | ||
| | | {{ItemLink|Plain Cube}}<ref name="booster /> | ||
| | | | ||
: Sticky Roots | : Sticky Roots | ||
|- | |- | ||
| [[Blue Ray]] | |||
| [[File:Blue-ray-sprite.png|center]] | | [[File:Blue-ray-sprite.png|center]] | ||
| | | {{ItemLink|Sea Disc}}<ref name="booster /> | ||
| | | | ||
: Mana Trees | : Mana Trees | ||
|- | |- | ||
| [[Son of the East]] (boss) | |||
| [[File:Son-Of-The-East.png|center]] | | [[File:Son-Of-The-East.png|center]] | ||
| | | None | ||
| | | | ||
: Trial of the West, Crowing Tops | : Trial of the West, Crowing Tops | ||
|- | |- | ||
| [[Ancient Guardian]] (boss) | |||
| [[File:AncientGuardianCropped.png|center]] | | [[File:AncientGuardianCropped.png|center]] | ||
| | | None | ||
| | | | ||
: Crowing Tops | : Crowing Tops | ||
|} | |} | ||
<references> | |||
<ref name="booster">Additional drops not possible as this enemy can't be fought here after obtaining the {{ItemLink|Garden Booster}}</ref> | |||
<ref name="rank">Additional drops not possible due to combat rank being disabled in dungeon</ref> | |||
</references> | |||
== | == Role in the Plot == | ||
=== In CrossWorlds === | |||
The Grand Krys'kajo serves as a test of mastery over the elements [[Shock]] and [[Wave]]. The temple is watched over by a caretaker of the Track, [[Son of the East]]. This is the penultimate dungeon of the Track, although several smaller challenges separate it from the final dungeon, [[Ku'lero Temple]]. Seekers who prove their mastery here are awarded the {{ItemLink|Star Shade}}. For completing the Temple, Seekers are rewarded by [[Di'aro]], who extends their [[SP]] bar to 12 SP points. The [[NPC#Trackwalker General|Trackwalker General]] gives them an additional reward of two {{ItemLink|Circuit Override|showName=Circuit Overrides}}. | |||
[[ | === In CrossCode === | ||
[[Lea]] reaches the Grand Krys'kajo together with [[Emilie-Sophie de Belmond|Emilie]], [[Toby Tremblay|C'tron]], [[Apollo]] and [[Joern]]. After C'tron and Joern decide to log off for the day, the other three players race through the dungeon. Apollo always comes first, and reveals that he has played through [[CrossWorlds]] before. Lea can beat Emilie if she takes less than 30 minutes after the dungeon's midpoint. After the players reunite and visit the heritage site, they log off. After logging back in the next day, Lea encounters C'tron as he finishes the dungeon, and the two have a conversation about the stars. | |||
In the [[A New Home]] DLC, Lea and C'tron return here to look at the stars again, in the hopes that this will help recover C'tron's memory. The sight causes him to remember something important, after which he quickly flees... | |||
== | == Trophies == | ||
To beat [[ | {{Main|Trophies}} | ||
[[ | ;A Test of Power | ||
:Defeat the [[Son of the East]] in Trial of the West. | |||
;Battle on the Crown | |||
:Defeat the [[Son of the East]] and the [[Ancient Guardian]] in Crowing Tops. | |||
;At the Speed of Sound | |||
:To beat [[Emilie]] you have 30 minutes to clear the 2nd half of dungeon after meeting up with the party at the ''Centre Branch''. | |||
;Grand Scavenger | |||
:Obtain all chests in Grand Krys'kajo; see [[#Chests]]. | |||
Latest revision as of 14:56, 10 May 2021
Grand Krys'kajo is a location in CrossWorlds. It is a temple in the middle of Gaia's Garden which is built in and around the giant tree known as Gaia. This is the final of the jungle's three temples, in which the Shock and Wave elements must be used together in order to progress.
The name is also used to refer to the entire group of 3 temples, including the Zir'vitar Temple and the So'najiz Temple.
| Grand Krys'kajo |
|---|
|
This temple is built right into the name-giving tree at the heart of Gaia's Garden. It can only be accessed by first completing both the Zir'vitar Temple and So'najiz Temple. A Seeker needs to show that they have mastered both elements acquired in the temples to prove their worthiness. It is said a guardian tests every Seeker personally at the top of the tree. |
| -Encyclopedia entry |
Layout
The temple has six floors, including a sublevel and four upper levels. The path to progress through the temple is as follows:
- Enter and continue forward to the Main Stream.
- There are two paths here; follow them in any order. Each will lead you through several puzzle rooms to a balcony in Main Stream. Press both buttons to unlock the puzzle.
- Complete the Main Stream puzzle to proceed to the next room and fight the mid-boss.
- Exit onto the main branches of the tree.
- Go left and right in either order. Each way is a long but linear path in and out of several puzzle rooms to eventually collect a key.
- With the two keys, you can enter the middle door and complete the final bounce puzzle there to collect the Master Key.
- Return to the mid-boss room to open the door to the boss room.
- After the boss, continue up to the 5th floor for the conclusion of the dungeon.
The only connected area is Gaia's Garden, via Entry Test and a teleporter in Seeker's Conclusion.
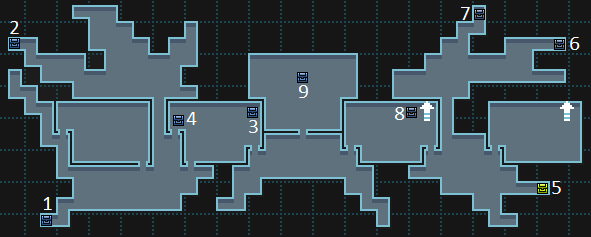
Rooms

| # | Area Name | Floor |
|---|---|---|
| 1 | Entry Test | GF |
| 2 | Main Stream | GF, 1F |
| 3 | Magnetic Transit | GF |
| 4 | Sticky Roots | U1 |
| 5 | Magnetic Attraction | GF |
| 6 | Mana Trees | 1F |
| 7 | Trial of Trios | GF |
| 8 | Block Conveyance | GF |
| 9 | Geometry | GF |
| 10 | Ghostly Lumber | 1F |
| 11 | Trial of the West | 2F |
| 12 | Center Branch | 2F, 3F |
| 13 | Branch Transmit | 3F |
| 14 | West Branch | 3F |
| 15 | Symmetry | 3F |
| 16 | Branch Conveyance | 3F |
| 17 | East Branch | 3F |
| 18 | Poetry | 3F |
| 19 | Falling Leaves | 3F |
| 20 | Upstream | 2F |
| 21 | Crowing Tops | 4F |
| 22 | Seeker's Conclusion | 5F |
Treasures
| Acc. | Type | Contains | Location | Info |
|---|---|---|---|---|
| 1 | 3 × |
West Branch | ||
| 2 | 4 × |
West Branch | ||
| 3 | 1 × |
Branch Transmit | ||
| 4 | 3 × |
Branch Transmit | Activate the Tesla coil in the northwest corner to spawn the chest. | |
| 5 | 1 × LV49 |
East Branch | Drop down from the puzzle area on the roof to reach this chest. | |
| 6 | 2 × |
East Branch | ||
| 7 | 2 × |
East Branch | ||
| 8 | 1 × |
Branch Conveyance | ||
| 9 | 1 × |
Falling Leaves | Complete the bounce puzzle to spawn the chest. |
Enemies
Unlike most dungeons, the Grand Krys'kajo lacks any respawning enemies, but all non-boss enemies encountered here can easily be found elsewhere.
| Name | Sprite | Drops | Location |
|---|---|---|---|
| Argeby |
| ||
| Papagun |
| ||
| Jelleric |
| ||
| Angler |
| ||
| Shokat |
| ||
| Behesloth |
| ||
| Rob0ck |
| ||
| Powerplant |
| ||
| Ectovolt |
| ||
| Ocubepus |
| ||
| Blue Ray |
| ||
| Son of the East (boss) |  |
None |
|
| Ancient Guardian (boss) |  |
None |
|
<references>
<ref name="booster">Additional drops not possible as this enemy can't be fought here after obtaining the ![]() Garden Booster</ref>
<ref name="rank">Additional drops not possible due to combat rank being disabled in dungeon</ref>
</references>
Garden Booster</ref>
<ref name="rank">Additional drops not possible due to combat rank being disabled in dungeon</ref>
</references>
Role in the Plot
In CrossWorlds
The Grand Krys'kajo serves as a test of mastery over the elements Shock and Wave. The temple is watched over by a caretaker of the Track, Son of the East. This is the penultimate dungeon of the Track, although several smaller challenges separate it from the final dungeon, Ku'lero Temple. Seekers who prove their mastery here are awarded the ![]() Star Shade. For completing the Temple, Seekers are rewarded by Di'aro, who extends their SP bar to 12 SP points. The Trackwalker General gives them an additional reward of two
Star Shade. For completing the Temple, Seekers are rewarded by Di'aro, who extends their SP bar to 12 SP points. The Trackwalker General gives them an additional reward of two ![]() Circuit Overrides.
Circuit Overrides.
In CrossCode
Lea reaches the Grand Krys'kajo together with Emilie, C'tron, Apollo and Joern. After C'tron and Joern decide to log off for the day, the other three players race through the dungeon. Apollo always comes first, and reveals that he has played through CrossWorlds before. Lea can beat Emilie if she takes less than 30 minutes after the dungeon's midpoint. After the players reunite and visit the heritage site, they log off. After logging back in the next day, Lea encounters C'tron as he finishes the dungeon, and the two have a conversation about the stars.
In the A New Home DLC, Lea and C'tron return here to look at the stars again, in the hopes that this will help recover C'tron's memory. The sight causes him to remember something important, after which he quickly flees...
Trophies
- A Test of Power
- Defeat the Son of the East in Trial of the West.
- Battle on the Crown
- Defeat the Son of the East and the Ancient Guardian in Crowing Tops.
- At the Speed of Sound
- To beat Emilie you have 30 minutes to clear the 2nd half of dungeon after meeting up with the party at the Centre Branch.
- Grand Scavenger
- Obtain all chests in Grand Krys'kajo; see #Chests.