Digmo: Difference between revisions
mNo edit summary |
Oneiros108 (talk | contribs) (Correct boosted stats) Tag: 2017 source edit |
||
| (One intermediate revision by the same user not shown) | |||
| Line 6: | Line 6: | ||
|subtype=Mine Robot | |subtype=Mine Robot | ||
|HP=3000 | |HP=3000 | ||
|atk= | |atk=78 | ||
|def= | |def=75 | ||
|foc= | |foc=74 | ||
|color=#5d6466 | |color=#5d6466 | ||
|blevel=60 | |blevel=60 | ||
| Line 15: | Line 15: | ||
|bdef=364 | |bdef=364 | ||
|bfoc=340 | |bfoc=340 | ||
|heat=-100 | |heat=-100 | ||
|cold=90 | |cold=90 | ||
|EXP=169 | |EXP=169 | ||
|credits= | |bEXP=125 | ||
|credits=425 | |||
|bcredits=3661 | |||
|drops={{ItemDrop|{{ItemDrop/entry|name=Metal Gears|chance=100%|rank=D|quantity=1}} | |drops={{ItemDrop|{{ItemDrop/entry|name=Metal Gears|chance=100%|rank=D|quantity=1}} | ||
{{ItemDrop/entry|name=Purple Ore Lump|chance=16%|rank=D|quantity=1}} | {{ItemDrop/entry|name=Purple Ore Lump|chance=16%|rank=D|quantity=1}} | ||
{{ItemDrop/entry|name=Rusty Bits|chance=16%|rank=D|quantity=1}} | {{ItemDrop/entry|name=Rusty Bits|chance=16%|rank=D|quantity=1}} | ||
{{ItemDrop/entry|name=Diamond|chance=30|rank= | {{ItemDrop/entry|name=Diamond|chance=30%|rank=D}}}}}} | ||
{{EnemyNavBox|Temple Mine}} | {{EnemyNavBox|Temple Mine}} | ||
The '''Digmo''' is a mechanical [[enemy]] in [[CrossWorlds]]. They can be encountered in [[Temple Mine]]. | The '''Digmo''' is a mechanical [[enemy]] in [[CrossWorlds]]. They can be encountered in [[Temple Mine]]. | ||
Latest revision as of 21:19, 22 January 2022
'
The Digmo is a mechanical enemy in CrossWorlds. They can be encountered in Temple Mine.
 |
|---|
|
When bombs are too powerful this bot comes around and uses its wheel to dig deep. The track however makes it use its systems to hurl ice blocks at you, dash at you or shake the whole mine to let rocks fall on you. That's a lot of "you"s so be careful! |
| -Monster Fibula report |
Appearance
The Digmo is a robot that has a wheel instead of legs and has two arms which end in claws. Its "eye" is presumably a lamp. It has a red screen on the back. It seems to be infected by Fleazers. It looks exactly the same as an Infected Digmo that was infected by way less Fleazers.
Combat
When engaged in combat, the Digmo will follow Lea and occasionally use on of its three attacks. During one of its attacks, it'll slam the ground and stand still, flashing red, making rocks fall at Lea when doing so. It can also charge at Lea, flashing white, standing still for a moment after charging. Its last attack is preceded by the Digmo flashing white and standing on its arms. It'll then use its wheel to create a stream of ice which it tries to shoot at Lea. It'll also stand still after this attack for a while. Whenever it is hit in the back, a break meter appears. When this is full, the Digmo will stand still and receive more damage than usual. The Digmo takes reduced damage when hit in the front or the sides.
Strategies
Since it must be hit in the back to deal substantial amounts of damage, it's best to not attack until it has done of its attacks since these lend you opportunities to attack its back. When the Digmo is making rocks fall, try to use hit-and-run attacks to damage the Digmo and avoid the falling rocks. Its Charge attack can easily be dodged. If it tries to shoot ice at Lea, try to stay close and run around the Digmo, so that you can easily reach its back once its done with the attack. The Sphere Saw can be a great tool for dealing a lot of damage to the Digmo when it has done either of its attacks or when its stunned.
Locations
- Temple Mine
- Control Room A
- Frozen Chamber 2
- Chamber of Fire (after dungeon completion only)
- Control Room B (after dungeon completion only)
Gallery
-

The rock attack
-

The charge attack
-

The ice attack
-
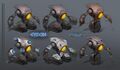
Digmo concept art


Trivia
- The Digmo was introduced along with the Temple Mine in Early Access v0.4.0.