Sapphire Ridge: Difference between revisions
Oneiros108 (talk | contribs) (→Treasures: Corrected all chests) |
mNo edit summary Tag: 2017 source edit |
||
| (34 intermediate revisions by 9 users not shown) | |||
| Line 1: | Line 1: | ||
{{Location_Card|name=Sapphire Ridge | {{Location_Card|name=Sapphire Ridge | ||
|color=#403380 | |||
|image=File:Sapphire Ridge.png | |image=File:Sapphire Ridge.png | ||
|description=The tranquil ridge filled with bamboo structures and hidden paths. | |description=The tranquil ridge filled with bamboo structures and hidden paths. | ||
|room_count= | |room_count=42 | ||
|treasure_default = | |quest_count=8 | ||
|treasure_default = 4 | |||
|treasure_key = 0 | |treasure_key = 0 | ||
|treasure_masterkey = 0 | |treasure_masterkey = 0 | ||
|treasure_bronze = | |treasure_bronze = 12 | ||
|treasure_silver = | |treasure_silver = 10 | ||
|treasure_gold = | |treasure_gold = 17 | ||
|trader_count= | |trader_count=12}} | ||
'''Sapphire Ridge''' is a [[ | '''Sapphire Ridge''' is a [[location]] in [[CrossWorlds]]. It is an area of caves and bamboo forests with Japanese-influenced architecture that can be found on the east half of the [[Croissant]]. It is a high-level area that can only be accessed after obtaining all four [[Element]]s. The area closely resembles the [[Old Hideout]] area from the prologue, and is likely connected to it. | ||
{{Encyclopedia | |||
| title = Sapphire Ridge | |||
| contents = Sapphire Ridge is a system of hills located to the east of [[Shadoon]]. It's covered in eternal night by a strange weather phenomenon that is currently researched by the [[United Voyager Nation]]. Many years ago miners carved deep into the hills to unearth the valuable Cobalt Ore. Although not much was found, the miners uncovered many hidden paths that lead to the north of the area. Otherwise Sapphire Ridge is rather rural as most paths lead through the cave-systems up [[Ku'lero Temple|Ascension Temple]]. | |||
The south houses a hostel called the Cave Inn, which counts among the oldest structures built by humans on Shadoon. | |||
| source = Encyclopedia entry | |||
}} | |||
== Layout == | == Layout == | ||
The area is a complex tangle of crisscrossing pathways and caves. The main features of note are the Cave Inn Mall to the south, which serves as the main hub of the area, and the Old Dojo to the north. | |||
Most of the map is immediately accessible, but the northern area past Path to Peace is notably locked until the {{ItemLink|Meteor Shade}} is collected. There's also a few areas locked behind quests and plot progression: Henry's Hideout is reached during the [[Henry Trailblazing]] quest, the interior of the Old Dojo is reached during the [[Trials of the Golden Bugs]] quest, the Hidden Entrance and Tunnel are unlocked late in the game's plot, and [[Facility X]] can only be reached through the puzzle following the platform-exclusive quests. | |||
=== Connecting | === Connecting regions === | ||
* [[Autumn's Fall]] | * [[Autumn's Fall]] (via Sapphire Tunnel) | ||
* [[Vermillion Wasteland]] (via Hidden Tunnel East) | |||
* [[Rhombus Square]] (via teleporter at The Cave Inn) | |||
* [[Old Hideout]] (via teleporters in Waterfall Backyard and Old Dojo) | |||
=== | === Map === | ||
[[File:Sapphire-ridge-map.png|thumb|upright=1.8|left|link=https://static.wikia.nocookie.net/crosscode_gamepedia/images/7/77/Sapphire-ridge-map.png|For the full-resolution image, click the map.]] | |||
| | {| class="wikitable sortable" | ||
|+ Areas of Sapphire Ridge | |||
|- | |- | ||
! | ! # | ||
! Area Name | ! Area Name | ||
! Floor | |||
|- | |- | ||
| 1 || Sapphire Tunnel | | 1 || Sapphire Tunnel || GF | ||
|- | |- | ||
| 2 || Western Exit | | 2 || Western Exit | ||
'''Landmark: Western Exit''' | |||
| GF | |||
|- | |||
| 3 || North West Path || GF | |||
|- | |||
| 4 || River Road || GF | |||
|- | |||
| 5 || The Cave Inn | |||
'''Landmark: The Cave Inn''' | |||
| GF, 1F, 2F | |||
|- | |||
| 6 || Tranquil Bamboo || GF | |||
|- | |||
| 7 || Baton Pond || GF | |||
|- | |||
| 8 || The Barracks || GF | |||
|- | |||
| 9 || The Bellow || GF | |||
|- | |||
| 10 || Bamboo Thicket || GF | |||
|- | |||
| 11 || North East Path || GF | |||
|- | |||
| 12 || Spider Chasm || GF | |||
|- | |||
| 13 || High Ground || GF | |||
|- | |||
| 14 || Flower Lake || GF | |||
|- | |||
| 15 || Narrow Passage || GF | |||
|- | |- | ||
| | | 16 || Eroded Passage || GF | ||
|- | |- | ||
| | | 17 || Nesting Grounds || GF | ||
|- | |- | ||
| | | 18 || Carved Pathway | ||
'''Landmark: Carved Pathway''' | |||
| GF | |||
|- | |- | ||
| | | 19 || Wheel Passage || GF | ||
|- | |- | ||
| | | 20 || Old Dojo | ||
'''Landmark: Old Dojo''' | |||
| GF | |||
|- | |- | ||
| | | 21 || Path to Peace || GF | ||
|- | |- | ||
| | | 22 || Cave Waterfall || GF | ||
|- | |- | ||
| | | 23 || Waterfall Backyard || GF | ||
|- | |- | ||
| | | 24 || Ascension Temple | ||
'''Landmark: Ascension Temple''' | |||
| GF | |||
|- | |- | ||
| | | 25 || Cave Inn EG || GF | ||
|- | |- | ||
| | | 26 || Cave Inn Mall || GF | ||
|- | |- | ||
| | | 27 || Cave Inn Store || GF | ||
|- | |- | ||
| | | 28 || Cave Inn Storage || GF | ||
|- | |- | ||
| | | 29 || Cave Inn 1F || 1F | ||
|- | |- | ||
| | | 30 || Owner's Room || 2F | ||
|- | |- | ||
| | | 31 || Henry's Hideout || GF | ||
|- | |- | ||
| | | 32 || Old Dojo ''(interior)''|| GF | ||
|- | |- | ||
| 33 || Dojo Tunnel || GF | |||
|- | |- | ||
| | | 34 || Meteor Cave || GF | ||
|- | |||
| 35 || Dream Pond || GF | |||
|- | |||
| 36 || Hidden Entrance || GF | |||
|- | |||
| 37 || Hidden Tunnel West || GF | |||
|- | |||
| 38 || Hidden Tunnel Center || GF | |||
|- | |||
| 39 || Hidden Tunnel East || GF | |||
|- | |- | ||
| | | 40 || Facility X Entrance || U1 | ||
|- | |- | ||
| | | 41 || Happy Place || U1 | ||
|- | |- | ||
| | | 42 || Stronger Together || U1 | ||
|} | |} | ||
{{clear}} | |||
=== Treasures === | |||
[[File:Sapphire_Ridge chest.png|thumb|upright=1.8|left|link=https://static.wikia.nocookie.net/crosscode_gamepedia/images/d/de/Sapphire_Ridge_chest.png|Click the map for a full-resolution image.]] | |||
{{TreasureList| | |||
{{TreasureList/entry|acc=1|type=gold|item=Precious Metal|amount=3|loc=Sapphire Tunnel}} | |||
{{TreasureList/entry|acc=2|type=default|item=Vanilla Ice Cream|amount=4|loc=Western Exit}} | |||
{{TreasureList/entry|acc=3|type=bronze|item=Pepper Night Tea|amount=6|loc=Western Exit}} | |||
{{TreasureList/entry|acc=4|type=bronze|item=Golden Bars|amount=3|loc=North West Path}} | |||
{{TreasureList/entry|acc=5|type=silver|item=Samurai Shell|amount=4|loc=North West Path}} | |||
{{TreasureList/entry|acc=6|type=bronze|item=Steel Bamboo|amount=4|loc=River Road}} | |||
{{TreasureList/entry|acc=7|type=gold|item=Tremor Engine|amount=1|loc=River Road}} | |||
{{TreasureList/entry|acc=8|type=bronze|item=Shrimp Risotto|amount=5|loc=River Road}} | |||
{{TreasureList/entry|acc=9|type=bronze|item=Raw Meat|amount=6|loc=The Cave Inn}} | |||
{{TreasureList/entry|acc=10|type=gold|item=Cross Sandwich|amount=4|loc=The Cave Inn|info=Access by following the south ledge from Bamboo Thicket.}} | |||
{{TreasureList/entry|acc=11|type=gold|item=Old Blueprint|amount=1|loc=Cave Inn Storage}} | |||
{{TreasureList/entry|acc=12|type=default|item=Sticky Web|amount=2|loc=Cave Inn 1F}} | |||
{{TreasureList/entry|acc=13|type=default|item=Veggie Set|amount=2|loc=Tranquil Bamboo}} | |||
{{TreasureList/entry|acc=14|type=bronze|item=Hoverpad|amount=3|loc=Tranquil Bamboo}} | |||
{{TreasureList/entry|acc=15|type=gold|item=Tengu Mask|amount=1|loc=Bamboo Thicket}} | |||
{{TreasureList/entry|acc=16|type=silver|item=Sharp Splitter|amount=2|loc=Bamboo Thicket}} | |||
{{TreasureList/entry|acc=17|type=gold|item=Bluefiber Robe|amount=1|loc=North East Path|info=After activating the jump pads in this area, go to North West Path and return along the hidden path.}} | |||
{{TreasureList/entry|acc=18|type=silver|item=Ronin Shell|amount=4|loc=North East Path}} | |||
{{TreasureList/entry|acc=19|type=bronze|item=Sticky Web|amount=6|loc=Spider Chasm}} | |||
{{TreasureList/entry|acc=20|type=gold|item=Tremor Engine|amount=1|loc=Spider Chasm}} | |||
{{TreasureList/entry|acc=21|type=gold|item=Burglar's Rope|amount=1|loc=High Ground}} | |||
{{TreasureList/entry|acc=22|type=silver|item=Mystery Grape|amount=5|loc=High Ground}} | |||
{{TreasureList/entry|acc=23|type=default|item=Hotsauce|amount=6|loc=Eroded Passage}} | |||
{{TreasureList/entry|acc=24|type=silver|item=Cobalt Crystal|amount=4|loc=Eroded Passage}} | |||
{{TreasureList/entry|acc=25|type=silver|item=Wrap Roll|amount=5|loc=Narrow Passage}} | |||
{{TreasureList/entry|acc=26|type=bronze|item=Spark Tin|amount=8|loc=Narrow Passage}} | |||
{{TreasureList/entry|acc=27|type=gold|item=Omni Lock|amount=1|loc=Flower Lake|info=Enter this area from both sides to unlock it.}} | |||
{{TreasureList/entry|acc=28|type=gold|item=Sonic Spike|amount=1|loc=Flower Lake|info=Enter this area from both sides to unlock it.}} | |||
{{TreasureList/entry|acc=29|type=silver|item=Echo Roll|amount=4|loc=Carved Pathway|info=Hit the switch reachable from the south entrance, then return through the east entrance to reach this chest.}} | |||
{{TreasureList/entry|acc=30|type=gold|item=Full Course|amount=4|loc=Carved Pathway}} | |||
{{TreasureList/entry|acc=31|type=bronze|item=Catalop Pellet|amount=8|loc=Carved Pathway|info=Only reachable from the south entrance.}} | |||
{{TreasureList/entry|acc=32|type=gold|item=Shining Bracer|amount=1|loc=Wheel Passage}} | |||
{{TreasureList/entry|acc=33|type=bronze|item=Sweet Berry Tea|amount=7|loc=Wheel Passage}} | |||
{{TreasureList/entry|acc=34|type=gold|item=Lead Boots|amount=1|loc=Old Dojo}} | |||
{{TreasureList/entry|acc=35|type=gold|item=Warkeeper|amount=1|loc=Old Dojo|info=Trapped by 2 [[Moon Beetle]]s and 2 [[Sun Beetle]]s in a very confined space.}} | |||
{{TreasureList/entry|acc=36|type=silver|item=Green Risotto|amount=3|loc=Old Dojo}} | |||
{{TreasureList/entry|acc=37|type=gold|item=Dream Globe|amount=1|loc=Dream Pond}} | |||
{{TreasureList/entry|acc=38|type=silver|item=Epic Metal|amount=2|loc=Ascension Temple}} | |||
{{TreasureList/entry|acc=39|type=silver|item=Golden Ticket|amount=3|loc=Ascension Temple}} | |||
{{TreasureList/entry|acc=40|type=gold|item=Antique Token|amount=1|loc=Ascension Temple}} | |||
{{TreasureList/entry|acc=41|type=bronze|item=Vanilla Ice Cream|amount=4|loc=Baton Pond|info=}} | |||
{{TreasureList/entry|acc=42|type=bronze|item=Energy Espresso|amount=4|loc=The Barracks|info=}} | |||
{{TreasureList/entry|acc=43|type=gold|item=Broken Chakrams|amount=1|loc=The Bellow|info=}} | |||
}} | |||
{{clear}} | |||
== | == Enemies == | ||
Due to the recent combat improvements that can be obtained from the [[Grand Krys'kajo]] temples, the enemies here can be a significant step up in difficulty from anything that's been seen before. | Due to the recent combat improvements that can be obtained from the [[Grand Krys'kajo]] temples, the enemies here can be a significant step up in difficulty from anything that's been seen before. | ||
{| class="wikitable" | {| class="wikitable" | ||
|+ [[Enemies]] of Sapphire Ridge | |||
! Name | ! Name | ||
! Sprite | |||
! Drops | |||
! Locations | ! Locations | ||
|- | |- | ||
| [[Fallfly]] | |||
| [[File:fallfly-sprite.png|center]] | | [[File:fallfly-sprite.png|center]] | ||
| | | {{ItemLink|Solid Bubble}}, {{ItemLink|Salty Ice Cream}}, {{ItemLink|Garnet}}<ref name="booster" /> | ||
| | | Sapphire Tunnel | ||
|- | |- | ||
| [[Sun Beetle]] | |||
| [[File:sun-beetle-sprite.png|center]] | | [[File:sun-beetle-sprite.png|center]] | ||
| | | {{ItemLink|Samurai Shell}}, {{ItemLink|Sharp Splitter}}, {{ItemLink|Lapis Lazuli}}<ref name="booster" /> | ||
| | | North West Path, Eroded Passage, River Road, The Cave Inn, Bamboo Thicket, North East Path, Flower Lake, Carved Pathway, Old Dojo, Old Dojo ''interior''<ref name="respawn" />, High Ground | ||
|- | |- | ||
| [[Moon Beetle]] | |||
| [[File:moon-beetle-sprite.png|center]] | | [[File:moon-beetle-sprite.png|center]] | ||
| | | {{ItemLink|Ronin Shell}}, {{ItemLink|Sharp Splitter}}, {{ItemLink|Mooncake}}, {{ItemLink|Lapis Lazuli}}<ref name="booster" /> | ||
| | | Western Exit, North West Path, Eroded Passage, River Road, The Cave Inn, Bamboo Thicket, North East Path, Spider Chasm, Flower Lake, Narrow Passage, Old Dojo, Old Dojo ''interior''<ref name="respawn" />, High Ground, Henry's Hideout<ref name="henry" /> | ||
|- | |- | ||
| [[Aranetarda]] | | [[Aranetarda]] | ||
| | | [[File:Aranetarda-sprite.png|center]] | ||
| {{ItemLink|Sticky Web}}, {{ItemLink|Wrap Roll}}, {{ItemLink|Lapis Lazuli}}<ref name="booster" /> | |||
| North West Path, Eroded Passage, North East Path, Spider Chasm, Flower Lake, Narrow Passage, Carved Pathway, Wheel Passage, Old Dojo, Nesting Grounds<ref name="challenge" />, High Ground, Henry's Hideout<ref name="henry" />, Baton Pond, The Barracks<ref name="pandza" /> | |||
|- | |- | ||
| [[Pandza]] | | [[Pandza]] | ||
| | | [[File:Pandza-sprite.png|center]] | ||
| {{ItemLink|Hoverpad}}, {{ItemLink|Green Risotto}}, {{ItemLink|Lapis Lazuli}}<ref name="booster" /> | |||
| North West Path, Bamboo Thicket, Carved Pathway, Wheel Passage, High Ground | |||
|- | |||
| [[Kamikater]] | |||
| [[File:Kamikater-sprite.png|center]] | |||
| None | |||
| Eroded Passage, Spider Chasm, Narrow Passage, Wheel Passage, The Barracks, The Bellow<ref name="pandza" /> | |||
|- | |||
| [[Bamboo Fountain]] | |||
| [[File:Bamboo-fountain-sprite.png|center]] | |||
| None | |||
| Flower Lake | |||
|- | |||
| [[War Webster]] | |||
| [[File:War-webster-sprite.png|center]] | |||
| {{ItemLink|Sticky Web}}<ref name="norank" /> | |||
| Nesting Grounds<ref name="challenge" />, The Barracks<ref name="pandza" />, The Bellow<ref name="pandza" /> | |||
|- | |||
| [[Twilight Master]] ([[Bosses|boss]]) | |||
| [[File:Twilight-master-sprite.png|center]] | |||
| {{ItemLink|Twilight Shard}} | |||
| Old Dojo ''interior''<ref name="respawn" /> | |||
|- | |||
| [[Pandza Mk. II]] (boss) | |||
| [[File:Pandza-mk-ii-sprite.png|center]] | |||
| {{ItemLink|Hoverpad}} | |||
| The Bellow<ref name="pandza" /> | |||
|- | |||
| [[Henry]] (boss) | |||
| [[File:Henry-sprite.png|center]] | |||
| None | |||
| Henry's Hideout<ref name="henry" /> | |||
|} | |} | ||
<references> | |||
<ref name="booster">With {{ItemLink|Ridge Booster}} enabled</ref> | |||
<ref name="respawn">Does not respawn</ref> | |||
<ref name="henry">Spawns during [[Henry Trailblazing]] quest</ref> | |||
<ref name="challenge">Spawns in the [[Ring of Spiders]] challenge</ref> | |||
<ref name="pandza">Spawns before or during the [[Pandza Mk. II]] boss fight, and does not respawn after</ref> | |||
<ref name="norank">Additional drops not obtainable because rank is disabled during this encounter</ref> | |||
</references> | |||
== Botanics == | == Botanics == | ||
| Line 139: | Line 289: | ||
|unlockLocation=4 | |unlockLocation=4 | ||
|items= | |items= | ||
* {{ItemLink| | * {{ItemLink|Steel Bamboo}} (45 %) | ||
* {{ItemLink| | * {{ItemLink|Catalop Pellet}} (55 %) | ||
|unlockDrops=8}} | |unlockDrops=8}} | ||
{{ItemDestroyable|name=Alpha Ridge Flower | {{ItemDestroyable|name=Alpha Ridge Flower | ||
| Line 164: | Line 314: | ||
|unlockLocation=4 | |unlockLocation=4 | ||
|items= | |items= | ||
* {{ItemLink| | * {{ItemLink|Mystery Grape}} (45 %) | ||
* {{ItemLink| | * {{ItemLink|Pink Petal}} (55 %) | ||
|unlockDrops=8}} | |unlockDrops=8}} | ||
{{ItemDestroyable|name=Alpha Crystal | {{ItemDestroyable|name=Alpha Crystal | ||
| Line 189: | Line 339: | ||
|unlockLocation=4 | |unlockLocation=4 | ||
|items= | |items= | ||
* {{ItemLink| | * {{ItemLink|Cobalt Crystal}} (45 %) | ||
* {{ItemLink| | * {{ItemLink|Spark Tin}} (55 %) | ||
|unlockDrops=8}} | |unlockDrops=8}} | ||
|} | |} | ||
== | == Traders == | ||
Sapphire Ridge has a sizeable trader hub located in the Cave Inn Mall. | |||
* '''Sapphire Sandwiches''' – Located in Cave Inn Mall | |||
{| class="wikitable sortable" | |||
! Offered Item | |||
! Credits | |||
! Requisite Items | |||
|- | |||
| {{ItemLink|Chef Sandwich|showFoodIcon=1}} | |||
| 950 | |||
| 2x {{ItemLink|Veggie Set}}, 2x {{ItemLink|Fruit Set}} | |||
|- | |||
| {{ItemLink|Mega-Sandwich|showFoodIcon=1}} | |||
| 2100 | |||
| 4x {{ItemLink|Veggie Set}}, 4x {{ItemLink|Fruit Set}}, {{ItemLink|Spice Set}} | |||
|- | |||
| {{ItemLink|Cross Sandwich|showFoodIcon=1}} | |||
| 5000 | |||
| 7x {{ItemLink|Veggie Set}}, 7x {{ItemLink|Fruit Set}}, 3x {{ItemLink|Spice Set}} | |||
|} | |||
* '''Sapphire Tea''' – Located in Cave Inn Mall | |||
{| class="wikitable sortable" | |||
! Offered Item | |||
! Credits | |||
! Requisite Items | |||
|- | |||
| {{ItemLink|Sweet Berry Tea|showFoodIcon=1}} | |||
| 1050 | |||
| {{ItemLink|Veggie Set}}, {{ItemLink|Fruit Set}}, {{ItemLink|Spice Set}} | |||
|- | |||
| {{ItemLink|Pepper Night Tea|showFoodIcon=1}} | |||
| 3400 | |||
| 3x {{ItemLink|Veggie Set}}, 3x {{ItemLink|Fruit Set}}, 3x {{ItemLink|Spice Set}} | |||
|} | |||
* '''Sapphire Buffs 1''' – Located in Cave Inn Mall | |||
{| class="wikitable sortable" | |||
! Offered Item | |||
! Credits | |||
! Requisite Items | |||
|- | |||
| {{ItemLink|Tofu Cracker|showFoodIcon=1}} | |||
| 550 | |||
| 2x {{ItemLink|Veggie Set}} | |||
|- | |||
| {{ItemLink|Cheese Cracker|showFoodIcon=1}} | |||
| 1350 | |||
| 4x {{ItemLink|Veggie Set}}, {{ItemLink|Spice Set}} | |||
|- | |||
| {{ItemLink|Veggie Wraps|showFoodIcon=1}} | |||
| 550 | |||
| 2x {{ItemLink|Veggie Set}} | |||
|- | |||
| {{ItemLink|Veggie Burger|showFoodIcon=1}} | |||
| 1350 | |||
| 4x {{ItemLink|Veggie Set}}, {{ItemLink|Spice Set}} | |||
|} | |||
* '''Sapphire Buffs 2''' – Located in Cave Inn Mall | |||
{| class="wikitable sortable" | |||
! Offered Item | |||
! Credits | |||
! Requisite Items | |||
|- | |||
| {{ItemLink|Flaming Bun|showFoodIcon=1}} | |||
| 550 | |||
| 2x {{ItemLink|Fruit Set}} | |||
|- | |||
| {{ItemLink|Blazing Bun|showFoodIcon=1}} | |||
| 1350 | |||
| 4x {{ItemLink|Fruit Set}}, {{ItemLink|Spice Set}} | |||
|- | |||
| {{ItemLink|Fruit Salad|showFoodIcon=1}} | |||
| 550 | |||
| 2x {{ItemLink|Fruit Set}} | |||
|- | |||
| {{ItemLink|Fruit Pie|showFoodIcon=1}} | |||
| 1350 | |||
| 4x {{ItemLink|Fruit Set}}, {{ItemLink|Spice Set}} | |||
|} | |||
* '''Sapphire Weapons''' – Located in Cave Inn Mall | |||
{| class="wikitable sortable" | |||
! Offered Item | |||
! Credits | |||
! Requisite Items | |||
|- | |||
| {{ItemLink|Survivor's Blade}} | |||
| 80000 | |||
| 19x {{ItemLink|Dirty Rubble}}, 9x {{ItemLink|Catalop Pellet}}, 4x {{ItemLink|Cobalt Crystal}}, 2x {{ItemLink|Ronin Shell}} | |||
|- | |||
| {{ItemLink|Marksmen Trigger}} | |||
| 83000 | |||
| 11x {{ItemLink|Pink Petal}}, 7x {{ItemLink|Sticky Web}}, 2x {{ItemLink|Sharp Splitter}}, 4x {{ItemLink|Metal Down}} | |||
|- | |||
| {{ItemLink|Panzer Fist}} | |||
| 87000 | |||
| 5x {{ItemLink|Steel Bamboo}}, 2x {{ItemLink|Precious Metal}}, 4x {{ItemLink|Samurai Shell}}, {{ItemLink|Hoverpad}} | |||
|- | |||
| {{ItemLink|Shuddering Cleaver}} | |||
| 99999 | |||
| {{ItemLink|Twitching Slicer}}, 4x {{ItemLink|Sharp Splitter}}, 3x {{ItemLink|Living Bolt}}, 3x {{ItemLink|Tremor Engine}} | |||
|} | |||
* '''Sapphire Head''' – Located in Cave Inn Mall | |||
{| class="wikitable sortable" | |||
! Offered Item | |||
! Credits | |||
! Requisite Items | |||
|- | |||
| {{ItemLink|Hardhead Hat}} | |||
| 83000 | |||
| 18x {{ItemLink|Green Arbor}}, 8x {{ItemLink|Catalop Pellet}}, 5x {{ItemLink|Refined Metal}}, 3x {{ItemLink|Samurai Shell}} | |||
|- | |||
| {{ItemLink|Scouting Visor}} | |||
| 87000 | |||
| 15x {{ItemLink|Spark Tin}}, 7x {{ItemLink|Mystery Grape}}, 3x {{ItemLink|Hoverpad}}, 4x {{ItemLink|Glow Pear}} | |||
|} | |||
* '''Sapphire Torso''' – Located in Cave Inn Mall | |||
{| class="wikitable sortable" | |||
! Offered Item | |||
! Credits | |||
! Requisite Items | |||
|- | |||
| {{ItemLink|Shadowy Cloak}} | |||
| 83000 | |||
| 16x {{ItemLink|Green Arbor}}, 16x {{ItemLink|Dirty Rubble}}, 3x {{ItemLink|Ronin Shell}}, 11x {{ItemLink|Sticky Web}} | |||
|- | |||
| {{ItemLink|Plated Plate}} | |||
| 87000 | |||
| 6x {{ItemLink|Spark Tin}}, 3x {{ItemLink|Precious Metal}}, 4x {{ItemLink|Samurai Shell}}, 4x {{ItemLink|Ronin Shell}} | |||
|} | |||
* '''Sapphire Legs''' – Located in Cave Inn Mall | |||
{| class="wikitable sortable" | |||
! Offered Item | |||
! Credits | |||
! Requisite Items | |||
|- | |||
| {{ItemLink|Bamboots}} | |||
| 83000 | |||
| 12x {{ItemLink|Pink Petal}}, 6x {{ItemLink|Steel Bamboo}}, 4x {{ItemLink|Sticky Web}}, 3x {{ItemLink|Power Spinach}} | |||
|- | |||
| {{ItemLink|Brave Anchors}} | |||
| 87000 | |||
| 22x {{ItemLink|Blue Grass}}, 8x {{ItemLink|Cobalt Crystal}}, 8x {{ItemLink|Mystery Grape}}, 2x {{ItemLink|Samurai Shell}} | |||
|} | |||
* '''Sapphire Metals''' – Located in Cave Inn Mall | |||
{| class="wikitable sortable" | |||
! Offered Item | |||
! Credits | |||
! Requisite Items | |||
|- | |||
| {{ItemLink|Junk Metal}} | |||
| 90 | |||
| {{ItemLink|Blue Grass}}, {{ItemLink|Green Arbor}}, 2x {{ItemLink|Dirty Rubble}} | |||
|- | |||
| {{ItemLink|Refined Metal}} | |||
| 450 | |||
| 2x {{ItemLink|Junk Metal}}, {{ItemLink|Pink Petal}}, {{ItemLink|Catalop Pellet}}, 2x {{ItemLink|Spark Tin}} | |||
|- | |||
| {{ItemLink|Precious Metal}} | |||
| 2500 | |||
| 2x {{ItemLink|Refined Metal}}, 2x {{ItemLink|Mystery Grape}}, 2x {{ItemLink|Steel Bamboo}} | |||
|- | |||
| {{ItemLink|Precious Metal}} | |||
| 2500 | |||
| 2x {{ItemLink|Refined Metal}}, {{ItemLink|Mystery Grape}}, {{ItemLink|Steel Bamboo}}, 2x {{ItemLink|Cobalt Crystal}} | |||
|} | |||
* '''Sapphire Sets''' – Located in Cave Inn Mall | |||
{| class="wikitable sortable" | |||
! Offered Item | |||
! Credits | |||
! Requisite Items | |||
|- | |||
| {{ItemLink|Veggie Set}} | |||
| 100 | |||
| 2x {{ItemLink|Blue Grass}}, {{ItemLink|Catalop Pellet}} | |||
|- | |||
| {{ItemLink|Fruit Set}} | |||
| 100 | |||
| 2x {{ItemLink|Green Arbor}}, {{ItemLink|Pink Petal}} | |||
|- | |||
| {{ItemLink|Spice Set}} | |||
| 250 | |||
| {{ItemLink|Mystery Grape}}, {{ItemLink|Steel Bamboo}} | |||
|} | |||
* '''Sapphire Loot''' – Located in Cave Inn Mall | |||
{| class="wikitable sortable" | |||
! Offered Item | |||
! Credits | |||
! Requisite Items | |||
|- | |||
| {{ItemLink|Samurai Shell}} | |||
| 2350 | |||
| 2x {{ItemLink|Sticky Web}}, 3x {{ItemLink|Green Arbor}}, 2x {{ItemLink|Catalop Pellet}} | |||
|- | |||
| {{ItemLink|Ronin Shell}} | |||
| 2350 | |||
| 2x {{ItemLink|Sticky Web}}, 3x {{ItemLink|Blue Grass}}, 2x {{ItemLink|Pink Petal}} | |||
|- | |||
| {{ItemLink|Hoverpad}} | |||
| 3600 | |||
| {{ItemLink|Samurai Shell}}, {{ItemLink|Ronin Shell}}, {{ItemLink|Mystery Grape}}, {{ItemLink|Steel Bamboo}} | |||
|- | |||
| {{ItemLink|Sharp Splitter}} | |||
| 5100 | |||
| 2x {{ItemLink|Samurai Shell}}, 2x {{ItemLink|Ronin Shell}}, {{ItemLink|Precious Metal}}, 2x {{ItemLink|Cobalt Crystal}} | |||
|} | |||
* '''Rusty''' – Located in Cave Inn 1F (after bringing him the {{ItemLink|Old Blueprint}}) | |||
{| class="wikitable sortable" | |||
! Offered Item | |||
! Credits | |||
! Requisite Items | |||
|- | |||
| {{ItemLink|Old Geta}} | |||
| 10101 | |||
| {{ItemLink|Geta Wood}}, {{ItemLink|Geta Straps}}, {{ItemLink|Geta Glue}}, {{ItemLink|Twilight Shard}} | |||
|} | |||
== Shops == | |||
There are two shops in Sapphire Ridge: an item shop in the Cave Inn Store, and an equipment shop in the Cave Inn Mall. | There are two shops in Sapphire Ridge: an item shop in the Cave Inn Store, and an equipment shop in the Cave Inn Mall. | ||
{| class="wikitable" | [[File:SR-Item-Shop.png|right|thumb|Good Items]] | ||
* '''Good Items''' – Located in the Cave Inn Store | |||
{| class="wikitable sortable" | |||
! Item | |||
! Credits | |||
|- | |||
| {{ItemLink|Sandwich|showFoodIcon=1}} || 100 | |||
|- | |||
| {{ItemLink|Hi-Sandwich|showFoodIcon=1}} || 300 | |||
|- | |||
| {{ItemLink|Green Leaf Tea|showFoodIcon=1}} || 250 | |||
|- | |||
| {{ItemLink|Just Water|showFoodIcon=1}} || 222 | |||
|- | |||
| {{ItemLink|Kebab Roll|showFoodIcon=1}} || 650 | |||
|- | |||
| {{ItemLink|Meaty Risotto|showFoodIcon=1}} || 650 | |||
|- | |||
| {{ItemLink|Spicy Bun|showFoodIcon=1}} || 200 | |||
|- | |||
| {{ItemLink|Fruit Drink|showFoodIcon=1}} || 200 | |||
|- | |||
| {{ItemLink|Rice Cracker|showFoodIcon=1}} || 200 | |||
|- | |||
| {{ItemLink|Veggie Sticks|showFoodIcon=1}} || 200 | |||
|- | |||
| {{ItemLink|Bergen Ice Cream|showFoodIcon=1}} || 450 | |||
|- | |||
| {{ItemLink|Sweet Lemonjuice|showFoodIcon=1}} || 450 | |||
|- | |||
| {{ItemLink|Cup o' Coffee|showFoodIcon=1}} || 450 | |||
|- | |||
| {{ItemLink|Salted Peanuts|showFoodIcon=1}} || 450 | |||
|- | |||
| {{ItemLink|Snack Mix|showFoodIcon=1}} || 350 | |||
|} | |||
[[File:SR-Equip-Shop.png|right|thumb|Sapphire Arsenal]] | |||
* '''Sapphire Arsenal''' – Located in the Cave Inn Mall | |||
{| class="wikitable sortable" | |||
! Item | |||
! Credits | |||
|- | |||
| {{ItemLink|Titan Goggles}} || 46750 | |||
|- | |||
| {{ItemLink|Cobalt Goggles}} || 71350 | |||
|- | |||
| {{ItemLink|Titan Edge}} || 46475 | |||
|- | |||
| {{ItemLink|Cobalt Edge}} || 70975 | |||
|- | |||
| {{ItemLink|Titan Mail}} || 46925 | |||
|- | |- | ||
| {{ItemLink|Cobalt Mail}} || 71925 | |||
|- | |- | ||
| | | {{ItemLink|Titan Boots}} || 46750 | ||
|- | |- | ||
| | | {{ItemLink|Cobalt Boots}} || 71350 | ||
|} | |} | ||
== | == Quests == | ||
Sapphire Ridge | The [[quests]] that can be started in Sapphire Ridge are: | ||
* [[Trials of the Golden Bugs]] | |||
** [[Trial of Vigor]] | |||
** [[Trial of Agility]] | |||
** [[Trial of Patience]] | |||
** [[Trial of Insight]] | |||
* [[Henry Trailblazing]] | |||
* [[Last Minute Help Needed]] | |||
* [[An Unfortunate Series of Features]] | |||
== A New Home DLC Changes == | |||
{{Location_Card|name=Sapphire Ridge | |||
|color=#403380 | |||
|image=File:Sapphire Ridge.png | |||
|description=The tranquil ridge filled with bamboo structures and hidden paths. | |||
|room_count=43 | |||
|quest_count=8 | |||
|treasure_default = 4 | |||
|treasure_key = 0 | |||
|treasure_masterkey = 0 | |||
|treasure_bronze = 12 | |||
|treasure_silver = 10 | |||
|treasure_gold = 17 | |||
|trader_count=12}} | |||
The [[A New Home]] DLC includes the opening of the Ascension Temple in Sapphire Ridge, which contains a teleporter leading to [[Ku'lero Temple]]. [[Sao]] can also be encountered and fought here. | |||
=== Layout === | |||
The DLC adds a single room to the area, The Rise, which is the interior of the Ascension Temple. | |||
=== Connecting Regions === | |||
* [[Autumn's Fall]] (via Sapphire Tunnel) | |||
* [[Vermillion Wasteland]] (via Hidden Tunnel East) | |||
* [[Rhombus Square]] (via teleporter at The Cave Inn) | |||
* [[Old Hideout]] (via teleporters in Waterfall Backyard and Old Dojo) | |||
* [[Ku'lero Temple]] (via teleporter in The Rise) | |||
=== Map === | |||
[[File:Sapphire-ridge-map-dlc.png|thumb|upright=1.8|left|link=https://static.wikia.nocookie.net/crosscode_gamepedia/images/3/35/Sapphire-ridge-map-dlc.png|For the full-resolution image, click the map.]] | |||
{| class="wikitable sortable" | {| class="wikitable sortable" | ||
|+ Areas of Sapphire Ridge | |||
|- | |||
! # | |||
! Area Name | |||
! Floor | |||
|- | |||
| 1 || Sapphire Tunnel || GF | |||
|- | |||
| 2 || Western Exit | |||
'''Landmark: Western Exit''' | |||
| GF | |||
|- | |||
| 3 || North West Path || GF | |||
|- | |||
| 4 || River Road || GF | |||
|- | |||
| 5 || The Cave Inn | |||
'''Landmark: The Cave Inn''' | |||
| GF, 1F, 2F | |||
|- | |||
| 6 || Tranquil Bamboo || GF | |||
|- | |||
| 7 || Baton Pond || GF | |||
|- | |||
| 8 || The Barracks || GF | |||
|- | |||
| 9 || The Bellow || GF | |||
|- | |||
| 10 || Bamboo Thicket || GF | |||
|- | |||
| 11 || North East Path || GF | |||
|- | |||
| 12 || Spider Chasm || GF | |||
|- | |||
| 13 || High Ground || GF | |||
|- | |||
| 14 || Flower Lake || GF | |||
|- | |||
| 15 || Narrow Passage || GF | |||
|- | |||
| 16 || Eroded Passage || GF | |||
|- | |||
| 17 || Nesting Grounds || GF | |||
|- | |||
| 18 || Carved Pathway | |||
'''Landmark: Carved Pathway''' | |||
| GF | |||
|- | |||
| 19 || Wheel Passage || GF | |||
|- | |||
| 20 || Old Dojo | |||
'''Landmark: Old Dojo''' | |||
| GF | |||
|- | |||
| 21 || Path to Peace || GF | |||
|- | |||
| 22 || Cave Waterfall || GF | |||
|- | |||
| 23 || Waterfall Backyard || GF | |||
|- | |||
| 24 || Ascension Temple | |||
'''Landmark: Ascension Temple''' | |||
| GF | |||
|- | |||
| 25 || Cave Inn EG || GF | |||
|- | |||
| 26 || Cave Inn Mall || GF | |||
|- | |||
| 27 || Cave Inn Store || GF | |||
|- | |||
| 28 || Cave Inn Storage || GF | |||
|- | |||
| 29 || Cave Inn 1F || 1F | |||
|- | |||
| 30 || Owner's Room || 2F | |||
|- | |||
| 31 || Henry's Hideout || GF | |||
|- | |- | ||
| 32 || Old Dojo ''(interior)''|| GF | |||
|- | |- | ||
| | | 33 || Dojo Tunnel || GF | ||
| | |||
| | |||
|- | |- | ||
| | | 34 || Meteor Cave || GF | ||
| Cave | |||
|- | |- | ||
| | | 35 || Dream Pond || GF | ||
| | |||
| | |||
|- | |- | ||
| | | 36 || Hidden Entrance || GF | ||
| | |||
| | |||
|- | |- | ||
| | | 37 || Hidden Tunnel West || GF | ||
| | |||
| | |||
|- | |- | ||
| | | 38 || Hidden Tunnel Center || GF | ||
| | |||
| | |||
|- | |- | ||
| | | 39 || Hidden Tunnel East || GF | ||
| | |||
| | |||
|- | |- | ||
| | | 40 || Facility X Entrance || U1 | ||
| | |||
| | |||
|- | |- | ||
| | | 41 || Happy Place || U1 | ||
| | |||
| | |||
|- | |- | ||
| | | 42 || Stronger Together || U1 | ||
| | |||
| | |||
|- | |- | ||
| | | 43 || The Rise || GF | ||
| | |||
| | |||
|} | |} | ||
{{clear}} | |||
== | === Enemies === | ||
The | {| class="wikitable" | ||
|+ [[Enemies]] of Sapphire Ridge | |||
! Name | |||
! Sprite | |||
! Drops | |||
! Locations | |||
|- | |||
| [[Sao]] | |||
| [[File:Sao-sprite.png|center]] | |||
| None | |||
| North West Path<ref name="respawn" /> | |||
|} | |||
<references> | |||
<ref name="respawn>Does not respawn.</ref> | |||
</references> | |||
== Role in the Plot == | |||
=== In CrossWorlds === | |||
Sapphire Ridge is the furthest location that humanity has been able to unlock in the [[Track of the Ancients]]. As such, it is the final destination for [[Seeker]]s, who arrive here after demonstrating mastery of all four elements. Here, they are challenged to the [[Trials of the Golden Bugs]], a final series of trials organized by the mysterious [[Twilight Master]]. After completing the trials, they receive the {{ItemLink|Meteor Shade}}, signaling that they have reached the endgame of CrossWorlds. The Shade unlocks the city of [[Rhombus Square]] with all its extra content, as well as the northern part of Sapphire Ridge, containing the Ascension Temple, which is still inaccessible. | |||
During the [[A New Home]] DLC, CrossWorlds receives some major updates. Humanity has uncovered the final steps in the Track of the Ancients, and the Ascension Temple is finally unlocked, revealing a teleporter to [[Ku'lero Temple]], the final dungeon of CrossWorlds, where the [[Secret of the Ancients]] is hidden. | |||
=== In CrossCode === | |||
Over the course of CrossCode, several of [[Lea]]'s dream memories feature Sapphire Ridge, leading [[Sergey Asimov|Sergey]] to speculate that a hidden area is located here. After reaching the area and completing the CrossWorlds plot, they discover a secret teleporter in Waterfall Backyard, hidden behind several pathfinding puzzles, that leads to the [[Old Hideout]]. | |||
After learning from [[Satoshi Sakai|Satoshi]] that the area also hides an entrance to [[Vermillion Wasteland]], Lea returns here, and Sergey is able to uncover the entrance at the Old Dojo. When Lea and her friends decide to storm Vermillion Wasteland and attempt to recover the [[Evotar Server]], they meet here and use the hidden tunnel to access the Wasteland. | |||
[[ | In the [[A New Home]] DLC, [[Toby Tremblay|C'tron]] returns here after remembering his past, and finds the tunnel to Vermillion Wasteland blocked off. When Lea and Sergey follow him here, he confirms that he was a spy for [[Benedict Sidwell|Sidwell]]. Later, Lea and her friends join the crowds of players taking part in the grand opening of [[Ku'lero Temple]]. | ||
== Trophies == | |||
{{Main|Trophies}} | |||
{{ | ;There is no Cow Level | ||
:Visit the Perfectly Normal Bamboo at The Cave Inn. | |||
;The Dawn's Blade | |||
:Defeat the [[Twilight Master]]. | |||
;That was... Unexpected | |||
:Defeat [[Henry]]. | |||
;I hate Spiders! | |||
:Survive 5 minutes in the [[Ring of Spiders]] without any party members. | |||
;Sapphire Landmarks | |||
:Find all landmarks in Sapphire Ridge. | |||
;Sapphire Scavenger | |||
:Obtain all chests in Sapphire Ridge; see [[#Treasures]]. | |||
;Pierce through the Heaven | |||
:Obtain the {{ItemLink|Infinity Spiral Drill}} at the end of [[The Book of an Old Man]] quest. | |||
{{ | |||
== Challenges and secrets == | |||
Currently there is only one challenge available in the Sapphire Ridge: [[Ring of Spiders]], a challenge that tests both skill and endurance by letting you battle infinitely respawning [[Aranetarda]]s and [[War Webster]]s for a high score. | |||
The area also has a few secrets: The second time you can encounter [[Fan Cameos#Code Knight|Code Knight]] is in Henry's Hideout. There is also Baton Pond, a hidden area containing a boss fight that is tied to the [[A Promise Is a Promise 5]] quest but can be accessed without the quest. A hint to locating the easily-overlooked path leading here can be found on a bookshelf in Books 'n Worms in [[Rhombus Square]]. | |||
[[ | |||
Latest revision as of 20:27, 25 September 2021
Sapphire Ridge is a location in CrossWorlds. It is an area of caves and bamboo forests with Japanese-influenced architecture that can be found on the east half of the Croissant. It is a high-level area that can only be accessed after obtaining all four Elements. The area closely resembles the Old Hideout area from the prologue, and is likely connected to it.
| Sapphire Ridge |
|---|
|
Sapphire Ridge is a system of hills located to the east of Shadoon. It's covered in eternal night by a strange weather phenomenon that is currently researched by the United Voyager Nation. Many years ago miners carved deep into the hills to unearth the valuable Cobalt Ore. Although not much was found, the miners uncovered many hidden paths that lead to the north of the area. Otherwise Sapphire Ridge is rather rural as most paths lead through the cave-systems up Ascension Temple. The south houses a hostel called the Cave Inn, which counts among the oldest structures built by humans on Shadoon. |
| -Encyclopedia entry |
Layout
The area is a complex tangle of crisscrossing pathways and caves. The main features of note are the Cave Inn Mall to the south, which serves as the main hub of the area, and the Old Dojo to the north.
Most of the map is immediately accessible, but the northern area past Path to Peace is notably locked until the ![]() Meteor Shade is collected. There's also a few areas locked behind quests and plot progression: Henry's Hideout is reached during the Henry Trailblazing quest, the interior of the Old Dojo is reached during the Trials of the Golden Bugs quest, the Hidden Entrance and Tunnel are unlocked late in the game's plot, and Facility X can only be reached through the puzzle following the platform-exclusive quests.
Meteor Shade is collected. There's also a few areas locked behind quests and plot progression: Henry's Hideout is reached during the Henry Trailblazing quest, the interior of the Old Dojo is reached during the Trials of the Golden Bugs quest, the Hidden Entrance and Tunnel are unlocked late in the game's plot, and Facility X can only be reached through the puzzle following the platform-exclusive quests.
Connecting regions
- Autumn's Fall (via Sapphire Tunnel)
- Vermillion Wasteland (via Hidden Tunnel East)
- Rhombus Square (via teleporter at The Cave Inn)
- Old Hideout (via teleporters in Waterfall Backyard and Old Dojo)
Map
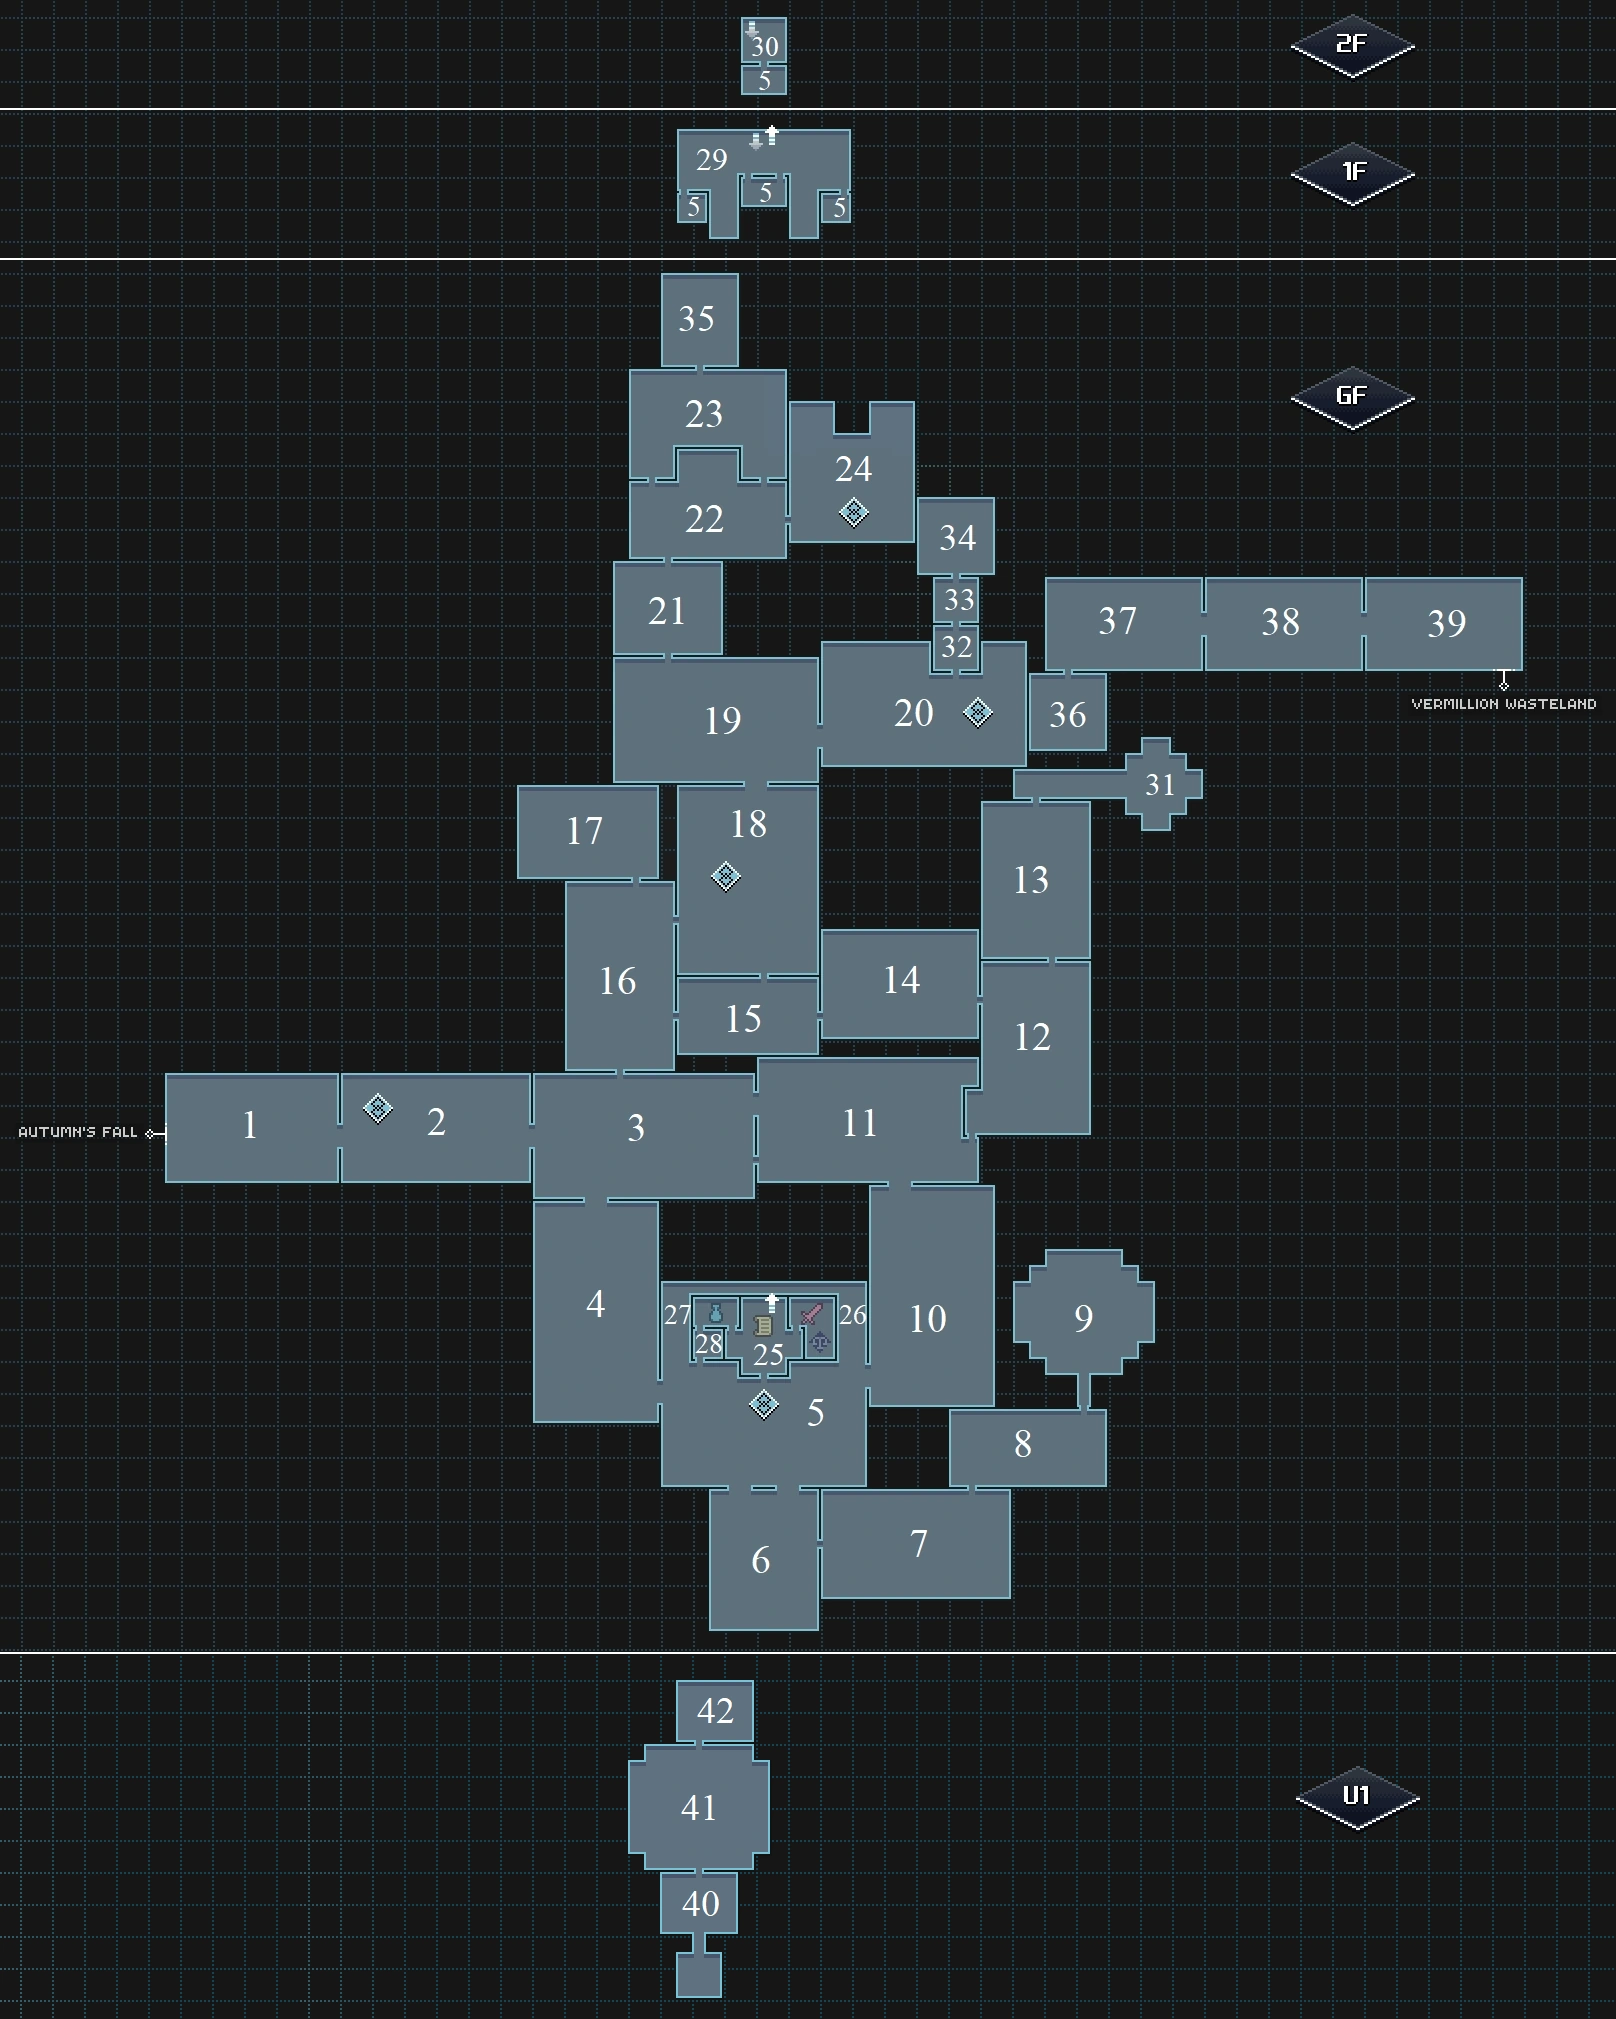
| # | Area Name | Floor |
|---|---|---|
| 1 | Sapphire Tunnel | GF |
| 2 | Western Exit
Landmark: Western Exit |
GF |
| 3 | North West Path | GF |
| 4 | River Road | GF |
| 5 | The Cave Inn
Landmark: The Cave Inn |
GF, 1F, 2F |
| 6 | Tranquil Bamboo | GF |
| 7 | Baton Pond | GF |
| 8 | The Barracks | GF |
| 9 | The Bellow | GF |
| 10 | Bamboo Thicket | GF |
| 11 | North East Path | GF |
| 12 | Spider Chasm | GF |
| 13 | High Ground | GF |
| 14 | Flower Lake | GF |
| 15 | Narrow Passage | GF |
| 16 | Eroded Passage | GF |
| 17 | Nesting Grounds | GF |
| 18 | Carved Pathway
Landmark: Carved Pathway |
GF |
| 19 | Wheel Passage | GF |
| 20 | Old Dojo
Landmark: Old Dojo |
GF |
| 21 | Path to Peace | GF |
| 22 | Cave Waterfall | GF |
| 23 | Waterfall Backyard | GF |
| 24 | Ascension Temple
Landmark: Ascension Temple |
GF |
| 25 | Cave Inn EG | GF |
| 26 | Cave Inn Mall | GF |
| 27 | Cave Inn Store | GF |
| 28 | Cave Inn Storage | GF |
| 29 | Cave Inn 1F | 1F |
| 30 | Owner's Room | 2F |
| 31 | Henry's Hideout | GF |
| 32 | Old Dojo (interior) | GF |
| 33 | Dojo Tunnel | GF |
| 34 | Meteor Cave | GF |
| 35 | Dream Pond | GF |
| 36 | Hidden Entrance | GF |
| 37 | Hidden Tunnel West | GF |
| 38 | Hidden Tunnel Center | GF |
| 39 | Hidden Tunnel East | GF |
| 40 | Facility X Entrance | U1 |
| 41 | Happy Place | U1 |
| 42 | Stronger Together | U1 |
Treasures
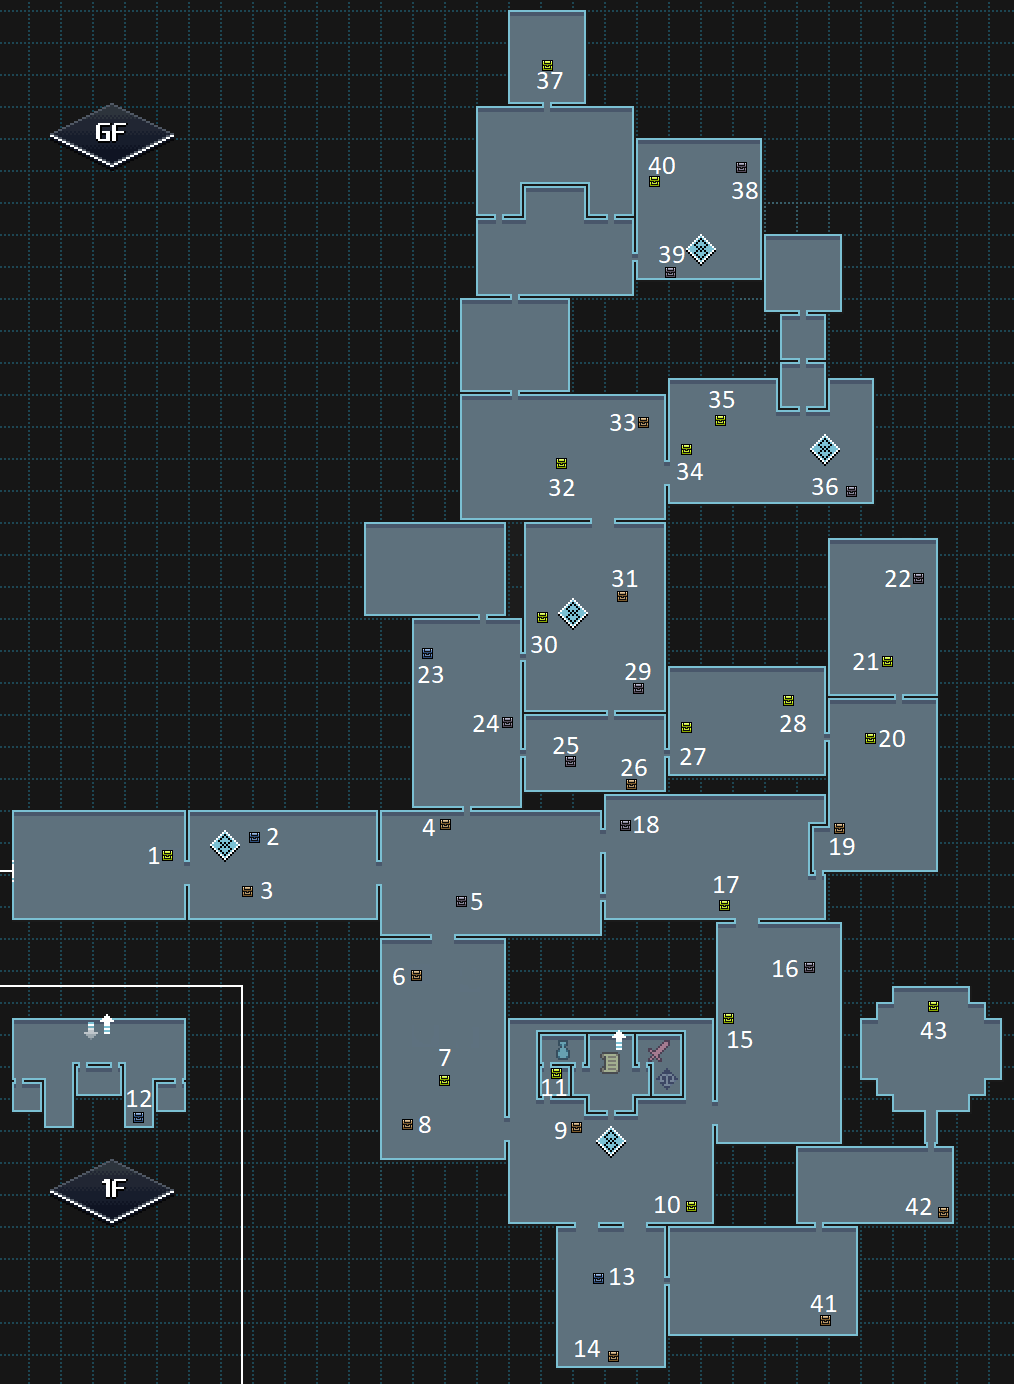
| Acc. | Type | Contains | Location | Info |
|---|---|---|---|---|
| 1 | 3 × |
Sapphire Tunnel | ||
| 2 | 4 × |
Western Exit | ||
| 3 | 6 × |
Western Exit | ||
| 4 | 3 × |
North West Path | ||
| 5 | 4 × |
North West Path | ||
| 6 | 4 × |
River Road | ||
| 7 | 1 × |
River Road | ||
| 8 | 5 × |
River Road | ||
| 9 | 6 × |
The Cave Inn | ||
| 10 | 4 × |
The Cave Inn | Access by following the south ledge from Bamboo Thicket. | |
| 11 | 1 × |
Cave Inn Storage | ||
| 12 | 2 × |
Cave Inn 1F | ||
| 13 | 2 × |
Tranquil Bamboo | ||
| 14 | 3 × |
Tranquil Bamboo | ||
| 15 | 1 × LV53 |
Bamboo Thicket | ||
| 16 | 2 × |
Bamboo Thicket | ||
| 17 | 1 × LV51 |
North East Path | After activating the jump pads in this area, go to North West Path and return along the hidden path. | |
| 18 | 4 × |
North East Path | ||
| 19 | 6 × |
Spider Chasm | ||
| 20 | 1 × |
Spider Chasm | ||
| 21 | 1 × LV57 |
High Ground | ||
| 22 | 5 × |
High Ground | ||
| 23 | 6 × |
Eroded Passage | ||
| 24 | 4 × |
Eroded Passage | ||
| 25 | 5 × |
Narrow Passage | ||
| 26 | 8 × |
Narrow Passage | ||
| 27 | 1 × |
Flower Lake | Enter this area from both sides to unlock it. | |
| 28 | 1 × LV57 |
Flower Lake | Enter this area from both sides to unlock it. | |
| 29 | 4 × |
Carved Pathway | Hit the switch reachable from the south entrance, then return through the east entrance to reach this chest. | |
| 30 | 4 × |
Carved Pathway | ||
| 31 | 8 × |
Carved Pathway | Only reachable from the south entrance. | |
| 32 | 1 × LV59 |
Wheel Passage | ||
| 33 | 7 × |
Wheel Passage | ||
| 34 | 1 × LV58 |
Old Dojo | ||
| 35 | 1 × LV60 |
Old Dojo | Trapped by 2 Moon Beetles and 2 Sun Beetles in a very confined space. | |
| 36 | 3 × |
Old Dojo | ||
| 37 | 1 × |
Dream Pond | ||
| 38 | 2 × |
Ascension Temple | ||
| 39 | 3 × |
Ascension Temple | ||
| 40 | 1 × |
Ascension Temple | ||
| 41 | 4 × |
Baton Pond | ||
| 42 | 4 × |
The Barracks | ||
| 43 | 1 × LV01 |
The Bellow |
Enemies
Due to the recent combat improvements that can be obtained from the Grand Krys'kajo temples, the enemies here can be a significant step up in difficulty from anything that's been seen before.
| Name | Sprite | Drops | Locations |
|---|---|---|---|
| Fallfly | Sapphire Tunnel | ||
| Sun Beetle | North West Path, Eroded Passage, River Road, The Cave Inn, Bamboo Thicket, North East Path, Flower Lake, Carved Pathway, Old Dojo, Old Dojo interior<ref name="respawn" />, High Ground | ||
| Moon Beetle | Western Exit, North West Path, Eroded Passage, River Road, The Cave Inn, Bamboo Thicket, North East Path, Spider Chasm, Flower Lake, Narrow Passage, Old Dojo, Old Dojo interior<ref name="respawn" />, High Ground, Henry's Hideout<ref name="henry" /> | ||
| Aranetarda | North West Path, Eroded Passage, North East Path, Spider Chasm, Flower Lake, Narrow Passage, Carved Pathway, Wheel Passage, Old Dojo, Nesting Grounds<ref name="challenge" />, High Ground, Henry's Hideout<ref name="henry" />, Baton Pond, The Barracks<ref name="pandza" /> | ||
| Pandza | North West Path, Bamboo Thicket, Carved Pathway, Wheel Passage, High Ground | ||
| Kamikater | None | Eroded Passage, Spider Chasm, Narrow Passage, Wheel Passage, The Barracks, The Bellow<ref name="pandza" /> | |
| Bamboo Fountain | None | Flower Lake | |
| War Webster | Nesting Grounds<ref name="challenge" />, The Barracks<ref name="pandza" />, The Bellow<ref name="pandza" /> | ||
| Twilight Master (boss) | Old Dojo interior<ref name="respawn" /> | ||
| Pandza Mk. II (boss) | The Bellow<ref name="pandza" /> | ||
| Henry (boss) | None | Henry's Hideout<ref name="henry" /> |
<references>
<ref name="booster">With ![]() Ridge Booster enabled</ref>
<ref name="respawn">Does not respawn</ref>
<ref name="henry">Spawns during Henry Trailblazing quest</ref>
<ref name="challenge">Spawns in the Ring of Spiders challenge</ref>
<ref name="pandza">Spawns before or during the Pandza Mk. II boss fight, and does not respawn after</ref>
<ref name="norank">Additional drops not obtainable because rank is disabled during this encounter</ref>
</references>
Ridge Booster enabled</ref>
<ref name="respawn">Does not respawn</ref>
<ref name="henry">Spawns during Henry Trailblazing quest</ref>
<ref name="challenge">Spawns in the Ring of Spiders challenge</ref>
<ref name="pandza">Spawns before or during the Pandza Mk. II boss fight, and does not respawn after</ref>
<ref name="norank">Additional drops not obtainable because rank is disabled during this encounter</ref>
</references>
Botanics
| Botanic | Contents | ||||||
|---|---|---|---|---|---|---|---|
 |
Alpha Bamboo |
| |||||
|
| |||||||
 |
Beta Bamboo |
| |||||
|
| |||||||
 |
Omega Bamboo |
| |||||
|
| |||||||
 |
Alpha Ridge Flower |
| |||||
|
| |||||||
 |
Beta Ridge Flower |
| |||||
|
| |||||||
 |
Omega Ridge Flower |
| |||||
|
| |||||||
 |
Alpha Crystal |
| |||||
|
| |||||||
 |
Beta Crystal |
| |||||
|
| |||||||
 |
Omega Crystal |
| |||||
|
| |||||||
Traders
Sapphire Ridge has a sizeable trader hub located in the Cave Inn Mall.
- Sapphire Sandwiches – Located in Cave Inn Mall
| Offered Item | Credits | Requisite Items |
|---|---|---|
| 950 | 2x | |
| 2100 | 4x | |
| 5000 | 7x |
- Sapphire Tea – Located in Cave Inn Mall
| Offered Item | Credits | Requisite Items |
|---|---|---|
| 1050 | ||
| 3400 | 3x |
- Sapphire Buffs 1 – Located in Cave Inn Mall
| Offered Item | Credits | Requisite Items |
|---|---|---|
| 550 | 2x | |
| 1350 | 4x | |
| 550 | 2x | |
| 1350 | 4x |
- Sapphire Buffs 2 – Located in Cave Inn Mall
| Offered Item | Credits | Requisite Items |
|---|---|---|
| 550 | 2x | |
| 1350 | 4x | |
| 550 | 2x | |
| 1350 | 4x |
- Sapphire Weapons – Located in Cave Inn Mall
| Offered Item | Credits | Requisite Items |
|---|---|---|
| LV54 |
80000 | 19x |
| LV55 |
83000 | 11x |
| LV56 |
87000 | 5x |
| LV58 |
99999 | LV44 |
- Sapphire Head – Located in Cave Inn Mall
| Offered Item | Credits | Requisite Items |
|---|---|---|
| LV55 |
83000 | 18x |
| LV56 |
87000 | 15x |
- Sapphire Torso – Located in Cave Inn Mall
| Offered Item | Credits | Requisite Items |
|---|---|---|
| LV55 |
83000 | 16x |
| LV56 |
87000 | 6x |
- Sapphire Legs – Located in Cave Inn Mall
| Offered Item | Credits | Requisite Items |
|---|---|---|
| LV55 |
83000 | 12x |
| LV56 |
87000 | 22x |
- Sapphire Metals – Located in Cave Inn Mall
| Offered Item | Credits | Requisite Items |
|---|---|---|
| 90 | ||
| 450 | 2x | |
| 2500 | 2x | |
| 2500 | 2x |
- Sapphire Sets – Located in Cave Inn Mall
| Offered Item | Credits | Requisite Items |
|---|---|---|
| 100 | 2x | |
| 100 | 2x | |
| 250 |
- Sapphire Loot – Located in Cave Inn Mall
| Offered Item | Credits | Requisite Items |
|---|---|---|
| 2350 | 2x | |
| 2350 | 2x | |
| 3600 | ||
| 5100 | 2x |
- Rusty – Located in Cave Inn 1F (after bringing him the
 Old Blueprint)
| Offered Item | Credits | Requisite Items |
|---|---|---|
| LV62 |
10101 |
Shops
There are two shops in Sapphire Ridge: an item shop in the Cave Inn Store, and an equipment shop in the Cave Inn Mall.

- Good Items – Located in the Cave Inn Store
| Item | Credits |
|---|---|
| 100 | |
| 300 | |
| 250 | |
| 222 | |
| 650 | |
| 650 | |
| 200 | |
| 200 | |
| 200 | |
| 200 | |
| 450 | |
| 450 | |
| 450 | |
| 450 | |
| 350 |

- Sapphire Arsenal – Located in the Cave Inn Mall
| Item | Credits |
|---|---|
| LV42 |
46750 |
| LV50 |
71350 |
| LV42 |
46475 |
| LV50 |
70975 |
| LV42 |
46925 |
| LV50 |
71925 |
| LV42 |
46750 |
| LV50 |
71350 |
Quests
The quests that can be started in Sapphire Ridge are:
- Trials of the Golden Bugs
- Henry Trailblazing
- Last Minute Help Needed
- An Unfortunate Series of Features
A New Home DLC Changes
The A New Home DLC includes the opening of the Ascension Temple in Sapphire Ridge, which contains a teleporter leading to Ku'lero Temple. Sao can also be encountered and fought here.
Layout
The DLC adds a single room to the area, The Rise, which is the interior of the Ascension Temple.
Connecting Regions
- Autumn's Fall (via Sapphire Tunnel)
- Vermillion Wasteland (via Hidden Tunnel East)
- Rhombus Square (via teleporter at The Cave Inn)
- Old Hideout (via teleporters in Waterfall Backyard and Old Dojo)
- Ku'lero Temple (via teleporter in The Rise)
Map

| # | Area Name | Floor |
|---|---|---|
| 1 | Sapphire Tunnel | GF |
| 2 | Western Exit
Landmark: Western Exit |
GF |
| 3 | North West Path | GF |
| 4 | River Road | GF |
| 5 | The Cave Inn
Landmark: The Cave Inn |
GF, 1F, 2F |
| 6 | Tranquil Bamboo | GF |
| 7 | Baton Pond | GF |
| 8 | The Barracks | GF |
| 9 | The Bellow | GF |
| 10 | Bamboo Thicket | GF |
| 11 | North East Path | GF |
| 12 | Spider Chasm | GF |
| 13 | High Ground | GF |
| 14 | Flower Lake | GF |
| 15 | Narrow Passage | GF |
| 16 | Eroded Passage | GF |
| 17 | Nesting Grounds | GF |
| 18 | Carved Pathway
Landmark: Carved Pathway |
GF |
| 19 | Wheel Passage | GF |
| 20 | Old Dojo
Landmark: Old Dojo |
GF |
| 21 | Path to Peace | GF |
| 22 | Cave Waterfall | GF |
| 23 | Waterfall Backyard | GF |
| 24 | Ascension Temple
Landmark: Ascension Temple |
GF |
| 25 | Cave Inn EG | GF |
| 26 | Cave Inn Mall | GF |
| 27 | Cave Inn Store | GF |
| 28 | Cave Inn Storage | GF |
| 29 | Cave Inn 1F | 1F |
| 30 | Owner's Room | 2F |
| 31 | Henry's Hideout | GF |
| 32 | Old Dojo (interior) | GF |
| 33 | Dojo Tunnel | GF |
| 34 | Meteor Cave | GF |
| 35 | Dream Pond | GF |
| 36 | Hidden Entrance | GF |
| 37 | Hidden Tunnel West | GF |
| 38 | Hidden Tunnel Center | GF |
| 39 | Hidden Tunnel East | GF |
| 40 | Facility X Entrance | U1 |
| 41 | Happy Place | U1 |
| 42 | Stronger Together | U1 |
| 43 | The Rise | GF |
Enemies
| Name | Sprite | Drops | Locations |
|---|---|---|---|
| Sao | None | North West Path<ref name="respawn" /> |
<references> <ref name="respawn>Does not respawn.</ref> </references>
Role in the Plot
In CrossWorlds
Sapphire Ridge is the furthest location that humanity has been able to unlock in the Track of the Ancients. As such, it is the final destination for Seekers, who arrive here after demonstrating mastery of all four elements. Here, they are challenged to the Trials of the Golden Bugs, a final series of trials organized by the mysterious Twilight Master. After completing the trials, they receive the ![]() Meteor Shade, signaling that they have reached the endgame of CrossWorlds. The Shade unlocks the city of Rhombus Square with all its extra content, as well as the northern part of Sapphire Ridge, containing the Ascension Temple, which is still inaccessible.
Meteor Shade, signaling that they have reached the endgame of CrossWorlds. The Shade unlocks the city of Rhombus Square with all its extra content, as well as the northern part of Sapphire Ridge, containing the Ascension Temple, which is still inaccessible.
During the A New Home DLC, CrossWorlds receives some major updates. Humanity has uncovered the final steps in the Track of the Ancients, and the Ascension Temple is finally unlocked, revealing a teleporter to Ku'lero Temple, the final dungeon of CrossWorlds, where the Secret of the Ancients is hidden.
In CrossCode
Over the course of CrossCode, several of Lea's dream memories feature Sapphire Ridge, leading Sergey to speculate that a hidden area is located here. After reaching the area and completing the CrossWorlds plot, they discover a secret teleporter in Waterfall Backyard, hidden behind several pathfinding puzzles, that leads to the Old Hideout.
After learning from Satoshi that the area also hides an entrance to Vermillion Wasteland, Lea returns here, and Sergey is able to uncover the entrance at the Old Dojo. When Lea and her friends decide to storm Vermillion Wasteland and attempt to recover the Evotar Server, they meet here and use the hidden tunnel to access the Wasteland.
In the A New Home DLC, C'tron returns here after remembering his past, and finds the tunnel to Vermillion Wasteland blocked off. When Lea and Sergey follow him here, he confirms that he was a spy for Sidwell. Later, Lea and her friends join the crowds of players taking part in the grand opening of Ku'lero Temple.
Trophies
- There is no Cow Level
- Visit the Perfectly Normal Bamboo at The Cave Inn.
- The Dawn's Blade
- Defeat the Twilight Master.
- That was... Unexpected
- Defeat Henry.
- I hate Spiders!
- Survive 5 minutes in the Ring of Spiders without any party members.
- Sapphire Landmarks
- Find all landmarks in Sapphire Ridge.
- Sapphire Scavenger
- Obtain all chests in Sapphire Ridge; see #Treasures.
- Pierce through the Heaven
- Obtain the LV65
 Infinity Spiral Drill at the end of The Book of an Old Man quest.
Challenges and secrets
Currently there is only one challenge available in the Sapphire Ridge: Ring of Spiders, a challenge that tests both skill and endurance by letting you battle infinitely respawning Aranetardas and War Websters for a high score.
The area also has a few secrets: The second time you can encounter Code Knight is in Henry's Hideout. There is also Baton Pond, a hidden area containing a boss fight that is tied to the A Promise Is a Promise 5 quest but can be accessed without the quest. A hint to locating the easily-overlooked path leading here can be found on a bookshelf in Books 'n Worms in Rhombus Square.