Gaia's Garden: Difference between revisions
Plaguerized (talk | contribs) mNo edit summary |
Plaguerized (talk | contribs) (→Quests) |
||
| Line 361: | Line 361: | ||
== Quests == | == Quests == | ||
{{Main|Gaia's Garden/Quests}} | |||
The [[quests]] that can be started in Gaia's Garden are: | |||
* {{QuestLink|The Root Cause}} | |||
* {{QuestLink|Gaia's Garden Trailblazing}} | |||
** {{QuestLink|Gaia's Garden Collect}} | |||
** {{QuestLink|Gaia's Garden Defeat}} | |||
** {{QuestLink|Gaia's Garden Landmarks}} | |||
** {{QuestLink|Gaia's Garden Data Probe}} | |||
== Treasures == | == Treasures == | ||
Revision as of 04:12, 6 March 2019
Gaia's Garden is a location in CrossWorlds. It is the largest area in the game, an immense jungle located to the northeast of Rookie Harbor. It can only be reached after completing Faj'ro Temple.
| Gaia's Garden |
|---|
|
Gaia's Garden is an enormous jungle and the largest area to be found on Shadoon. Its high trees stand towering beside the many rivers that stretch from the north-west to the south-east. In the center of the jungle a huge lake can be found with a small island that is home to the paradoxical Basin Keep. In the south-east a small Shad tribe calls the trees their home. They mostly keep to themselves and live in harmony with the jungle. However, tensions between humans and Shad have arisen ever since humans built a power plant at the entrance of the Zir'vitar Temple. A vile infestation has spread in the north-east of the jungle which seems to originate from the power plant. In the north one can find the mighty Grand Krys'kajo. A tree that stand above all other trees. However to get close to it, A Seeker first need to to finish the trials of both the Zir'vitar Temple and So'najiz Temple which stand beside the tree. |
| -Encyclopedia entry |
Layout
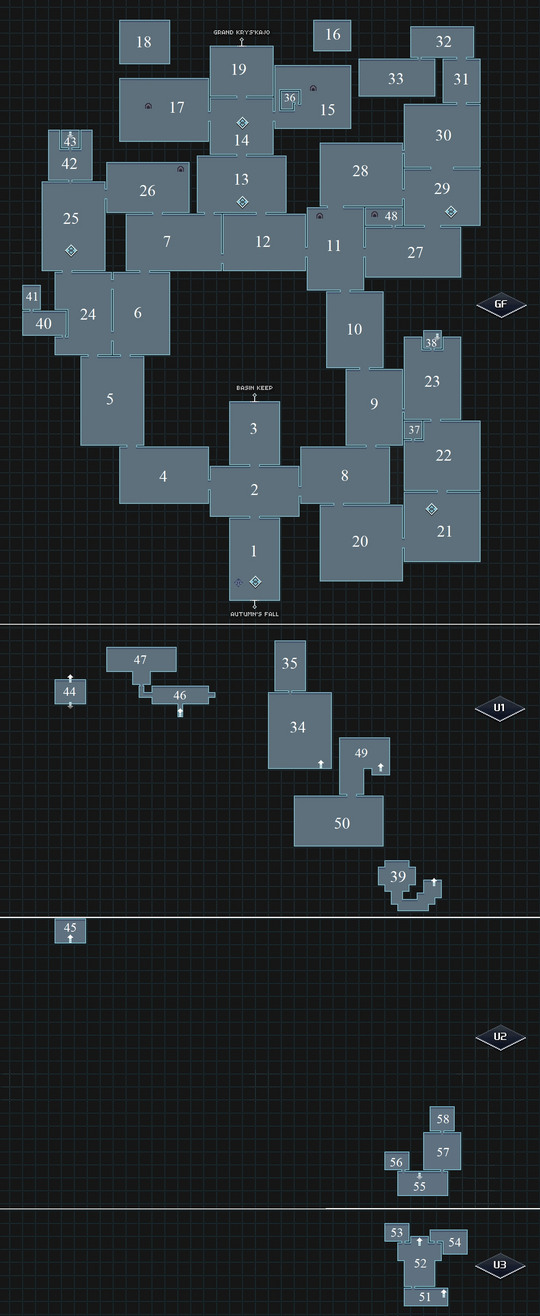
The area's main entrance from Autumn's Fall leads to a crossroads, where continuing straight will lead to the city of Basin Keep. The left and right paths wrap around the city, eventually meeting up at the three temples of the Grand Krys'kajo. Three sub-areas can be accessed from this ring path: the swampy Royal Grove to the northwest, the shady, mushroom-filled Infested Marshes to the northeast, and Vr'da Vil to the southeast.
Vr'da Vil is a Shad village, and the fifth town reached in the game. It is also the only town that is part of a larger exploration area, rather than being a separate area. Most of the inhabitants are quite hostile to humans, due to some past incident that involves the Wiccats that infest the northern areas of the village; the Shad blame the infestation on the humans' power plant near the temples. The villagers' trust has to be regained by completing a mandatory storyline quest.
Connecting regions
Map

| # | Area Name |
|---|---|
| 1 | Jungle Entrance
Landmark: Southern Entrance |
| 2 | Crossroad |
| 3 | Basin Keep Entrance |
| 4 | Overgrown Path |
| 5 | Drizzle Bosk |
| 6 | Wet Passage |
| 7 | River's Bed |
| 8 | Splitting Stumps |
| 9 | Clinging River |
| 10 | Ringing River |
| 11 | Old Timber |
| 12 | Tying Greens |
| 13 | Peridot Approach
Landmark: Peridot Approach |
| 14 | Rite of Passage
Landmark: Rite of Passage |
| 15 | Zir'vitar Temple Entrance |
| 16 | Zir'vitar Temple Roof |
| 17 | So'najiz Temple Entrance |
| 18 | So'najiz Lake Platform |
| 19 | Gran Krys'kajo Entrance |
| 20 | Vr'da Vil West |
| 21 | Vr'da Vil East
Landmark: Vr'da Vil |
| 22 | Vr'da Vil North |
| 23 | Chief's Den |
| 24 | Covert Path |
| 25 | Royal Grove
Landmark: Royal Grove |
| 26 | Calm Backyard |
| 27 | Lost Lookout |
| 28 | Seared Lake |
| 29 | Infested Marshes South
Landmark: Infested Marshes |
| 30 | Infested Marshes North |
| 31 | Infested Heart |
| 32 | The Descent |
| 33 | Root |
| 34 | Chilled Den |
| 35 | Frozen Lair |
| 36 | Lou's Office |
| 37 | K'tara's House |
| 38 | Chief's House |
| 39 | Sacred Pond |
| 40 | Dripping Cave |
| 41 | Tranquility Pond |
| 42 | Lost Shrine Entrance |
| 43 | Lost Shrine |
| 44 | Lost Puzzle Room |
| 45 | Lost Power Room |
| 46 | Grubby Cave |
| 47 | Temple of Innovation |
| 48 | Foul Cavity |
| 49 | Infested Cavern Entrance |
| 50 | Infested Cavern Maze |
Enemies
'
| Name | Locations | |
|---|---|---|
| Papagun |
| |
| Argeby |
| |
| Gelleric |
| |
| Shokat |
| |
| Angler |
| |
| Behesloth |
| |
| Jack'On'Fire |
| |
| Wiccat |
|
Botanics
The following botanics can be found in Gaia's Garden:
| Destroyable | Contents | ||||||
|---|---|---|---|---|---|---|---|
| Alpha Puff Plant |
| ||||||
| Beta Puff Plant |
| ||||||
| Omega Puff Plant |
| ||||||
| Alpha Closed Bareleles |
| ||||||
| Beta Closed Bareleles |
| ||||||
| Bee Hive |
| ||||||
| Alpha Open Bareleles |
| ||||||
| Beta Open Bareleles |
| ||||||
| Omega Open Bareleles |
| ||||||
| Alpha Vivid Puff Plant |
| ||||||
| Beta Vivid Puff Plant |
| ||||||
| Omega Vivid Puff Plant |
| ||||||
| Alpha Virus Shroom |
| ||||||
| Beta Virus Shroom |
| ||||||
| Omega Virus Shroom |
| ||||||
Traders
There is only one trader initially but more can be unlocked after a storyline quest.
| Name | Location | Trade Offers | |||||||||||||||
|---|---|---|---|---|---|---|---|---|---|---|---|---|---|---|---|---|---|
| Edgy Salesman | Jungle Entrance |
| |||||||||||||||
| V'rda Vil Sets | V'rda Vil West Unlocks after the The Root Cause quest |
| |||||||||||||||
| V'rda Vil Sets Metals | V'rda Vil West Unlocks after the The Root Cause quest |
| |||||||||||||||
Quests
The quests that can be started in Gaia's Garden are:
Treasures
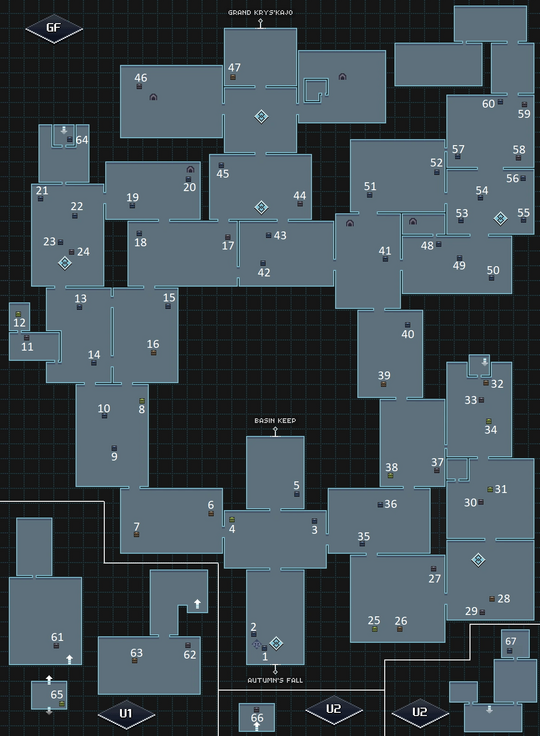
Gaia's Garden has by far the largest number of chests of any area, having at least twice as many as any other area except Maroon Valley. Many of these are not initially accessible, and require either the ![]() Radiant Key from the So'najiz Temple, or the Wave element from the Zir'vitar Temple (to use a Wave teleporter) in order to access them.
Radiant Key from the So'najiz Temple, or the Wave element from the Zir'vitar Temple (to use a Wave teleporter) in order to access them.

| Acc. | Type | Contains | Location | Info |
|---|---|---|---|---|
| 1 | 4 × |
Jungle Entrance | ||
| 2 | 8 × |
Jungle Entrance | ||
| 3 | 6 × |
Crossroad | Enter on the upper path from Splitting Stumps to reach it | |
| 4 | 2 × |
Crossroad | Enter on the upper path from Splitting Stumps to reach it. | |
| 5 | 5 × |
Basin Keep Entrance | ||
| 6 | 5 × |
Overgrown Path | Take the upper path starting in Splitting Stumps to reach here. The Wave element is required | |
| 7 | 4 × |
Overgrown Path | The Wave element is required | |
| 8 | 1 × LV41 |
Drizzle Bosk | Follow the upper path from Splitting Stumps to Overgrown Path and hit the switch at the end. This opens the upper path from Overgrown Path to here. | |
| 9 | 6 × |
Drizzle Bosk | ||
| 10 | 4 × |
Drizzle Bosk | ||
| 11 | 6 × |
Dripping Cave | The Wave element is required | |
| 12 | 1 × |
Tranquility Pond | ||
| 13 | 4 × |
Covert Path | ||
| 14 | 4 × |
Covert Path | ||
| 15 | 5 × |
Wet Passage | Take the north entrance from Covert Path to reach here | |
| 16 | 4 × |
Wet Passage | Take the north entrance from Covert Path to reach here. The Wave element is required | |
| 17 | 4 × |
River's Bed | The Wave element is required | |
| 18 | 7 × |
River's Bed | Take the secret pathway from Calm Backyard to reach here | |
| 19 | 4 × |
Calm Backyard | ||
| 20 | 6 × |
Calm Backyard | ||
| 21 | 3 × |
Royal Grove | Enter from Calm Backyard to reach this | |
| 22 | 8 × |
Royal Grove | ||
| 23 | 7 × |
Royal Grove | Enter from Calm Backyard to reach this | |
| 24 | 3 × |
Royal Grove | Enter from Calm Backyard to reach this | |
| 25 | 5 × |
Vr'da Vil West | ||
| 26 | 2 × |
Vr'da Vil West | ||
| 27 | 2 × |
Vr'da Vil West | ||
| 28 | 4 × |
Vr'da Vil East | ||
| 29 | 5 × |
Vr'da Vil East | The Wave element is required | |
| 30 | 2 × |
Vr'da Vil North | ||
| 31 | 3 × |
Vr'da Vil North | ||
| 32 | 2 × |
Chief's Den | ||
| 33 | 3 × |
Chief's Den | ||
| 34 | 1 × |
Chief's Den | ||
| 35 | 6 × |
Splitting Stumps | Enter on the upper path from Vr'da Vil East to reach it | |
| 36 | 4 × |
Splitting Stumps | The Wave element is required | |
| 37 | 4 × |
Clinging River | ||
| 38 | 1 × LV41 |
Clinging River | Take the upper path from Ringing River to reach here. | |
| 39 | 2 × |
Ringing River | The Wave element is required | |
| 40 | 6 × |
Ringing River | The Wave element is required | |
| 41 | 7 × |
Old Timber | The Wave element is required | |
| 42 | 4 × |
Tying Greens | ||
| 43 | 6 × |
Tying Greens | ||
| 44 | 1 × LV45 |
Peridot Approach | Enter on the hidden path from Tying Greens to reach it. The Wave element is required | |
| 45 | 4 × |
Peridot Approach | ||
| 46 | 2 × |
So'najiz Temple Entrance | ||
| 47 | 4 × |
Grand Krys'kajo Entrance | The Wave element is required | |
| 48 | 3 × |
Lost Lookout | The Wave element is required | |
| 49 | 5 × |
Lost Lookout | ||
| 50 | 4 × |
Lost Lookout | ||
| 51 | 2 × |
Seared Lake | ||
| 52 | 2 × |
Seared Lake | ||
| 53 | 3 × |
Infested Marshes South | Enter from Seared Lake to reach this | |
| 54 | 9 × |
Infested Marshes South | Enter from Seared Lake to reach this | |
| 55 | 2 × |
Infested Marshes South | Enter from Seared Lake to reach this.The Wave element is required | |
| 56 | 2 × |
Infested Marshes South | ||
| 57 | 3 × |
Infested Marshes North | Enter from Seared Lake to reach this | |
| 58 | 5 × |
Infested Marshes North | Enter from Seared Lake to hit the switch opening the right path from Infested Marshes South. Return that way to reach the chest | |
| 59 | 5 × |
Infested Marshes North | Enter from Seared Lake to hit the switch opening the right path from Infested Marshes South. Return that way to reach the chest | |
| 60 | 3 × |
Infested Marshes North | Enter from Seared Lake to hit the switch opening the right path from Infested Marshes South. Return that way to reach the chest | |
| 61 | 5 × |
Chilled Den | ||
| 62 | 3 × |
Infested Cavern Maze | ||
| 63 | 1 × |
Infested Cavern Maze | ||
| 64 | 2 × |
Lost Shrine | The entrance to the Lost Shrine isn't marked on the map initially. It's hidden behind the large tree in the north of Royal Grove reachable from Calm Backyard. The code for the shrine is ↑↑↓↓←→←→AB, although the code still must be read first at the northeast of So'najiz Temple Entrance | |
| 65 | 3 × |
Lost Puzzle Room | ||
| 66 | 1 × LV01 |
Lost Power Room |


