Jelleric: Difference between revisions
No edit summary |
(Accidentaly pressed Save on the last edit. Added info to all sections, removed trivia section and Stub template.) |
||
| Line 1: | Line 1: | ||
{{Enemy_Card|name=Jelleric | {{Enemy_Card|name=Jelleric | ||
|sprite=File:Jelleric-sprite.png | |sprite=File:Jelleric-sprite.png | ||
| Line 49: | Line 48: | ||
*Trial of Wobble (x4) | *Trial of Wobble (x4) | ||
*Trial of Persistence (x3) | *Trial of Persistence (x3) | ||
*Bouncing Surprise (x17) (only once) | *Bouncing Surprise (x17) <font color="yellow">(only once)</font> | ||
'''[[Gaia's Garden]]''' | '''[[Gaia's Garden]]''' | ||
*East Branch (x12) (only once) | *East Branch (x12) <font color="yellow">(only once)</font> | ||
==Gallery== | ==Gallery== | ||
Revision as of 20:20, 1 June 2022
'
'
The Jelleric is an abstract enemy in CrossWorlds. They can be found mainly inside of So'najiz Temple.
 |
|---|
|
A stronger slime enemy? Really? Not really! Just like the Gelleric the actual enemy is the light inside the mass. But the mass is harder and a bit darker which makes it stronger! Other than that it behaves exactly like its weaker kind, yep. |
| -Monster Fibula report |
Appearance
The Jelleric looks almost identical to the Gelleric. It’s a teal blob with a blue core and is different from its predecessor in that it can combine with others of its kind and form a bigger blob.
Combat
It shares the same attacks as the Gelleric, which means it can either jump towards the player or slam its body into the ground and cause a Wave element shockwave. However, it also has a unique team attack, where three of them come together, raise their defense, and shoot a Wave orb similar to the Fae Round throw art.
Strategies
When they begin their team attack, two Gellerics will circle around the one that’s going to fire. Attacking them while they are doing this move is not worth it as they take reduced damage, so be patient and strike right after they become vulnerable again. Also, they can't do this if there's less than 3 Jellerics alive.
Location(s)
- Trial of Wobble (x4)
- Trial of Persistence (x3)
- Bouncing Surprise (x17) (only once)
- East Branch (x12) (only once)
Gallery
-
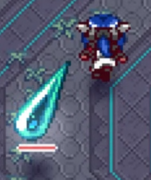
Boing.
-

Ready to slam its face into the ground.
-
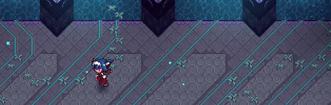
Teamwork is the key to success.
-


