Trijelly: Difference between revisions
Oneiros108 (talk | contribs) (Correct boosted stats) Tag: 2017 source edit |
(Locations, gallery, revision.) Tag: 2017 source edit |
||
| Line 34: | Line 34: | ||
==Appearance== | ==Appearance== | ||
The Trijelly is a floating jellyfish with | The Trijelly is a floating jellyfish with four blue tentacles hanging under its body and a red manubrium hanging under its base. There is red triangle floating in its body. | ||
==Combat== | ==Combat== | ||
Once engaged, the Trijelly will try to keep its distance from | Once engaged, the Trijelly will try to keep its distance from the player and is resistant to [[Balls]]. To attack, it floats a bit higher and creates a bubble that follows the player and explodes after getting close enough to them or after around three seconds pass. Alternatively, the Trijelly can move towards the player and attempt to knock them into the air to do a multi-hit attack. This enemy can be broken by making it get hit by one of its own bubble's explosions, either by using the [[Heat]] element to blow the bubble up or by pushing it in Neutral mode until it explodes by itself. | ||
==Strategies== | ==Strategies== | ||
It is important to keep your distance from this enemy in case you are trying to take it out as fast as possible. If you are too close, it floats away and becomes unreachable until it gets down once again. This allows it to not only dodge your attacks, but also the bubble's explosion. You can still rush them if you [[Dash]] and hit them hard enough with a fast [[Combat Art]] like [[File:First-cut-icon.png|26px|link=First Cut]] [[First Cut]], or you can use a [[Melee]] Combat Art that has enough reach such as [[File:Ice Twirl-icon.png|26px|link=Ice Twirl]] [[Ice Twirl]]. | |||
==Locations== | ==Locations== | ||
;Faj'ro Temple | ;'''[[Faj'ro Temple]]''' | ||
:*Test of Tri (x3) | |||
: | :*Test of Vigor (x3) / (x5 on first visit) | ||
: | :*Left Chamber 1<ref>Room inside 1F, not GF.</ref> (x2) | ||
: | :*Sand Terror (part of the [[Pinzo'jrahrrrn]] fight) | ||
: | :*Test of Surprise (x1) / (x2 on first visit) | ||
: | :*Large Fire Chamber (x2) / (none on first visit) | ||
::Test of Wisdom | :*Test of Wisdom (x2) / (infinite on first visit) | ||
: | |||
: | <references /> | ||
==Gallery== | |||
<gallery mode=packed> | |||
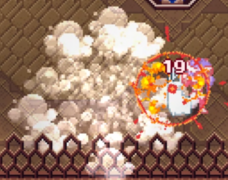
File:trijelly-bubble.png|A Trijelly spawning a bubble. | |||
File:trijelly-explosion.png|[[Lea]] [[Guarding]] against a bubble. | |||
</gallery> | |||
[[Category:Enemies]] | [[Category:Enemies]] | ||
Latest revision as of 22:35, 6 December 2022
'
The Trijelly is an abstract enemy in CrossWorlds. It can be encountered in the Faj'ro Temple.
 |
|---|
|
Water was too cold and wet for this jellyfish so it made Maroon Valley its new home. Despite its warmer environment it can conjure forth homing bubbles and attack with a spinning attack that lifts its prey upwards. Use heat to shoot the bubbles and temporarily stun them. Using their attacks against them, truly a humiliating tactic! |
| -Monster Fibula report |
Appearance
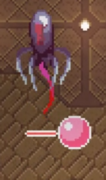
The Trijelly is a floating jellyfish with four blue tentacles hanging under its body and a red manubrium hanging under its base. There is red triangle floating in its body.
Combat
Once engaged, the Trijelly will try to keep its distance from the player and is resistant to Balls. To attack, it floats a bit higher and creates a bubble that follows the player and explodes after getting close enough to them or after around three seconds pass. Alternatively, the Trijelly can move towards the player and attempt to knock them into the air to do a multi-hit attack. This enemy can be broken by making it get hit by one of its own bubble's explosions, either by using the Heat element to blow the bubble up or by pushing it in Neutral mode until it explodes by itself.
Strategies
It is important to keep your distance from this enemy in case you are trying to take it out as fast as possible. If you are too close, it floats away and becomes unreachable until it gets down once again. This allows it to not only dodge your attacks, but also the bubble's explosion. You can still rush them if you Dash and hit them hard enough with a fast Combat Art like ![]() First Cut, or you can use a Melee Combat Art that has enough reach such as
First Cut, or you can use a Melee Combat Art that has enough reach such as ![]() Ice Twirl.
Ice Twirl.
Locations
- Faj'ro Temple
-
- Test of Tri (x3)
- Test of Vigor (x3) / (x5 on first visit)
- Left Chamber 1<ref>Room inside 1F, not GF.</ref> (x2)
- Sand Terror (part of the Pinzo'jrahrrrn fight)
- Test of Surprise (x1) / (x2 on first visit)
- Large Fire Chamber (x2) / (none on first visit)
- Test of Wisdom (x2) / (infinite on first visit)
<references />
Gallery
-
A Trijelly spawning a bubble.
-