Sir Blobus Starnikus: Difference between revisions
Plaguerized (talk | contribs) No edit summary |
No edit summary |
||
| (7 intermediate revisions by 4 users not shown) | |||
| Line 1: | Line 1: | ||
{{Enemy_Card|name=Sir Blobus Starnikus | {{Enemy_Card|name=Sir Blobus Starnikus | ||
|sprite=File:Sir-Blobus-Starnikus.png | |sprite=File:Sir-Blobus-Starnikus.png | ||
| Line 17: | Line 16: | ||
|EXP=559 | |EXP=559 | ||
|credits=5500}} | |credits=5500}} | ||
'''Sir Blobus Starnikus''' is an abstract [[boss]] in [[CrossWorlds]]. It is the | {{EnemyNavBox|So'najiz Temple}} | ||
'''Sir Blobus Starnikus''' is an abstract [[boss]] in [[CrossWorlds]]. It is the boss of [[So'najiz Temple]], the Wave dungeon. | |||
{{Encyclopedia|icon=Abstract_Boss | {{Encyclopedia|icon=Abstract_Boss | ||
| Line 26: | Line 26: | ||
==Appearance== | ==Appearance== | ||
Sir Blobus Starnikus (SBS for short) is a | Sir Blobus Starnikus (SBS for short) is a floating purple and green starfish with a green eye in the middle of its body. It surrounds itself with a huge teal, spherical mass composed purely of [[Jelleric|Jellerics]]. | ||
==Combat== | ==Combat== | ||
SBS | SBS always stays floating over the hole in the center of its arena. There are two [[Puzzle Elements#Compressed Ball Elements|Compressors]] next to it, two pairs of Compressor Bouncers in the middle of the top and bottom wall with Anti Compressors behind them, and one Floor Switch on each corner to activate the pair that is around the wall closer to them. The battle starts with many Jellerics falling from the sky until SBS shows up and uses them to create an invincibility blob around itself. Its physical attacks cause [[Wave]] shockwaves wherever they land. | ||
[ | '''Phase 1''' | ||
= | *Backs up a little, then tackles the player and crashes into a wall, bouncing back to the center of the arena. | ||
*Squashes its body, then jumps and falls on top of the player. | |||
*Hitting it with enough [[Shock]] attacks will cause it to break, replacing both of its attacks with charging and firing a single fast Wave projectile similar to [[File:Fae Round -icon.PNG|26px|link=Fae Round]] [[Fae Round]]. | |||
*Before it recovers, shooting a Compressed Shock Ball into it will break it again and separate all the Jellerics that form the blob. Defeating the Jellerics is the only way to deal direct damage to SBS, with four of them being enough to progress into each phase. SBS will recover from breaking if the player doesn't break it again or defeats the Jellerics fast enough. | |||
The | '''Phase 2''' | ||
*Tackles the player twice. | |||
*Jumps twice in a row. | |||
*Charges and fires a slow homing Wave projectile that explodes after reaching the player or not reaching them fast enough. | |||
*Breaking it once will cause it to generate a barrier that stays between it and the player, diverting any Compressed Shock Balls that are shot directly at it towards the upper or bottom wall. The Ball can only reach it if the player shoots it into a wall and quickly activates the correct pair of Compressor Bouncers so it can hit SBS from the side. If SBS is charging its attack and diverts the Ball, it stops the attack entirely. | |||
'''Phase 3''' | |||
*Tackles thrice. | |||
*Jumps thrice in a row. | |||
*Fires two explosives in a row instead of one. | |||
*After breaking it once, SBS will divert the Compressed Shock Ball if the player tries to break it in the same way as in the last phase. When this happens, they have to quickly activate the other pair of Compressor Bouncers to actually hit and break SBS. | |||
'''Phase 4''' | |||
*The blob becomes so small that SBS can be damaged directly. The boss also stops coming back to the center of the arena after moving and stays floating close to where it finished its last attack. | |||
*Attacks faster. | |||
==Strategies== | |||
*Fighting the Jellerics at the start of the fight doesn't change anything, but you can use them to gather SP before the fight actually begins. | |||
*[[File:Radiant Swarm -icon.PNG|26px|link=Radiant Swarm]] [[Radiant Swarm]] is insanely effective at breaking SBS. | |||
*[[Melee]] doesn't break the boss much faster than [[Balls]]. | |||
*[[File:Ice Tornado-icon.png|26px|link=Ice Tornado]] [[Ice Tornado]] helps getting rid of the Jellerics before SBS can recover. | |||
[ | ==Locations== | ||
;'''[[So'najiz Temple]]''' | |||
:*Bouncing Suprise | |||
==Gallery== | ==Gallery== | ||
<gallery mode=packed> | |||
File:blobus-bounce.gif|Sir Blobus Starnikus bouncing. | |||
File:blobus-tackle.png|Tackling and crashing into a wall. | |||
File:blobus-divert.gif|Diverting a Compressed Shock Ball. | |||
</gallery> | |||
==Trivia== | ==Trivia== | ||
[ | * SBS bears a deep resemblance to Staryu, a star-shaped Pokémon. | ||
* A memorial shrine dedicated to Sir Blobus can be found in the [[Azure Archipelago]], implying it was deeply respected by the Echino- sea stars that live there. | |||
* In the game [https://mysingingmonsters.fandom.com/wiki/ My Singing Monsters], SBS is referenced by the [https://mysingingmonsters.fandom.com/wiki/Critters "Glubber Lagoon" Water Island critter]. | |||
Latest revision as of 04:10, 6 June 2023
'
Sir Blobus Starnikus is an abstract boss in CrossWorlds. It is the boss of So'najiz Temple, the Wave dungeon.
 |
|---|
|
This starfish is the leader of both the Gelleric and the Jelleric. It can enter a strange synthesis with them to create a large mass that is almost impenetrable. Only by using compressed shock balls can the bond be broken. |
| -Monster Fibula report |
Appearance
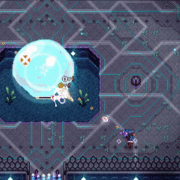
Sir Blobus Starnikus (SBS for short) is a floating purple and green starfish with a green eye in the middle of its body. It surrounds itself with a huge teal, spherical mass composed purely of Jellerics.
Combat
SBS always stays floating over the hole in the center of its arena. There are two Compressors next to it, two pairs of Compressor Bouncers in the middle of the top and bottom wall with Anti Compressors behind them, and one Floor Switch on each corner to activate the pair that is around the wall closer to them. The battle starts with many Jellerics falling from the sky until SBS shows up and uses them to create an invincibility blob around itself. Its physical attacks cause Wave shockwaves wherever they land.
Phase 1
- Backs up a little, then tackles the player and crashes into a wall, bouncing back to the center of the arena.
- Squashes its body, then jumps and falls on top of the player.
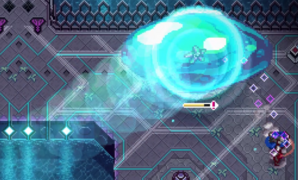
- Hitting it with enough Shock attacks will cause it to break, replacing both of its attacks with charging and firing a single fast Wave projectile similar to
 Fae Round.
 - Before it recovers, shooting a Compressed Shock Ball into it will break it again and separate all the Jellerics that form the blob. Defeating the Jellerics is the only way to deal direct damage to SBS, with four of them being enough to progress into each phase. SBS will recover from breaking if the player doesn't break it again or defeats the Jellerics fast enough.
Phase 2
- Tackles the player twice.
- Jumps twice in a row.
- Charges and fires a slow homing Wave projectile that explodes after reaching the player or not reaching them fast enough.
- Breaking it once will cause it to generate a barrier that stays between it and the player, diverting any Compressed Shock Balls that are shot directly at it towards the upper or bottom wall. The Ball can only reach it if the player shoots it into a wall and quickly activates the correct pair of Compressor Bouncers so it can hit SBS from the side. If SBS is charging its attack and diverts the Ball, it stops the attack entirely.
Phase 3
- Tackles thrice.
- Jumps thrice in a row.
- Fires two explosives in a row instead of one.
- After breaking it once, SBS will divert the Compressed Shock Ball if the player tries to break it in the same way as in the last phase. When this happens, they have to quickly activate the other pair of Compressor Bouncers to actually hit and break SBS.
Phase 4
- The blob becomes so small that SBS can be damaged directly. The boss also stops coming back to the center of the arena after moving and stays floating close to where it finished its last attack.
- Attacks faster.
Strategies
- Fighting the Jellerics at the start of the fight doesn't change anything, but you can use them to gather SP before the fight actually begins.
 Radiant Swarm is insanely effective at breaking SBS.
- Melee doesn't break the boss much faster than Balls.
 Ice Tornado helps getting rid of the Jellerics before SBS can recover.
Locations
- So'najiz Temple
-
- Bouncing Suprise
Gallery
-
Sir Blobus Starnikus bouncing.
-
Tackling and crashing into a wall.
-

Diverting a Compressed Shock Ball.


Trivia
- SBS bears a deep resemblance to Staryu, a star-shaped Pokémon.
- A memorial shrine dedicated to Sir Blobus can be found in the Azure Archipelago, implying it was deeply respected by the Echino- sea stars that live there.
- In the game My Singing Monsters, SBS is referenced by the "Glubber Lagoon" Water Island critter.