Gaia's Garden: Difference between revisions
Oneiros108 (talk | contribs) |
mNo edit summary Tag: 2017 source edit |
||
| (29 intermediate revisions by 15 users not shown) | |||
| Line 1: | Line 1: | ||
{{Location_Card|name=Gaia's Garden | {{Location_Card|name=Gaia's Garden | ||
|color=#00734F | |||
|image=File:Gaia's Garden.png | |image=File:Gaia's Garden.png | ||
|description=The great jungle of the north, home to the giant Tree known as "Gaia". | |description=The great jungle of the north, home to the giant Tree known as "Gaia". | ||
|room_count= | |room_count=58 | ||
|treasure_default = | |quest_count=8 | ||
|treasure_default = 35 | |||
|treasure_key = 0 | |treasure_key = 0 | ||
|treasure_masterkey = 0 | |treasure_masterkey = 0 | ||
| Line 9: | Line 11: | ||
|treasure_silver = 15 | |treasure_silver = 15 | ||
|treasure_gold = 8 | |treasure_gold = 8 | ||
|trader_count= | |trader_count=5}} | ||
{{ | '''Gaia's Garden''' is a [[Locations|location]] in [[CrossWorlds]]. It is the largest area in the game, an immense jungle located to the northeast of [[Rookie Harbor]]. It can only be reached after completing [[Faj'ro Temple]]. | ||
{{Encyclopedia | |||
|title=Gaia's Garden | |||
|contents=Gaia's Garden is an enormous jungle and the largest area to be found on Shadoon. Its high trees stand towering beside the many rivers that stretch from the north-west to the south-east. In the center of the jungle a huge lake can be found with a small island that is home to the paradoxical [[Basin Keep]]. | |||
In the south-east a small [[Shad]] tribe calls the trees their home. They mostly keep to themselves and live in harmony with the jungle. However, tensions between humans and Shad have arisen ever since humans built a power plant at the entrance of the [[Zir'vitar Temple]]. A vile infestation has spread in the north-east of the jungle which seems to originate from the power plant. | |||
In the north one can find the mighty [[Grand Krys'kajo]]. A tree that stand above all other trees. However to get close to it, A [[Seeker]] first needs to to finish the trials of both the Zir'vitar Temple and [[So'najiz Temple]] which stand beside the tree. | |||
|source=Encyclopedia entry}} | |||
== Layout == | == Layout == | ||
The area's main entrance from [[Autumn's Fall]] leads to a crossroads, where continuing straight will lead to the city of [[Basin Keep]]. The left and right paths wrap around the city, eventually meeting up at the three temples of the [[Grand Krys'kajo]]. Three sub-areas can be accessed from this ring path: the swampy Royal Grove to the northwest, the shady, mushroom-filled Infested Marshes to the northeast, and V'rda Vil to the southeast. | |||
V'rda Vil is a [[Shad]] village, and the fifth town reached in the game. It is also the only town that is part of a larger exploration area, rather than being a separate area. Most of the inhabitants are quite hostile to humans, due to some past incident that involves the [[Wiccat]]s that infest the northern areas of the village; the Shad blame the infestation on the humans' power plant near the temples. The villagers' trust has to be regained by completing a mandatory storyline quest. | |||
Most of the area is immediately accessible, although several of the side caves need to be unlocked. The houses in V'rda Vil are unlocked during the [[An Infested Village]] quest. The entrances to Zir'vitar and So'najiz temples are only accessible after that quest, and their ending rooms can only be reached after completing the dungeon. Infested Heart is unlocked during [[The Root Cause]] quest, and the Grand Krys'kajo entrance is unlocked after that quest. The Lost Shrine and Tranquility Pond require the Wave element to reach. Foul Cavity and the infested cavern are unlocked during the [[Mushroom Kingdom]] quest. The Chilled Den is unlocked during the [[Tropical Chill]] quest chain, and the Grubby Cave is unlocked during the [[Turret Defense]] quest chain. The secret lab is only unlocked during the Playstation-exclusive [[Foul Play]] quest. | |||
=== Connecting | === Connecting regions === | ||
* [[Autumn's Fall]] | * [[Autumn's Fall]] via Jungle Entrance | ||
* [[Basin Keep]] | * [[Basin Keep]] via Basin Keep Entrance and teleporter in Grubby Cave | ||
* [[Zir'vitar Temple]] | * [[Zir'vitar Temple]] via Zir'vitar Temple Entrance and Zir'vitar Temple Roof | ||
* [[So'najiz Temple]] | * [[So'najiz Temple]] via So'najiz Temple Entrance and So'najiz Lake Platform | ||
* [[Grand Krys'kajo]] | * [[Grand Krys'kajo]] via Grand Krys'kajo Entrance | ||
=== | === Map === | ||
[[File:Gaias-garden-map.png|upright=1.8|thumb|left|link=https://static.wikia.nocookie.net/crosscode_gamepedia/images/e/e9/Gaias-garden-map.png | Click the map for a full-resolution image.]] | |||
| | {| class="wikitable sortable" | ||
|+ Areas of Gaia's Garden | |||
|- | |- | ||
! | ! # | ||
! Area Name | ! Area Name | ||
! Floor | |||
|- | |- | ||
| 1 || Jungle Entrance | | 1 || Jungle Entrance | ||
'''Landmark: Southern Entrance''' | |||
| GF | |||
|- | |- | ||
| 2 || Crossroad | | 2 || Crossroad || GF | ||
|- | |- | ||
| 3 || Basin Keep Entrance | | 3 || Basin Keep Entrance || GF | ||
|- | |- | ||
| 4 || Overgrown Path | | 4 || Overgrown Path || GF | ||
|- | |- | ||
| 5 || Drizzle Bosk | | 5 || Drizzle Bosk || GF | ||
|- | |- | ||
| 6 || Wet Passage | | 6 || Wet Passage || GF | ||
|- | |- | ||
| 7 || River's Bed | | 7 || River's Bed || GF | ||
|- | |- | ||
| 8 || Splitting Stumps | | 8 || Splitting Stumps || GF | ||
|- | |- | ||
| 9 || Clinging River | | 9 || Clinging River || GF | ||
|- | |- | ||
| 10 || Ringing River | | 10 || Ringing River || GF | ||
|- | |- | ||
| 11 || Old Timber | | 11 || Old Timber || GF | ||
|- | |- | ||
| 12 || Tying Greens | | 12 || Tying Greens || GF | ||
|- | |- | ||
| 13 || Peridot Approach | | 13 || Peridot Approach | ||
'''Landmark: Peridot Approach''' | |||
| GF | |||
|- | |- | ||
| 14 || Rite of Passage | | 14 || Rite of Passage | ||
'''Landmark: Rite of Passage''' | |||
| GF | |||
|- | |- | ||
| 15 || Zir'vitar Temple Entrance | | 15 || Zir'vitar Temple Entrance || GF | ||
|- | |- | ||
| 16 || Zir'vitar Temple Roof | | 16 || Zir'vitar Temple Roof || GF | ||
|- | |- | ||
| 17 || So'najiz Temple Entrance | | 17 || So'najiz Temple Entrance || GF | ||
|- | |- | ||
| 18 || So'najiz Lake Platform | | 18 || So'najiz Lake Platform || GF | ||
|- | |- | ||
| 19 || Gran Krys'kajo Entrance | | 19 || Gran Krys'kajo Entrance || GF | ||
|- | |- | ||
| 20 || | | 20 || V'rda Vil West || GF | ||
|- | |- | ||
| 21 || | | 21 || V'rda Vil East | ||
'''Landmark: V'rda Vil''' | |||
| GF | |||
|- | |- | ||
| 22 || | | 22 || V'rda Vil North || GF | ||
|- | |- | ||
| 23 || Chief's Den | | 23 || Chief's Den || GF | ||
|- | |- | ||
| 24 || Covert Path | | 24 || Covert Path || GF | ||
|- | |- | ||
| 25 || Royal Grove | | 25 || Royal Grove | ||
'''Landmark: Royal Grove''' | |||
| GF | |||
|- | |||
| 26 || Calm Backyard || GF | |||
|- | |- | ||
| | | 27 || Lost Lookout || GF | ||
|- | |- | ||
| | | 28 || Seared Lake || GF | ||
|- | |- | ||
| | | 29 || Infested Marshes South | ||
'''Landmark: Infested Marshes''' | |||
| GF | |||
|- | |- | ||
| | | 30 || Infested Marshes North || GF | ||
|- | |- | ||
| | | 31 || Infested Heart || GF | ||
|- | |- | ||
| | | 32 || The Descent || GF | ||
|- | |- | ||
| | | 33 || Root || GF | ||
|- | |- | ||
| | | 34 || Chilled Den || U1 | ||
|- | |- | ||
| | | 35 || Frozen Lair || U1 | ||
|- | |- | ||
| | | 36 || Lou's Office || GF | ||
|- | |- | ||
| | | 37 || K'tara's House || GF | ||
|- | |- | ||
| | | 38 || Chief's House || GF | ||
|- | |- | ||
| | | 39 || Sacred Pond || U1 | ||
|- | |- | ||
| | | 40 || Dripping Cave || GF | ||
|- | |- | ||
| | | 41 || Tranquility Pond || GF | ||
|- | |- | ||
| | | 42 || Lost Shrine Entrance || GF | ||
|- | |- | ||
| | | 43 || Lost Shrine || GF | ||
|- | |- | ||
| | | 44 || Lost Puzzle Room || U1 | ||
|- | |- | ||
| | | 45 || Lost Power Room || U2 | ||
|- | |- | ||
| | | 46 || Grubby Cave || U1 | ||
|- | |- | ||
| | | 47 || Temple of Innovation || U1 | ||
|- | |- | ||
| | | 48 || Foul Cavity || GF | ||
|- | |- | ||
| | | 49 || Infested Cavern Entrance || U1 | ||
|- | |- | ||
| | | 50 || Infested Cavern Maze || U1 | ||
|- | |- | ||
| | | 51 || MM Entrance || U3 | ||
|- | |- | ||
| 52 || Metal Room || U3 | |||
|- | |- | ||
| | | 53 || Octo Office || U3 | ||
|- | |- | ||
| | | 54 || Test Chamber || U3 | ||
|- | |- | ||
| | | 55 || Agile Test Chamber || U2 | ||
|- | |- | ||
| | | 56 || Hand Office || U2 | ||
|- | |- | ||
| | | 57 || Big Boss || U2 | ||
|- | |- | ||
| | | 58 || Lead Office || U2 | ||
|} | |} | ||
{{clear}} | |||
== | === Treasures === | ||
Gaia's Garden has by far the largest number of chests of any area, having at least twice as many as any other area except [[Maroon Valley]]. Many of these are not initially accessible, and require either the {{ItemLink|Radiant Key}} from the [[So'najiz Temple]], or the [[Wave]] element from the [[Zir'vitar Temple]] (to use a Wave teleporter) in order to access them. | |||
{{ | [[File:Gaia's Garden Treasure Map.png|upright=1.8|thumb|left|link=https://static.wikia.nocookie.net/crosscode_gamepedia/images/c/ce/Gaia's_Garden_Treasure_Map.png | Click the map for a full-resolution image.]] | ||
{{TreasureList| | |||
{{TreasureList/entry|acc=1|type=default|item=Salted Peanuts|amount=4|loc=Jungle Entrance|info=}} | |||
{{TreasureList/entry|acc=2|type=default|item=Chef Sandwich|amount=8|loc=Jungle Entrance|info=}} | |||
{{TreasureList/entry|acc=3|type=default|item=Elder Wood|amount=6|loc=Crossroad|info=Enter on the upper path from Splitting Stumps to reach it.}} | |||
{{TreasureList/entry|acc=4|type=gold|item=Epic Metal|amount=2|loc=Crossroad|info=Enter on the upper path from Splitting Stumps to reach it. {{ItemLink|Radiant Key}} required.}} | |||
{{TreasureList/entry|acc=5|type=default|item=Steel Comb|amount=5|loc=Basin Keep Entrance|info=}} | |||
{{TreasureList/entry|acc=6|type=bronze|item=Cheese Cracker|amount=5|loc=Overgrown Path|info=Take the upper path starting in Splitting Stumps to reach here. The Wave element is required.}} | |||
{{TreasureList/entry|acc=7|type=bronze|item=Huge Nut|amount=4|loc=Overgrown Path|info=The Wave element is required.}} | |||
{{TreasureList/entry|acc=8|type=gold|item=Rough Branch|amount=1|loc=Drizzle Bosk|info= Follow the upper path from Splitting Stumps to Overgrown Path and hit the switch at the end. This opens the upper path from Overgrown Path to here. {{ItemLink|Radiant Key}} and the Wave element required.}} | |||
{{TreasureList/entry|acc=9|type=default|item=Spiky Nut|amount=6|loc=Drizzle Bosk|info=}} | |||
{{TreasureList/entry|acc=10|type=default|item=Sweet Berry Tea|amount=4|loc=Drizzle Bosk|info=}} | |||
{{TreasureList/entry|acc=11|type=silver|item=Golden Bars|amount=6|loc=Dripping Cave|info=The Wave element is required.}} | |||
{{TreasureList/entry|acc=12|type=gold|item=Galaxy Berry|amount=1|loc=Tranquility Pond|info={{ItemLink|Radiant Key}} and the Wave element required.}} | |||
{{TreasureList/entry|acc=13|type=default|item=Flaming Bun|amount=4|loc=Covert Path|info=}} | |||
{{TreasureList/entry|acc=14|type=default|item=Moon Fruit|amount=4|loc=Covert Path|info=}} | |||
{{TreasureList/entry|acc=15|type=default|item=Slime Drop|amount=5|loc=Wet Passage|info=Take the north entrance from Covert Path to reach here.}} | |||
{{TreasureList/entry|acc=16|type=bronze|item=Chili Dog|amount=4|loc=Wet Passage|info=Take the north entrance from Covert Path to reach here. The Wave element is required.}} | |||
{{TreasureList/entry|acc=17|type=silver|item=Pepper Night Tea|amount=4|loc=River's Bed|info=The Wave element is required.}} | |||
{{TreasureList/entry|acc=18|type=default|item=Fruit Salad|amount=7|loc=River's Bed|info=Take the secret pathway from Calm Backyard to reach here.}} | |||
{{TreasureList/entry|acc=19|type=default|item=Maultasche|amount=4|loc=Calm Backyard|info=}} | |||
{{TreasureList/entry|acc=20|type=default|item=Cup o' Coffee|amount=6|loc=Calm Backyard|info=}} | |||
{{TreasureList/entry|acc=21|type=default|item=Glow Pear|amount=3|loc=Royal Grove|info=Enter from Calm Backyard to reach this.}} | |||
{{TreasureList/entry|acc=22|type=default|item=Common Planter|amount=8|loc=Royal Grove|info=}} | |||
{{TreasureList/entry|acc=23|type=default|item=Salted Peanuts|amount=7|loc=Royal Grove|info=Enter from Calm Backyard to reach this.}} | |||
{{TreasureList/entry|acc=24|type=silver|item=Metal Down|amount=3|loc=Royal Grove|info=Enter from Calm Backyard to reach this.}} | |||
{{TreasureList/entry|acc=25|type=gold|item=Star Fruit|amount=5|loc=V'rda Vil West|info={{ItemLink|Radiant Key}} required.}} | |||
{{TreasureList/entry|acc=26|type=bronze|item=Metal Down|amount=2|loc=V'rda Vil West|info=}} | |||
{{TreasureList/entry|acc=27|type=silver|item=Plain Cube|amount=2|loc=V'rda Vil West|info=Projectiles can be shot through the ropes on the bridges.}} | |||
{{TreasureList/entry|acc=28|type=bronze|item=Snack Mix|amount=4|loc=V'rda Vil East|info=}} | |||
{{TreasureList/entry|acc=29|type=silver|item=Elder Wood|amount=5|loc=V'rda Vil East|info=The Wave element is required.}} | |||
{{TreasureList/entry|acc=30|type=silver|item=Precious Metal|amount=2|loc=V'rda Vil North|info=}} | |||
{{TreasureList/entry|acc=31|type=gold|item=Star Fruit|amount=3|loc=V'rda Vil North|info={{ItemLink|Radiant Key}} and the Wave element required.}} | |||
{{TreasureList/entry|acc=32|type=bronze|item=Prime Pistachios|amount=2|loc=Chief's Den|info=}} | |||
{{TreasureList/entry|acc=33|type=silver|item=Golden Bars|amount=3|loc=Chief's Den|info=}} | |||
{{TreasureList/entry|acc=34|type=gold|item=Geta Straps|amount=1|loc=Chief's Den|info={{ItemLink|Radiant Key}} and the Wave element required.}} | |||
{{TreasureList/entry|acc=35|type=default|item=Cup o' Coffee|amount=6|loc=Splitting Stumps|info=Enter on the upper path from V'rda Vil East to reach it.}} | |||
{{TreasureList/entry|acc=36|type=default|item=Royal Hive|amount=4|loc=Splitting Stumps|info=The Wave element is required.}} | |||
{{TreasureList/entry|acc=37|type=silver|item=Durian|amount=4|loc=Clinging River|info=}} | |||
{{TreasureList/entry|acc=38|type=gold|item=Rough Branch|amount=1|loc=Clinging River|info=Take the upper path from Ringing River to reach here.{{ItemLink|Radiant Key}} and the Wave element are required.}} | |||
{{TreasureList/entry|acc=39|type=bronze|item=Lazy Claw|amount=2|loc=Ringing River|info=The Wave element is required.}} | |||
{{TreasureList/entry|acc=40|type=default|item=Static Furball|amount=6|loc=Ringing River|info=The Wave element is required.}} | |||
{{TreasureList/entry|acc=41|type=default|item=Glowing Sphere|amount=7|loc=Old Timber|info=The Wave element is required.}} | |||
{{TreasureList/entry|acc=42|type=default|item=Palette Blossom|amount=4|loc=Tying Greens|info=}} | |||
{{TreasureList/entry|acc=43|type=default|item=Prime Pistachios|amount=6|loc=Tying Greens|info=}} | |||
{{TreasureList/entry|acc=44|type=silver|item=Aehre|amount=1|loc=Peridot Approach|info=Enter on the hidden path from Tying Greens to reach it. The Wave element is required.}} | |||
{{TreasureList/entry|acc=45|type=default|item=Energy Espresso|amount=4|loc=Peridot Approach|info=}} | |||
{{TreasureList/entry|acc=46|type=silver|item=Golden Bars|amount=2|loc=So'najiz Temple Entrance|info=}} | |||
{{TreasureList/entry|acc=47|type=bronze|item=Crystal Water|amount=4|loc=Grand Krys'kajo Entrance|info=The Wave element is required.}} | |||
{{TreasureList/entry|acc=48|type=default|item=Energy Espresso|amount=3|loc=Lost Lookout|info=The Wave element is required.}} | |||
{{TreasureList/entry|acc=49|type=default|item=Veggie Wraps|amount=5|loc=Lost Lookout|info=}} | |||
{{TreasureList/entry|acc=50|type=default|item=Werewolf Stick|amount=4|loc=Lost Lookout|info=}} | |||
{{TreasureList/entry|acc=51|type=default|item=Fruit Pie|amount=2|loc=Seared Lake|info=}} | |||
{{TreasureList/entry|acc=52|type=default|item=Blazing Bun|amount=2|loc=Seared Lake|info=}} | |||
{{TreasureList/entry|acc=53|type=default|item=Lazy Claw|amount=3|loc=Infested Marshes South|info=Enter from Seared Lake to reach this.}} | |||
{{TreasureList/entry|acc=54|type=default|item=Venom Shroom|amount=9|loc=Infested Marshes South|info=Enter from Seared Lake to reach this.}} | |||
{{TreasureList/entry|acc=55|type=default|item=Stout Backplate|amount=2|loc=Infested Marshes South|info=Enter from Seared Lake to reach this. The Wave element is required.}} | |||
{{TreasureList/entry|acc=56|type=default|item=Mega-Sandwich|amount=2|loc=Infested Marshes South|info=}} | |||
{{TreasureList/entry|acc=57|type=default|item=Ginger Tom. Salad|amount=3|loc=Infested Marshes North|info=Enter from Seared Lake to reach this.}} | |||
{{TreasureList/entry|acc=58|type=silver|item=Virus Root|amount=5|loc=Infested Marshes North|info=Enter from Seared Lake to hit the switch opening the right path from Infested Marshes South. Return that way to reach the chest}} | |||
{{TreasureList/entry|acc=59|type=silver|item=Golden Bars|amount=5|loc=Infested Marshes North|info=Enter from Seared Lake to hit the switch opening the right path from Infested Marshes South. Return that way to reach the chest.}} | |||
{{TreasureList/entry|acc=60|type=default|item=Spicy Beat-0-Type|amount=3|loc=Infested Marshes North|info=Enter from Seared Lake to hit the switch opening the right path from Infested Marshes South. Return that way to reach the chest.}} | |||
{{TreasureList/entry|acc=61|type=silver|item=Perforated Tophat|amount=5|loc=Chilled Den|info=}} | |||
{{TreasureList/entry|acc=62|type=silver|item=Stout Backplate|amount=3|loc=Infested Cavern Maze|info=}} | |||
{{TreasureList/entry|acc=63|type=bronze|item=Golden Ticket|amount=1|loc=Infested Cavern Maze|info=}} | |||
{{TreasureList/entry|acc=64|type=default|item=Energy Espresso|amount=2|loc=Lost Shrine|info=The entrance to the Lost Shrine isn't marked on the map initially. It's hidden behind the large tree in the north of Royal Grove reachable from Calm Backyard. The code for the shrine can be found by navigating to the entrance of Grand Krys'kajo, and then going to the north-east corner of that area, where an inscription states the code. The code is ↑↑↓↓←→←→AB (the Konami Code with A and B swapped).}} | |||
{{TreasureList/entry|acc=65|type=gold|item=Geta Glue|amount=3|loc=Lost Puzzle Room|info=}} | |||
{{TreasureList/entry|acc=66|type=silver|item=Broken Deck|amount=1|loc=Lost Power Room|info=Defeat the [[Tiefsee Angler]] to spawn the chest.}} | |||
{{TreasureList/entry|acc=67|type=default|item=Micro Crawler|amount=1|loc=Lead Office|info=Formerly Playstation exclusive. Obtainable at the end of the [[Foul Play]] quest.}} | |||
}} | |||
== Enemies == | |||
{| class="wikitable" | {| class="wikitable" | ||
|+ [[Enemies]] of Gaia's Garden | |||
! Name | ! Name | ||
! Sprite | |||
! Drops | |||
! Locations | ! Locations | ||
|- | |- | ||
| [[Papagun]] | |||
| [[File:Papagun-sprite.png|center]] | | [[File:Papagun-sprite.png|center]] | ||
| | | {{ItemLink|Huge Nut}}, {{ItemLink|Salted Peanuts}}, {{ItemLink|Amethyst}}<ref name="booster" /> | ||
| | | Jungle Entrance, Crossroad, Overgrown Path, Drizzle Bosk, Wet Passage, River's Bed, Splitting Stumps, Clinging River, Old Timber, Tying Greens, Peridot Approach, V'rda Vil North, Covert Path, Royal Grove, Calm Backyard | ||
|- | |||
| [[Argeby]] | |||
| [[File:Argeby-sprite.png|center]] | |||
| {{ItemLink|Palette Blossom}}, {{ItemLink|Veggie Wraps}}, {{ItemLink|Emerald}}<ref name="booster" /> | |||
| Jungle Entrance, Crossroad, Overgrown Path, Drizzle Bosk, Wet Passage, River's Bed, Splitting Stumps, Clinging River, Ringing River, Old Timber, Tying Greens, Peridot Approach, V'rda Vil North, Calm Backyard | |||
|- | |- | ||
| [[Tunnel Argeby]] | |||
| [[File:Argeby-sprite.png|center]] | | [[File:Argeby-sprite.png|center]] | ||
| [[ | | None<ref name="nodrop" /> | ||
| | | Grubby Cave, Temple of Innovation | ||
: | |- | ||
| [[Ampery]] | |||
| [[File:Ampery-sprite.png|center]] | |||
| {{ItemLink|Palette Blossom}} | |||
| Overgrown Path<ref name="rootingforpower" />, Drizzle Bosk<ref name="rootingforpower" />, Wet Passage<ref name="rootingforpower" />, River's Bed<ref name="rootingforpower" />, Covert Path<ref name="rootingforpower" />, Royal Grove<ref name="rootingforpower" /> | |||
|- | |||
| [[Gelleric]] | |||
| [[File:Gelleric-sprite.png|center]] | |||
| {{ItemLink|Slime Drop}}, {{ItemLink|Emerald}}<ref name="booster" /> | |||
| Crossroad, Overgrown Path, Drizzle Bosk, Wet Passage, River's Bed, Tying Greens, Peridot Approach, Covert Path, Royal Grove, Calm Backyard | |||
|- | |- | ||
| [[Tunnel Gelleric]] | |||
| [[File:Gelleric-sprite.png|center]] | | [[File:Gelleric-sprite.png|center]] | ||
| [[ | | None<ref name="nodrop" /> | ||
| | | Grubby Cave, Temple of Innovation | ||
|- | |||
| [[Shokat]] | |||
| [[File:Shokat-sprite.png|center]] | |||
| {{ItemLink|Static Furball}}, {{ItemLink|Cheese Cracker}}, {{ItemLink|Amethyst}}<ref name="booster" /> | |||
| Crossroad, Splitting Stumps, Clinging River, Ringing River, Old Timber, Tying Greens, Peridot Approach, V'rda Vil North, Calm Backyard, Lost Lookout, Infested Marshes South, Infested Marshes North, Seared Lake, Chilled Den<ref name="tropicalchill" /> | |||
|- | |||
| [[Wiccat]] | |||
| [[File:Wiccat-sprite.png|center]] | |||
| {{ItemLink|Static Furball}} | |||
| V'rda Vil North<ref name="infestedvillage" />, Chief's Den<ref name="infestedvillage" />, K'tara's House<ref name="infestedvillage" />, Chief's House<ref name="infestedvillage" />, Sacred Pond<ref name="infestedvillage" />, Zir'vitar Temple Entrance<ref name="rootcause" />, Old Timber<ref name="rootcause" />, Lost Lookout<ref name="rootcause" />, Infested Marshes North<ref name="rootcause" />, Root<ref name="rootcause" /> | |||
|- | |- | ||
| [[Tunnel Shockcat]] | |||
| [[File:Shokat-sprite.png|center]] | | [[File:Shokat-sprite.png|center]] | ||
| [[ | | None<ref name="nodrop" /> | ||
| | | Temple of Innovation | ||
: | |- | ||
| [[Tunnel Wiccat]] | |||
| [[File:Wiccat-sprite.png|center]] | |||
| None<ref name="nodrop" /> | |||
| Temple of Innovation | |||
|- | |||
| [[Angler]] | |||
| [[File:Angler-sprite.png|center]] | |||
| {{ItemLink|Glow Pear}}, {{ItemLink|Shrimp Risotto}}, {{ItemLink|Emerald}}<ref name="booster" /> | |||
| Covert Path, Royal Grove, Calm Backyard | |||
|- | |- | ||
| [[Tunnel Angler]] | |||
| [[File:Angler-sprite.png|center]] | | [[File:Angler-sprite.png|center]] | ||
| [[Angler]] | | None<ref name="nodrop" /> | ||
| | | Grubby Cave, Temple of Innovation | ||
|- | |||
| [[Leggy Angler]] | |||
| [[File:Leggy-angler-sprite.png|center]] | |||
| {{ItemLink|Glow Pear}}<ref name="norank" /> | |||
| Clinging River<ref name="foulplay" />, V'rda Vil North<ref name="foulplay" />, Test Chamber<ref name="foulplay" /> | |||
|- | |- | ||
| [[Behesloth]] | |||
| [[File:Behesloth-sprite.png|center]] | | [[File:Behesloth-sprite.png|center]] | ||
| [[ | | {{ItemLink|Lazy Claw}}, {{ItemLink|Stout Backplate}}, {{ItemLink|Amethyst}}<ref name="booster" /> | ||
| | | Ringing River, Lost Lookout, Infested Marshes South, Infested Marshes North, Seared Lake | ||
|- | |||
| [[ExeRepair(error++);]] | |||
| [[File:Exerepair-sprite.png|center]] | |||
| None | |||
| Sacred Pond<ref name="infestedvillage" />, Zir'vitar Temple Entrance<ref name="rootcause" />, Old Timber<ref name="rootcause" />, Lost Lookout<ref name="rootcause" />, Infested Marshes South<ref name="rootcause" />, Infested Marshes North<ref name="rootcause" />, The Descent<ref name="rootcause" />, Root<ref name="rootcause" /> | |||
|- | |||
| [[Jungle Guard]] | |||
| [[File:Jungle-guard-sprite.png|center]] | |||
| None | |||
| Infested Cavern Maze | |||
|- | |- | ||
| [[Jack'On'Fire]] | |||
| [[File:Jackonfire-sprite.png|center]] | | [[File:Jackonfire-sprite.png|center]] | ||
| | | {{ItemLink|Jack's Flame}} | ||
| | | Lost Lookout<ref name="pumpkinland" />, Infested Marshes South<ref name="pumpkinland" />, Infested Marshes North<ref name="pumpkinland" />, Seared Lake<ref name="pumpkinland" /> | ||
|- | |||
| [[Tourist Karotto]] | |||
| [[File:Tourist-karotto-sprite.png|center]] | |||
| {{ItemLink|Fruit Pie}} | |||
| Chilled Den<ref name="tropicalchill" /> | |||
|- | |||
| [[Tunnel Teslabovine]] | |||
| [[File:Tunnel-teslabovine-sprite.png|center]] | |||
| None<ref name="nodrop" /> | |||
| Temple of Innovation | |||
|- | |||
| [[Apollo|Apollo 3]] (PVP) | |||
| [[File:Apollo-3-sprite.png|center]] | |||
| None | |||
| Jungle Entrance<ref name="respawn" /> | |||
|- | |||
| [[Sephisloth]] ([[boss]]) | |||
| [[File:Sephisloth-sprite.png|center]] | |||
| {{ItemLink|Lazy Claw}}<ref name="norank" /> | |||
| Root<ref name="rootcause" /> | |||
|- | |||
| [[Tiefsee Angler]] (boss) | |||
| [[File:Tiefsee-angler-sprite.png|center]] | |||
| {{ItemLink|Glow Pear}} | |||
| Lost Power Room<ref name="respawn" /> | |||
|- | |||
| [[Buff Bloomy]] (boss) | |||
| [[File:Buff-bloomy-sprite.png|center]] | |||
| {{ItemLink|Power Spinach}}, {{ItemLink|Dk Pepper}} | |||
| Wet Passage<ref name="rootingforpower" /> | |||
|- | |||
| [[Karotto Fruitseeker]] (boss) | |||
| [[File:Karotto-fruitseeker-sprite.png|center]] | |||
| None | |||
| Frozen Lair<ref name="coldfiend" /> | |||
|- | |- | ||
| [[File: | | [[Mecha Gear FISH]] (boss) | ||
| | | [[File:Mecha-gear-fish-sprite.png|center|100x100px]] | ||
| | | {{ItemLink|Fishy Documents}} | ||
| Big Boss<ref name="foulplay" /> | |||
|} | |} | ||
<references> | |||
<ref name="booster">With {{ItemLink|Garden Booster}} enabled</ref> | |||
<ref name="nodrop">Only fought in battles where item drops are disabled</ref> | |||
<ref name="rootingforpower">Spawns during [[Rooting for Power]] quest</ref> | |||
<ref name="tropicalchill">Spawns during [[Tropical Chill]] quest</ref> | |||
<ref name="infestedvillage">Only fightable during [[An Infested Village]] quest</ref> | |||
<ref name="rootcause">Spawns during [[The Root Cause]] quest</ref> | |||
<ref name="norank">Additional drops not possible due to combat rank being disabled during this encounter</ref> | |||
<ref name="foulplay">Spawns during [[Foul Play]] quest (Playstation exclusive)</ref> | |||
<ref name="pumpkinland">Spawns during [[Pumpkin Land Superfun]] quest</ref> | |||
<ref name="respawn">Does not respawn</ref> | |||
<ref name="coldfiend">Spawns during [[Melting this Cold Fiend]] quest</ref> | |||
</references> | |||
== Botanics == | == Botanics == | ||
The following | The following botanics can be found in Gaia's Garden: | ||
{| class="wikitable" | {| class="wikitable" | ||
| Line 211: | Line 408: | ||
|image=[[File:Alpha-Puff-Plant.png|center]] | |image=[[File:Alpha-Puff-Plant.png|center]] | ||
|location=Commonly found everywhere but infested- and Vr'da Vil region. | |location=Commonly found everywhere but infested- and Vr'da Vil region. | ||
|unlockLocation= | |unlockLocation=15 | ||
|items= | |items= | ||
* {{ItemLink|Curly | * {{ItemLink|Curly Fern}} (12 %) | ||
* {{ItemLink|Steel Comb}} (8 %) | * {{ItemLink|Steel Comb}} (8 %) | ||
|unlockDrops= | |unlockDrops=30}} | ||
{{ItemDestroyable|name=Beta Puff Plant | {{ItemDestroyable|name=Beta Puff Plant | ||
|image=[[File:Beta-Puff-Plant.png|center]] | |image=[[File:Beta-Puff-Plant.png|center]] | ||
|location=Commonly found everywhere but infested- and Vr'da Vil region. | |location=Commonly found everywhere but infested- and Vr'da Vil region. | ||
|unlockLocation= | |unlockLocation=15 | ||
|items= | |items= | ||
* {{ItemLink|Curly | * {{ItemLink|Curly Fern}} (12 %) | ||
* {{ItemLink|Steel Comb}} (8 %) | * {{ItemLink|Steel Comb}} (8 %) | ||
* {{ItemLink|Elder Wood}} (1 %) | * {{ItemLink|Elder Wood}} (1 %) | ||
|unlockDrops= | |unlockDrops=30}} | ||
{{ItemDestroyable|name=Omega Puff Plant | {{ItemDestroyable|name=Omega Puff Plant | ||
|image=[[File:Omega-Puff-Plant.png|center]] | |image=[[File:Omega-Puff-Plant.png|center]] | ||
|location=Rarely found on high grounds | |location=Rarely found on high grounds outside infested- and Vr'da Vil region. | ||
|unlockLocation= | |unlockLocation=5 | ||
|items= | |items= | ||
* {{ItemLink|Elder Wood}} (45 %) | * {{ItemLink|Elder Wood}} (45 %) | ||
* {{ItemLink|Steel Comb}} (55 %) | * {{ItemLink|Steel Comb}} (55 %) | ||
|unlockDrops= | |unlockDrops=10}} | ||
{{ItemDestroyable|name=Alpha Closed Bareleles | {{ItemDestroyable|name=Alpha Closed Bareleles | ||
|image=[[File:Alpha-Closed-Barelels.png|center]] | |image=[[File:Alpha-Closed-Barelels.png|center]] | ||
|location=Commonly found near water where it's not raining. | |location=Commonly found near water where it's not raining. | ||
|unlockLocation= | |unlockLocation=10 | ||
|items= | |items= | ||
* {{ItemLink|Common Planter}} (10 %) | * {{ItemLink|Common Planter}} (10 %) | ||
* {{ItemLink|Spiky Nut}} (4 %) | * {{ItemLink|Spiky Nut}} (4 %) | ||
|unlockDrops= | |unlockDrops=20}} | ||
{{ItemDestroyable|name=Beta Closed Bareleles | {{ItemDestroyable|name=Beta Closed Bareleles | ||
|image=[[File:Beta-Closed-Barelels.png|center]] | |image=[[File:Beta-Closed-Barelels.png|center]] | ||
|location=Commonly found near water where it's not raining. | |location=Commonly found near water where it's not raining. | ||
|unlockLocation= | |unlockLocation=10 | ||
|items= | |items= | ||
* {{ItemLink|Common Planter}} (12 %) | * {{ItemLink|Common Planter}} (12 %) | ||
* {{ItemLink|Spiky Nut}} (4 %) | * {{ItemLink|Spiky Nut}} (4 %) | ||
|unlockDrops= | |unlockDrops=20}} | ||
{{ItemDestroyable|name=Bee Hive | {{ItemDestroyable|name=Bee Hive | ||
|image=[[File:Bee-Hive.png|center]] | |image=[[File:Bee-Hive.png|center]] | ||
|location=Sporadically found everywhere up against walls and trees. | |location=Sporadically found everywhere up against walls and trees. | ||
|unlockLocation= | |unlockLocation=5 | ||
|items= | |items= | ||
* {{ItemLink|Steel Comb}} (20 %) | * {{ItemLink|Steel Comb}} (20 %) | ||
* {{ItemLink|Royal Hive}} (20 %) | * {{ItemLink|Royal Hive}} (20 %) | ||
|unlockDrops= | |unlockDrops=10}} | ||
{{ItemDestroyable|name=Alpha Open Bareleles | {{ItemDestroyable|name=Alpha Open Bareleles | ||
|image=[[File:Alpha-Open-Barelels.png|center]] | |image=[[File:Alpha-Open-Barelels.png|center]] | ||
|location=Commonly found near water where it's raining. | |location=Commonly found near water where it's raining. | ||
|unlockLocation= | |unlockLocation=10 | ||
|items= | |items= | ||
* {{ItemLink|Common Planter}} (12 %) | * {{ItemLink|Common Planter}} (12 %) | ||
* {{ItemLink|Spiky Nut}} (8 %) | * {{ItemLink|Spiky Nut}} (8 %) | ||
|unlockDrops= | |unlockDrops=20}} | ||
{{ItemDestroyable|name=Beta Open Bareleles | {{ItemDestroyable|name=Beta Open Bareleles | ||
|image=[[File:Beta-Open-Barelels.png|center]] | |image=[[File:Beta-Open-Barelels.png|center]] | ||
|location=Commonly found near water where it's raining. | |location=Commonly found near water where it's raining. | ||
|unlockLocation= | |unlockLocation=10 | ||
|items= | |items= | ||
* {{ItemLink|Common Planter}} (12 %) | * {{ItemLink|Common Planter}} (12 %) | ||
* {{ItemLink|Spiky Nut}} (8 %) | * {{ItemLink|Spiky Nut}} (8 %) | ||
* {{ItemLink|Moon Fruit}} (1 %) | * {{ItemLink|Moon Fruit}} (1 %) | ||
|unlockDrops= | |unlockDrops=20}} | ||
{{ItemDestroyable|name=Omega Open Bareleles | {{ItemDestroyable|name=Omega Open Bareleles | ||
|image=[[File:Omega-Open-Barelels.png|center]] | |image=[[File:Omega-Open-Barelels.png|center]] | ||
|location=Rarely found near water where it's raining. | |location=Rarely found near water where it's raining. | ||
|unlockLocation= | |unlockLocation=4 | ||
|items= | |items= | ||
* {{ItemLink|Moon Fruit}} (45 %) | * {{ItemLink|Moon Fruit}} (45 %) | ||
* {{ItemLink|Spiky Nut}} (55 %) | * {{ItemLink|Spiky Nut}} (55 %) | ||
|unlockDrops= | |unlockDrops=8}} | ||
{{ItemDestroyable|name=Alpha Vivid Puff Plant | {{ItemDestroyable|name=Alpha Vivid Puff Plant | ||
|image=[[File:Alpha-Vivid-Puff-Plant.png|center]] | |image=[[File:Alpha-Vivid-Puff-Plant.png|center]] | ||
|location=Commonly found in the Vr'da Vil region. | |location=Commonly found in the Vr'da Vil region. | ||
|unlockLocation= | |unlockLocation=10 | ||
|items= | |items= | ||
* {{ItemLink|Blue Mango}} (12 %) | * {{ItemLink|Blue Mango}} (12 %) | ||
* {{ItemLink|Exotic Resin}} (8 %) | * {{ItemLink|Exotic Resin}} (8 %) | ||
|unlockDrops= | |unlockDrops=20}} | ||
{{ItemDestroyable|name=Beta Vivid Puff Plant | {{ItemDestroyable|name=Beta Vivid Puff Plant | ||
|image=[[File:Beta-Vivid-Puff-Plant.png|center]] | |image=[[File:Beta-Vivid-Puff-Plant.png|center]] | ||
|location=Commonly found in the Vr'da Vil region. | |location=Commonly found in the Vr'da Vil region. | ||
|unlockLocation= | |unlockLocation=10 | ||
|items= | |items= | ||
* {{ItemLink|Blue Mango}} (12 %) | * {{ItemLink|Blue Mango}} (12 %) | ||
* {{ItemLink|Exotic Resin}} (8 %) | * {{ItemLink|Exotic Resin}} (8 %) | ||
* {{ItemLink|Star Fruit}} (1 %) | * {{ItemLink|Star Fruit}} (1 %) | ||
|unlockDrops= | |unlockDrops=20}} | ||
{{ItemDestroyable|name=Omega Vivid Puff Plant | {{ItemDestroyable|name=Omega Vivid Puff Plant | ||
|image=[[File:Omega-Vivid-Puff-Plant.png|center]] | |image=[[File:Omega-Vivid-Puff-Plant.png|center]] | ||
|location=Rarely found in the Vr'da Vil region. | |location=Rarely found in the Vr'da Vil region. | ||
|unlockLocation= | |unlockLocation=4 | ||
|items= | |items= | ||
* {{ItemLink|Star Fruit}} (45 %) | * {{ItemLink|Star Fruit}} (45 %) | ||
* {{ItemLink|Exotic Resin}} (55 %) | * {{ItemLink|Exotic Resin}} (55 %) | ||
|unlockDrops= | |unlockDrops=8}} | ||
{{ItemDestroyable|name=Alpha Virus Shroom | {{ItemDestroyable|name=Alpha Virus Shroom | ||
|image=[[File:Alpha-Virus-Shroom.png|center]] | |image=[[File:Alpha-Virus-Shroom.png|center]] | ||
|location=Commonly found in the infested region of the jungle. | |location=Commonly found in the infested region of the jungle. | ||
|unlockLocation= | |unlockLocation=13 | ||
|items= | |items= | ||
* {{ItemLink|Venom Shroom}} (12 %) | * {{ItemLink|Venom Shroom}} (12 %) | ||
* {{ItemLink|Glowing Sphere}} (8 %) | * {{ItemLink|Glowing Sphere}} (8 %) | ||
|unlockDrops= | |unlockDrops=25}} | ||
{{ItemDestroyable|name=Beta Virus Shroom | {{ItemDestroyable|name=Beta Virus Shroom | ||
|image=[[File:Beta-Virus-Shroom.png|center]] | |image=[[File:Beta-Virus-Shroom.png|center]] | ||
|location=Commonly found in the infested region of the jungle. | |location=Commonly found in the infested region of the jungle. | ||
|unlockLocation= | |unlockLocation=13 | ||
|items= | |items= | ||
* {{ItemLink|Venom Shroom}} (12 %) | * {{ItemLink|Venom Shroom}} (12 %) | ||
* {{ItemLink|Glowing Sphere}} (8 %) | * {{ItemLink|Glowing Sphere}} (8 %) | ||
* {{ItemLink|Virus Root}} (1 %) | * {{ItemLink|Virus Root}} (1 %) | ||
|unlockDrops= | |unlockDrops=25}} | ||
{{ItemDestroyable|name=Omega Virus Shroom | {{ItemDestroyable|name=Omega Virus Shroom | ||
|image=[[File:Omega-Virus-Shroom.png|center]] | |image=[[File:Omega-Virus-Shroom.png|center]] | ||
|location=Rarely found in the infested region of the jungle. | |location=Rarely found in the infested region of the jungle. | ||
|unlockLocation= | |unlockLocation=4 | ||
|items= | |items= | ||
* {{ItemLink|Virus Root}} (45 %) | * {{ItemLink|Virus Root}} (45 %) | ||
* {{ItemLink|Glowing Sphere}} (55 %) | * {{ItemLink|Glowing Sphere}} (55 %) | ||
|unlockDrops= | |unlockDrops=8}} | ||
|} | |} | ||
== Traders == | == Traders == | ||
There is only one trader initially but more can be unlocked | There is only one [[trader]] initially but more can be unlocked through quests. The V'rda Vil trades are particularly notable, as they offer sets and metals for fewer trade items than anywhere else in the game, and are therefore very useful when obtaining late-game equipment. | ||
* '''Edgy Salesman''' – Located in Jungle Entrance | |||
{| class="wikitable sortable" | |||
! Offered Item | |||
! Credits | |||
! Requisite Items | |||
|- | |||
| {{ItemLink|Twitching Slicer}} | |||
| 44444 | |||
| {{ItemLink|Humming Razor}}, {{ItemLink|Tremor Engine}}, 4x {{ItemLink|Static Furball}}, 3x {{ItemLink|Precious Metal}} | |||
|- | |||
| {{ItemLink|Vermillion Mantle}} | |||
| 39666 | |||
| {{ItemLink|Precious Metal}}, 6x {{ItemLink|Butter Silk}}, 6x {{ItemLink|Palette Blossom}}, 6x {{ItemLink|Elder Wood}} | |||
|} | |||
* '''V'rda Vil Sets''' – Located in V'rda Vil West after the [[An Infested Village]] quest | |||
{| class="wikitable sortable" | |||
! Offered Item | |||
! Credits | |||
! Requisite Items | |||
|- | |||
| {{ItemLink|Veggie Set}} | |||
| 100 | |||
| 4x {{ItemLink|Common Planter}} | |||
|- | |||
| {{ItemLink|Fruit Set}} | |||
| 100 | |||
| 4x {{ItemLink|Curly Fern}} | |||
|- | |||
| {{ItemLink|Spice Set}} | |||
| 250 | |||
| {{ItemLink|Virus Root}}, {{ItemLink|Star Fruit}} | |||
|- | |||
| {{ItemLink|Spice Set}} | |||
| 250 | |||
| {{ItemLink|Virus Root}}, {{ItemLink|Moon Fruit}} | |||
|} | |||
* '''V'rda Vil Metals''' – Located in V'rda Vil West after the [[An Infested Village]] quest | |||
{| class="wikitable sortable" | |||
! Offered Item | |||
! Credits | |||
! Requisite Items | |||
|- | |||
| {{ItemLink|Junk Metal}} | |||
| 90 | |||
| 2x {{ItemLink|Curly Fern}}, 2x {{ItemLink|Common Planter}} | |||
|- | |||
| {{ItemLink|Refined Metal}} | |||
| 450 | |||
| {{ItemLink|Junk Metal}}, 2x {{ItemLink|Steel Comb}}, {{ItemLink|Glowing Sphere}} | |||
|- | |||
| {{ItemLink|Precious Metal}} | |||
| 2500 | |||
| {{ItemLink|Refined Metal}}, 2x {{ItemLink|Elder Wood}}, 2x {{ItemLink|Virus Root}} | |||
|- | |||
| {{ItemLink|Precious Metal}} | |||
| 2500 | |||
| {{ItemLink|Refined Metal}}, 2x {{ItemLink|Elder Wood}}, {{ItemLink|Moon Fruit}}, {{ItemLink|Star Fruit}} | |||
|} | |||
* '''TurretDefense Trader''' – Located in Grubby Cave after the [[Turret Defense]] quest | |||
{| class="wikitable sortable" | |||
! Offered Item | |||
! Credits | |||
! Requisite Items | |||
|- | |||
| {{ItemLink|Elder Wood}} | |||
| 600 | |||
| 2x {{ItemLink|Turret Tokens}} | |||
|- | |||
| {{ItemLink|Cross Sandwich|showFoodIcon=1}} | |||
| 5000 | |||
| 15x {{ItemLink|Turret Tokens}} | |||
|- | |||
| {{ItemLink|Final Dinner|showFoodIcon=1}} | |||
| 6666 | |||
| 30x {{ItemLink|Turret Tokens}} | |||
|- | |||
| {{ItemLink|Trench Boots}}<ref name="temples" /> | |||
| 77777 | |||
| 33x {{ItemLink|Turret Tokens}} | |||
|} | |||
<references> | |||
<ref name="temples">Available after completing [[Zir'vitar Temple]] and [[So'najiz Temple]]</ref> | |||
</references> | |||
* '''TurretDefense Trader''' – Located in Temple of Innovation after the [[An Original Idea]] quest | |||
{| class="wikitable sortable" | {| class="wikitable sortable" | ||
! Offered Item | |||
! Credits | |||
! Requisite Items | |||
|- | |- | ||
| {{ItemLink|Elder Wood}} | |||
| 600 | |||
| 2x {{ItemLink|Turret Tokens}} | |||
|- | |||
| {{ItemLink|Cross Sandwich|showFoodIcon=1}} | |||
| 5000 | |||
| 15x {{ItemLink|Turret Tokens}} | |||
|- | |||
| {{ItemLink|Final Dinner|showFoodIcon=1}} | |||
| 6666 | |||
| 30x {{ItemLink|Turret Tokens}} | |||
|- | |||
| {{ItemLink|Trench Boots}} | |||
| 77777 | |||
| 33x {{ItemLink|Turret Tokens}} | |||
|} | |||
== Quests == | |||
The [[quests]] that can be started in Gaia's Garden are: | |||
* [[The Root Cause]] | |||
* [[Gaia's Garden Trailblazing]] | |||
** [[Gaia's Garden Collect]] | |||
** [[Gaia's Garden Defeat]] | |||
** [[Gaia's Garden Landmarks]] | |||
** [[Gaia's Garden Data Probe]] | |||
* [[Turret Defense Challenge #1]] | |||
* [https://crosscode.fandom.com/wiki/Turret_Defense_Challenge_2 Turret Defense Challenge #2] | |||
== A New Home DLC Changes == | |||
{{Location_Card|name=Gaia's Garden | |||
|color=#00734F | |||
|image=File:Gaia's Garden.png | |||
|description=The great jungle of the north, home to the giant Tree known as "Gaia". | |||
|room_count=58 | |||
|quest_count=8 | |||
|treasure_default = 35 | |||
|treasure_key = 0 | |||
|treasure_masterkey = 0 | |||
|treasure_bronze = 9 | |||
|treasure_silver = 15 | |||
|treasure_gold = 8 | |||
|trader_count=7}} | |||
The [[A New Home]] DLC adds several new quests that take place partially in Gaia's Garden, one of which also unlocks some new traders in the area. | |||
=== Enemies === | |||
{| class="wikitable" | |||
|+ [[Enemies]] of Gaia's Garden | |||
! Name | ! Name | ||
! | ! Sprite | ||
! | ! Drops | ||
! Locations | |||
|- | |- | ||
| | | [[Ampery]] | ||
| | | [[File:Ampery-sprite.png|center]] | ||
|{{ | | {{ItemLink|Palette Blossom}} | ||
| Basin Keep Entrance<ref name="saltydetox" /> | |||
|- | |- | ||
| | | [[Picat]] | ||
| | | [[File:Picat-sprite.png|center]] | ||
| | | None | ||
| Lost Lookout<ref name="fridges" />, Infested Marshes North<ref name="fridges" /> | |||
|- | |- | ||
| | | [[Pinceron]] | ||
| | | [[File:Pinceron-sprite.png|center]] | ||
| | | {{ItemLink|Poison Stinger}}<ref name="norank" /> | ||
| Infested Marshes South<ref name="ontherun" /> | |||
|- | |||
| [[Boss Pincer]] | |||
| [[File:Boss-pincer-sprite.png|center]] | |||
| {{ItemLink|Poison Stinger}}<ref name="norank" /> | |||
| Infested Marshes South<ref name="ontherun" /> | |||
|- | |||
| [[Tim]] | |||
| [[File:Tim-sprite.png|center]] | |||
| {{ItemLink|Squishy Teeth}}<ref name="norank" /> | |||
| Infested Marshes South<ref name="ontherun" /> | |||
|- | |||
| [[Ivory Bovine]] | |||
| [[File:Ivory-buffalo-sprite.png|center]] | |||
| {{ItemLink|Bovine Skin}}<ref name="norank" /> | |||
| Infested Marshes South<ref name="ontherun" /> | |||
|- | |||
| [[Sao]] | |||
| [[File:Sao-sprite.png|center]] | |||
| None | |||
| Overgrown Path<ref name="sao" /> | |||
|- | |||
| [[Toxovolt]] ([[Bosses|boss]]) | |||
| [[File:Toxovolt-sprite.png|center]] | |||
| None | |||
| Basin Keep Entrance<ref name="saltydetox" /> | |||
|} | |} | ||
<references> | |||
<ref name="saltydetox">During the [[Salty Detox]] quest</ref> | |||
<ref name="fridges">During the [[Riches with Fridges]] quest</ref> | |||
<ref name="norank">Additional drops not possible since combat rank is disabled during this encounter</ref> | |||
<ref name="ontherun">During the [[Lost and On the Run]] quest</ref> | |||
<ref name="sao">After encountering him in [[Basin Keep]]; does not respawn</ref> | |||
</references> | |||
== | === Traders === | ||
The | The new quests add two additional traders to the area. | ||
* '''V'rda Vil Food''' – Located in V'rda Vil East after the [[Riches with Fridges]] quest | |||
{| class="wikitable sortable" | |||
! Offered Item | |||
! Credits | |||
! Requisite Items | |||
|- | |||
| {{ItemLink|Echo Roll|showFoodIcon=1}} | |||
| 4200 | |||
| 6x {{ItemLink|Fruit Set}}, 2x {{ItemLink|Spice Set}}, 7x {{ItemLink|White Grain}} | |||
|- | |||
| {{ItemLink|Green Risotto|showFoodIcon=1}} | |||
| 4200 | |||
| 6x {{ItemLink|Veggie Set}}, 2x {{ItemLink|Spice Set}}, 7x {{ItemLink|Green Arbor}} | |||
|- | |||
| {{ItemLink|Final Dinner|showFoodIcon=1}} | |||
| 11111 | |||
| 2x {{ItemLink|Full Course}}, 5x {{ItemLink|Spice Set}}, 3x {{ItemLink|Marinated Meat}}, {{ItemLink|Epic Metal}} | |||
|} | |||
* '''V'rda Vil Trades''' – Located in 'V'rda Vil East after the [[Riches with Fridges]] quest | |||
{| class="wikitable sortable" | |||
! Offered Item | |||
! Credits | |||
! Requisite Items | |||
|- | |||
| 2x {{ItemLink|Mellow Water}} | |||
| 2000 | |||
| {{ItemLink|Mellow Water}}, 6x {{ItemLink|Venom Shroom}}, 4x {{ItemLink|Vivid Water}} | |||
|- | |||
| 2x {{ItemLink|Yellow Sponge}} | |||
| 2000 | |||
| {{ItemLink|Yellow Sponge}}, 3x {{ItemLink|Glowing Sphere}}, 2x {{ItemLink|Glaring Rock}} | |||
|- | |||
| 2x {{ItemLink|Shell Nut}} | |||
| 2000 | |||
| {{ItemLink|Shell Nut}}, 3x {{ItemLink|Dirty Rubble}}, 3x {{ItemLink|Spark Tin}}, 2x {{ItemLink|Spiky Nut}} | |||
|- | |||
| {{ItemLink|Power Spinach}} | |||
| 2600 | |||
| 7x {{ItemLink|Blue Grass}}, 3x {{ItemLink|Catalop Pellet}}, 2x {{ItemLink|Cobalt Crystal}} | |||
|} | |||
== Role in the Plot == | |||
=== In CrossWorlds === | |||
[[Seeker]]s arrive in Gaia's Garden to run the three temples of the [[Grand Krys'kajo]] and collect the [[Shock]] and [[Wave]] elements. However, on going to do so, they find their path blocked by the [[Shad]] of V'rda Vil. The Shad are blockading the temples in protest, as their village is overrun with [[Wiccat]]s, which they blame on the humans who have built a power plant connected to [[Zir'vitar Temple]]. The Seekers must visit the mayor of [[Basin Keep]] in search of a solution, and are tasked with assisting the Shad [[NPC#K'tara|K'tara]] with dealing with the problem, during the mandatory quest [[An Infested Village]]. With K'tara's help, the Seekers gain access to the infested part of V'rda Vil and discover the source of the problem, an [[ExeRepair(error++);]] in a sacred spring under the Eldress's house. After defeating this, the Wiccats disappear and the Shad free access to the temples, although they remain suspicious of humanity. | |||
Seekers are then free to complete [[So'najiz Temple]] and [[Zir'vitar Temple]] in any order, collecting the Shock and Wave elements. However, before they can proceed with the Grand Krys'kajo proper, the Shad again block their path, as the Wiccats have returned to their village. The Seekers then encounter [[NPC#Lou Cretia|Lou Cretia]], a scientist working at the power plant, who sends them on a second mandatory quest, [[The Root Cause]]. They follow a trail of ExeRepair(error++);s across the jungle, eventually discovering the true cause of the infestation: a rogue monster, the [[Sephisloth]], had damaged the [[Track of the Ancients]], and the ExeRepair(error++); and Wiccats were a manifestation of the Track's debugging process. After defeating the Sephisloth, the Wiccats vanish for good this time, the Shad retreat and the Seekers can proceed to the Grand Krys'kajo and prove their mastery of Shock and Wave. | |||
=== In CrossCode === | |||
On arriving in Gaia's Garden, [[Lea]] is immediately confronted by [[Apollo]] and [[Joern]], with Apollo challenging her to a duel. After the duel, Joern, realizing how depressed Lea seems, convinces Apollo to let her join their party. The three complete the [[An Infested Village]] quest together before logging off for the night. The next day, Lea is contacted by [[Toby Tremblay|C'tron]], who tricks her into meeting up with [[Emilie-Sophie de Belmond|Emilie]] and then mediates between them, helping Emilie to forgive Lea for leaving the [[Para island raid]]. The trio complete one of the dungeons in the jungle, before deciding to call it a day. | |||
The next day, Lea, Emilie, and C'tron return to Gaia's Garden and complete the second dungeon as well as the [[The Root Cause]] quest. After, they run into Apollo and Joern, and while C'tron and Joern choose to log off for the day, Lea, Emilie, and Apollo go on to complete the [[Grand Krys'kajo]] together. | |||
In the [[A New Home]] DLC, Lea and C'tron return to Gaia's Garden to visit where C'tron reunited Lea and Emilie, in the hope that this will help C'tron to recover his memory. | |||
== | == Trophies == | ||
[[ | {{Main|Trophies}} | ||
;There is no Cow Level | |||
:Visit the perfectly normal mushroom in Seared Lake | |||
;The None-Winted Devil | |||
:Defeat the [[Sephisloth]] | |||
;Showdown at Gaia's Garden | |||
:Win the third PvP battle against [[Apollo]] | |||
;Old and Mean | |||
:Find and defeat [[Tiefsee Angler]] | |||
;True Spheromancer | |||
:Win the third PVP battle against [[Apollo]] without losing a single round | |||
;Gaia Landmarks | |||
:Find all landmarks in Gaia's Garden | |||
;Gaia's Scavenger | |||
:Open all chests in Gaia's Garden | |||
== Secrets and Challenges == | |||
The turret defense challenges from [[Turret Defense]] and [[An Original Idea]] can be repeated for high scores and to earn {{ItemLink|Turret Tokens}} to spend at traders. | |||
The Lost Shrine contains a miniboss which is necessary to complete the [[A Promise Is a Promise 4]] quest. The shrine is locked with a code, which can be found on a plaque behind [[Grand Krys'kajo]]. The code is a slight variation on the Konami code, Up Up Down Down Left Right Left Right A B. Hints towards the locarion of both the shrine and the plaque are given in a book in [[Basin Keep]] Echelon Tower. | |||
Latest revision as of 21:59, 2 November 2023
Gaia's Garden is a location in CrossWorlds. It is the largest area in the game, an immense jungle located to the northeast of Rookie Harbor. It can only be reached after completing Faj'ro Temple.
| Gaia's Garden |
|---|
|
Gaia's Garden is an enormous jungle and the largest area to be found on Shadoon. Its high trees stand towering beside the many rivers that stretch from the north-west to the south-east. In the center of the jungle a huge lake can be found with a small island that is home to the paradoxical Basin Keep. In the south-east a small Shad tribe calls the trees their home. They mostly keep to themselves and live in harmony with the jungle. However, tensions between humans and Shad have arisen ever since humans built a power plant at the entrance of the Zir'vitar Temple. A vile infestation has spread in the north-east of the jungle which seems to originate from the power plant. In the north one can find the mighty Grand Krys'kajo. A tree that stand above all other trees. However to get close to it, A Seeker first needs to to finish the trials of both the Zir'vitar Temple and So'najiz Temple which stand beside the tree. |
| -Encyclopedia entry |
Layout
The area's main entrance from Autumn's Fall leads to a crossroads, where continuing straight will lead to the city of Basin Keep. The left and right paths wrap around the city, eventually meeting up at the three temples of the Grand Krys'kajo. Three sub-areas can be accessed from this ring path: the swampy Royal Grove to the northwest, the shady, mushroom-filled Infested Marshes to the northeast, and V'rda Vil to the southeast.
V'rda Vil is a Shad village, and the fifth town reached in the game. It is also the only town that is part of a larger exploration area, rather than being a separate area. Most of the inhabitants are quite hostile to humans, due to some past incident that involves the Wiccats that infest the northern areas of the village; the Shad blame the infestation on the humans' power plant near the temples. The villagers' trust has to be regained by completing a mandatory storyline quest.
Most of the area is immediately accessible, although several of the side caves need to be unlocked. The houses in V'rda Vil are unlocked during the An Infested Village quest. The entrances to Zir'vitar and So'najiz temples are only accessible after that quest, and their ending rooms can only be reached after completing the dungeon. Infested Heart is unlocked during The Root Cause quest, and the Grand Krys'kajo entrance is unlocked after that quest. The Lost Shrine and Tranquility Pond require the Wave element to reach. Foul Cavity and the infested cavern are unlocked during the Mushroom Kingdom quest. The Chilled Den is unlocked during the Tropical Chill quest chain, and the Grubby Cave is unlocked during the Turret Defense quest chain. The secret lab is only unlocked during the Playstation-exclusive Foul Play quest.
Connecting regions
- Autumn's Fall via Jungle Entrance
- Basin Keep via Basin Keep Entrance and teleporter in Grubby Cave
- Zir'vitar Temple via Zir'vitar Temple Entrance and Zir'vitar Temple Roof
- So'najiz Temple via So'najiz Temple Entrance and So'najiz Lake Platform
- Grand Krys'kajo via Grand Krys'kajo Entrance
Map
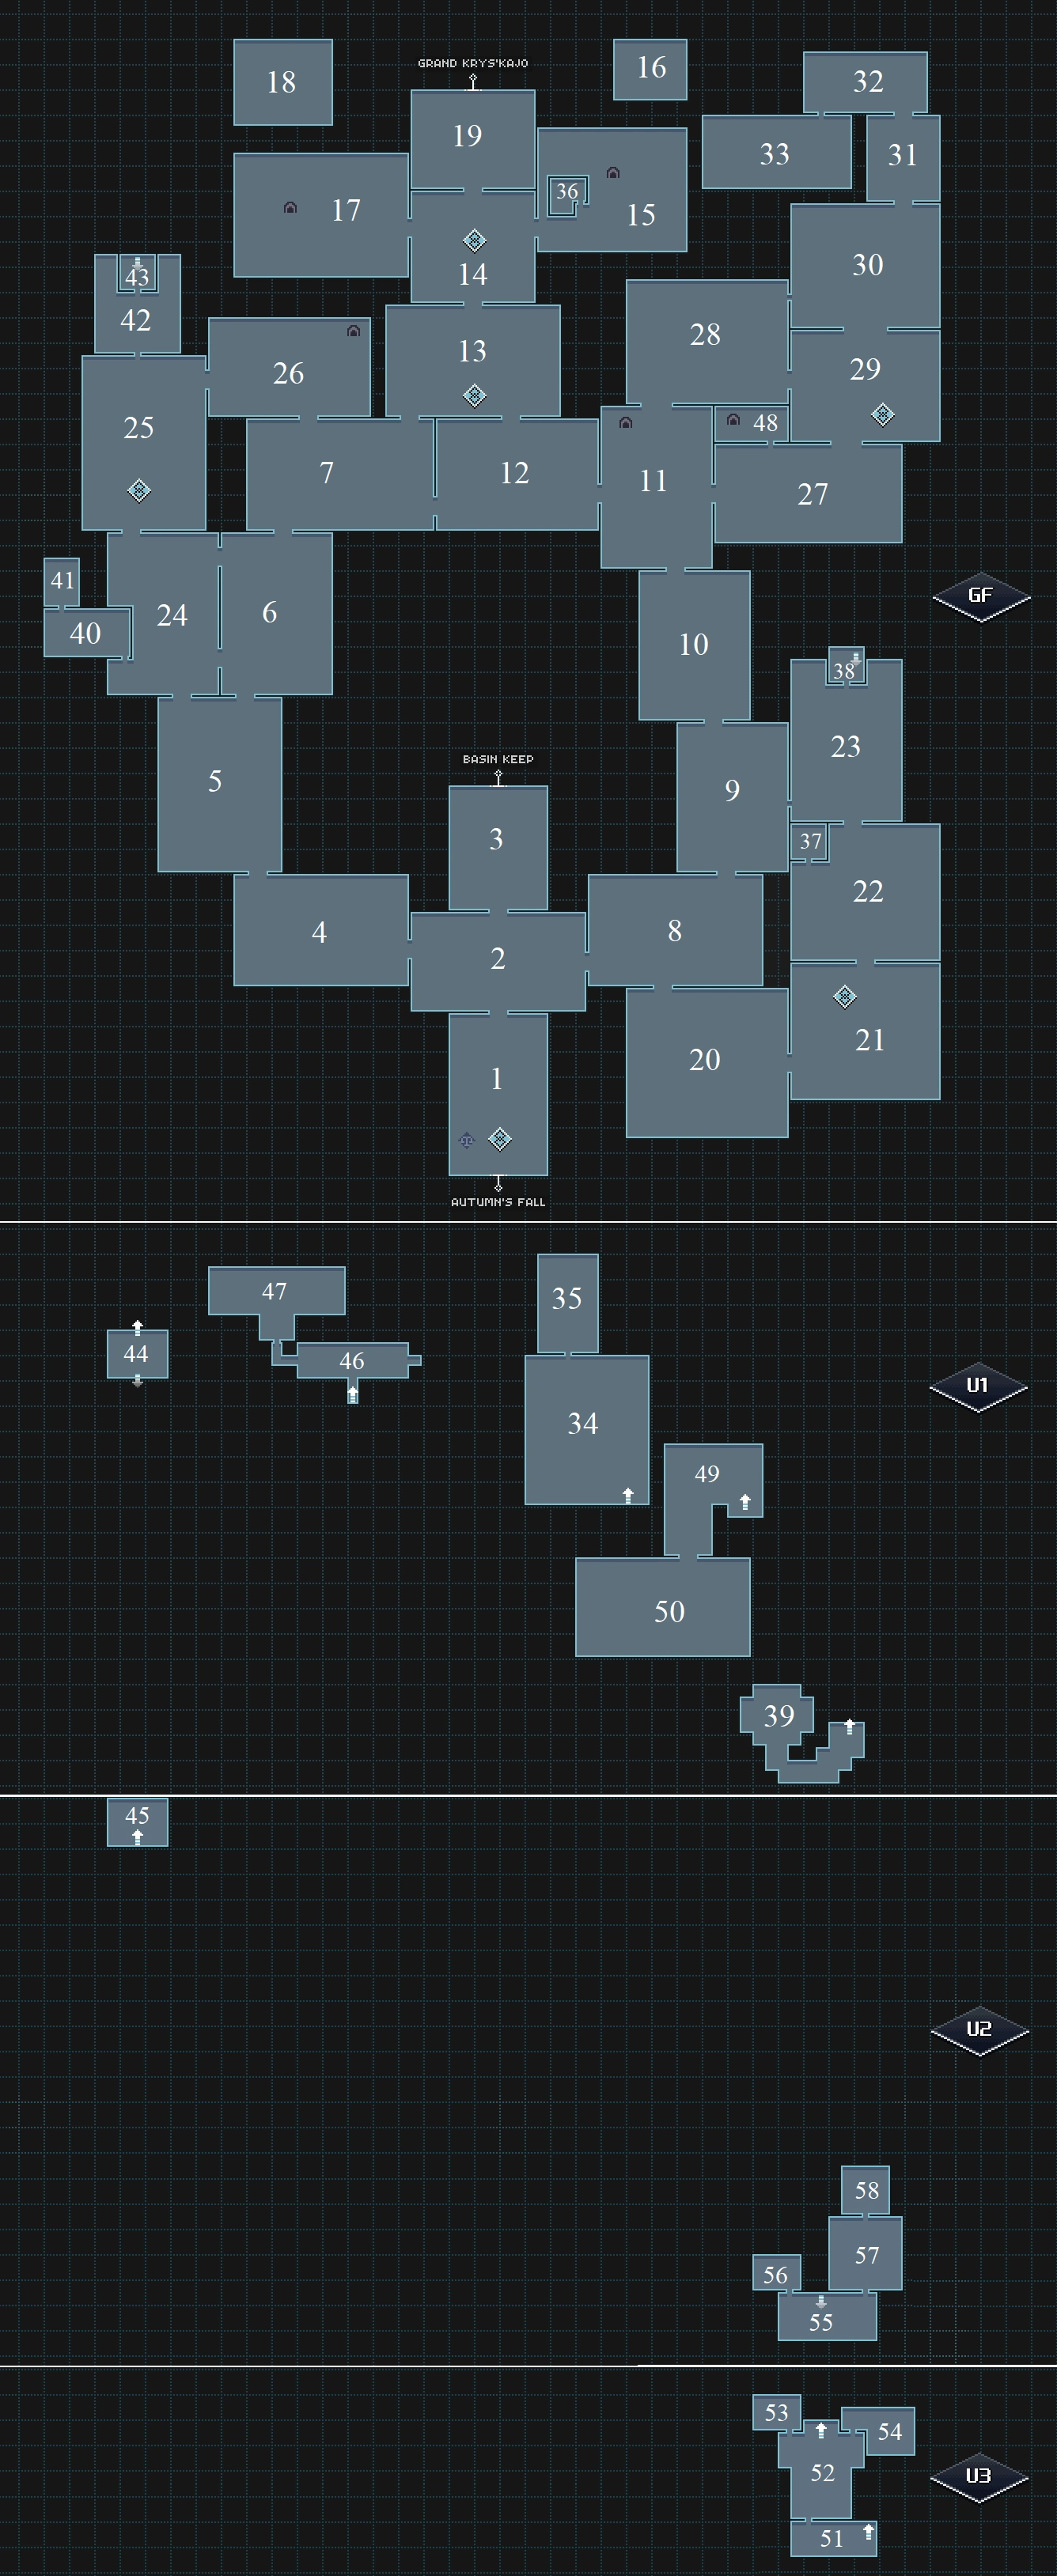
| # | Area Name | Floor |
|---|---|---|
| 1 | Jungle Entrance
Landmark: Southern Entrance |
GF |
| 2 | Crossroad | GF |
| 3 | Basin Keep Entrance | GF |
| 4 | Overgrown Path | GF |
| 5 | Drizzle Bosk | GF |
| 6 | Wet Passage | GF |
| 7 | River's Bed | GF |
| 8 | Splitting Stumps | GF |
| 9 | Clinging River | GF |
| 10 | Ringing River | GF |
| 11 | Old Timber | GF |
| 12 | Tying Greens | GF |
| 13 | Peridot Approach
Landmark: Peridot Approach |
GF |
| 14 | Rite of Passage
Landmark: Rite of Passage |
GF |
| 15 | Zir'vitar Temple Entrance | GF |
| 16 | Zir'vitar Temple Roof | GF |
| 17 | So'najiz Temple Entrance | GF |
| 18 | So'najiz Lake Platform | GF |
| 19 | Gran Krys'kajo Entrance | GF |
| 20 | V'rda Vil West | GF |
| 21 | V'rda Vil East
Landmark: V'rda Vil |
GF |
| 22 | V'rda Vil North | GF |
| 23 | Chief's Den | GF |
| 24 | Covert Path | GF |
| 25 | Royal Grove
Landmark: Royal Grove |
GF |
| 26 | Calm Backyard | GF |
| 27 | Lost Lookout | GF |
| 28 | Seared Lake | GF |
| 29 | Infested Marshes South
Landmark: Infested Marshes |
GF |
| 30 | Infested Marshes North | GF |
| 31 | Infested Heart | GF |
| 32 | The Descent | GF |
| 33 | Root | GF |
| 34 | Chilled Den | U1 |
| 35 | Frozen Lair | U1 |
| 36 | Lou's Office | GF |
| 37 | K'tara's House | GF |
| 38 | Chief's House | GF |
| 39 | Sacred Pond | U1 |
| 40 | Dripping Cave | GF |
| 41 | Tranquility Pond | GF |
| 42 | Lost Shrine Entrance | GF |
| 43 | Lost Shrine | GF |
| 44 | Lost Puzzle Room | U1 |
| 45 | Lost Power Room | U2 |
| 46 | Grubby Cave | U1 |
| 47 | Temple of Innovation | U1 |
| 48 | Foul Cavity | GF |
| 49 | Infested Cavern Entrance | U1 |
| 50 | Infested Cavern Maze | U1 |
| 51 | MM Entrance | U3 |
| 52 | Metal Room | U3 |
| 53 | Octo Office | U3 |
| 54 | Test Chamber | U3 |
| 55 | Agile Test Chamber | U2 |
| 56 | Hand Office | U2 |
| 57 | Big Boss | U2 |
| 58 | Lead Office | U2 |
Treasures
Gaia's Garden has by far the largest number of chests of any area, having at least twice as many as any other area except Maroon Valley. Many of these are not initially accessible, and require either the ![]() Radiant Key from the So'najiz Temple, or the Wave element from the Zir'vitar Temple (to use a Wave teleporter) in order to access them.
Radiant Key from the So'najiz Temple, or the Wave element from the Zir'vitar Temple (to use a Wave teleporter) in order to access them.
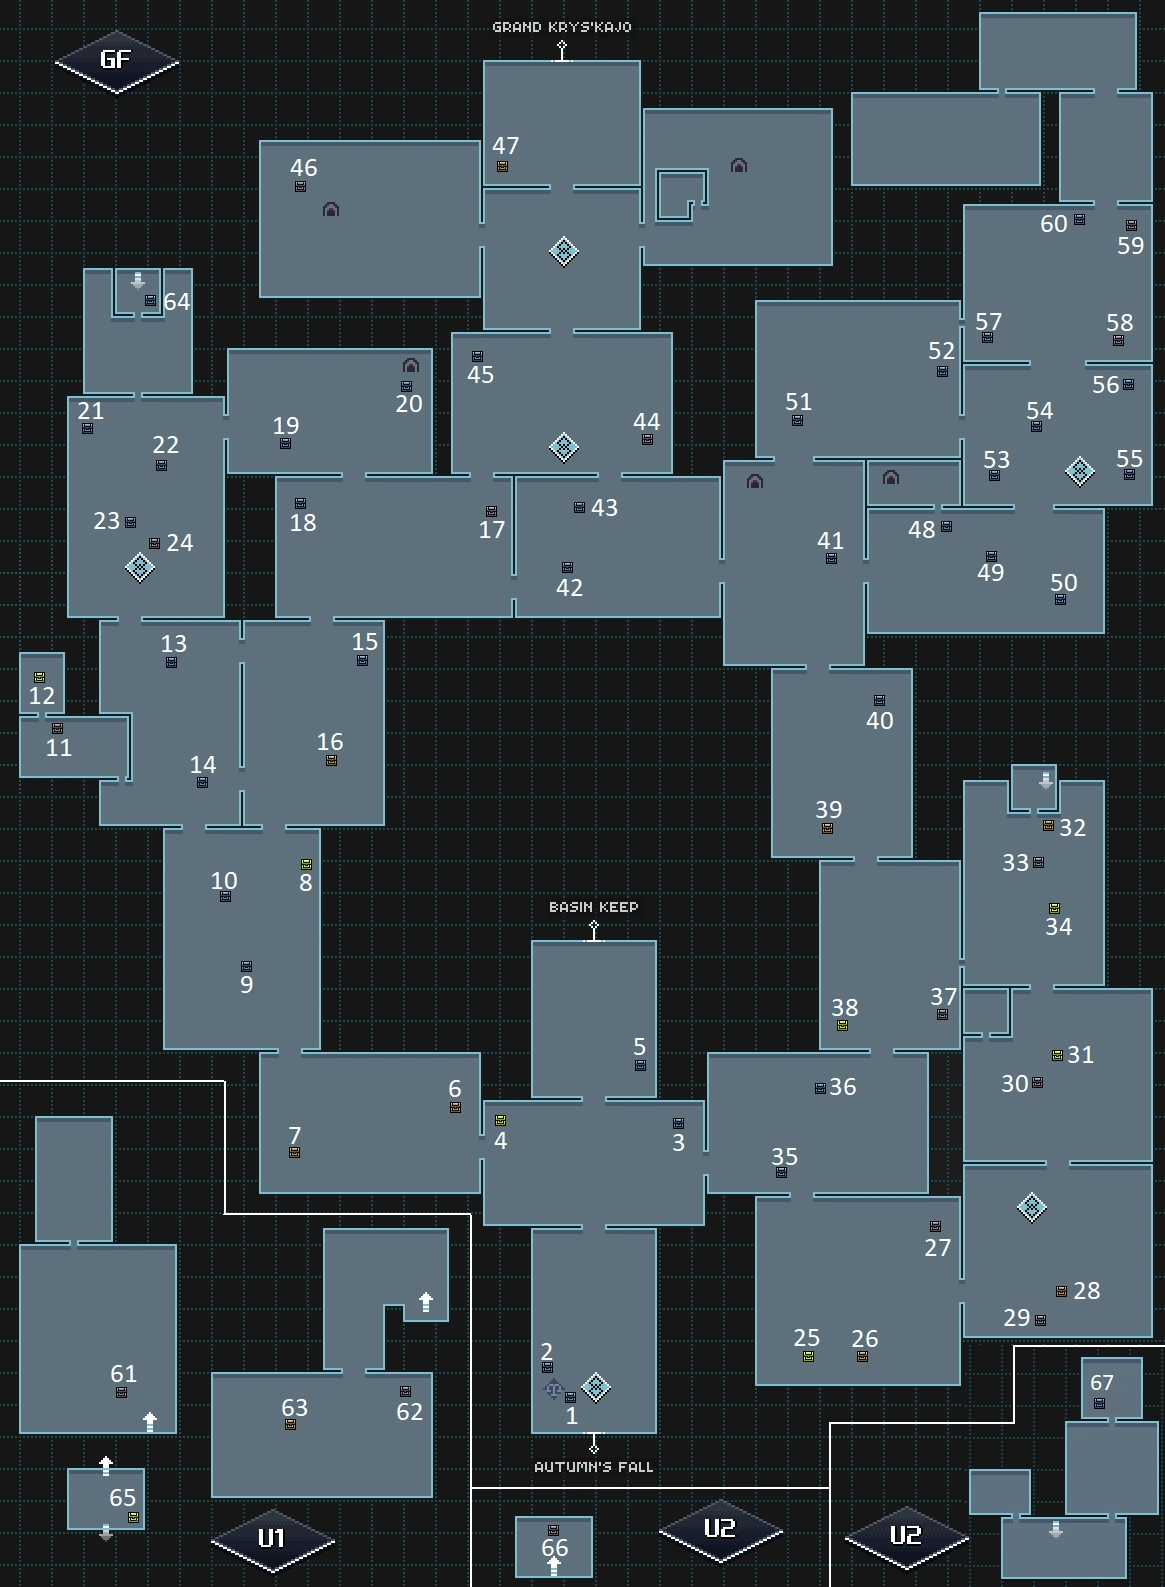
| Acc. | Type | Contains | Location | Info |
|---|---|---|---|---|
| 1 | 4 × |
Jungle Entrance | ||
| 2 | 8 × |
Jungle Entrance | ||
| 3 | 6 × |
Crossroad | Enter on the upper path from Splitting Stumps to reach it. | |
| 4 | 2 × |
Crossroad | Enter on the upper path from Splitting Stumps to reach it. | |
| 5 | 5 × |
Basin Keep Entrance | ||
| 6 | 5 × |
Overgrown Path | Take the upper path starting in Splitting Stumps to reach here. The Wave element is required. | |
| 7 | 4 × |
Overgrown Path | The Wave element is required. | |
| 8 | 1 × LV41 |
Drizzle Bosk | Follow the upper path from Splitting Stumps to Overgrown Path and hit the switch at the end. This opens the upper path from Overgrown Path to here. | |
| 9 | 6 × |
Drizzle Bosk | ||
| 10 | 4 × |
Drizzle Bosk | ||
| 11 | 6 × |
Dripping Cave | The Wave element is required. | |
| 12 | 1 × |
Tranquility Pond | ||
| 13 | 4 × |
Covert Path | ||
| 14 | 4 × |
Covert Path | ||
| 15 | 5 × |
Wet Passage | Take the north entrance from Covert Path to reach here. | |
| 16 | 4 × |
Wet Passage | Take the north entrance from Covert Path to reach here. The Wave element is required. | |
| 17 | 4 × |
River's Bed | The Wave element is required. | |
| 18 | 7 × |
River's Bed | Take the secret pathway from Calm Backyard to reach here. | |
| 19 | 4 × |
Calm Backyard | ||
| 20 | 6 × |
Calm Backyard | ||
| 21 | 3 × |
Royal Grove | Enter from Calm Backyard to reach this. | |
| 22 | 8 × |
Royal Grove | ||
| 23 | 7 × |
Royal Grove | Enter from Calm Backyard to reach this. | |
| 24 | 3 × |
Royal Grove | Enter from Calm Backyard to reach this. | |
| 25 | 5 × |
V'rda Vil West | ||
| 26 | 2 × |
V'rda Vil West | ||
| 27 | 2 × |
V'rda Vil West | Projectiles can be shot through the ropes on the bridges. | |
| 28 | 4 × |
V'rda Vil East | ||
| 29 | 5 × |
V'rda Vil East | The Wave element is required. | |
| 30 | 2 × |
V'rda Vil North | ||
| 31 | 3 × |
V'rda Vil North | ||
| 32 | 2 × |
Chief's Den | ||
| 33 | 3 × |
Chief's Den | ||
| 34 | 1 × |
Chief's Den | ||
| 35 | 6 × |
Splitting Stumps | Enter on the upper path from V'rda Vil East to reach it. | |
| 36 | 4 × |
Splitting Stumps | The Wave element is required. | |
| 37 | 4 × |
Clinging River | ||
| 38 | 1 × LV41 |
Clinging River | Take the upper path from Ringing River to reach here. | |
| 39 | 2 × |
Ringing River | The Wave element is required. | |
| 40 | 6 × |
Ringing River | The Wave element is required. | |
| 41 | 7 × |
Old Timber | The Wave element is required. | |
| 42 | 4 × |
Tying Greens | ||
| 43 | 6 × |
Tying Greens | ||
| 44 | 1 × LV45 |
Peridot Approach | Enter on the hidden path from Tying Greens to reach it. The Wave element is required. | |
| 45 | 4 × |
Peridot Approach | ||
| 46 | 2 × |
So'najiz Temple Entrance | ||
| 47 | 4 × |
Grand Krys'kajo Entrance | The Wave element is required. | |
| 48 | 3 × |
Lost Lookout | The Wave element is required. | |
| 49 | 5 × |
Lost Lookout | ||
| 50 | 4 × |
Lost Lookout | ||
| 51 | 2 × |
Seared Lake | ||
| 52 | 2 × |
Seared Lake | ||
| 53 | 3 × |
Infested Marshes South | Enter from Seared Lake to reach this. | |
| 54 | 9 × |
Infested Marshes South | Enter from Seared Lake to reach this. | |
| 55 | 2 × |
Infested Marshes South | Enter from Seared Lake to reach this. The Wave element is required. | |
| 56 | 2 × |
Infested Marshes South | ||
| 57 | 3 × |
Infested Marshes North | Enter from Seared Lake to reach this. | |
| 58 | 5 × |
Infested Marshes North | Enter from Seared Lake to hit the switch opening the right path from Infested Marshes South. Return that way to reach the chest | |
| 59 | 5 × |
Infested Marshes North | Enter from Seared Lake to hit the switch opening the right path from Infested Marshes South. Return that way to reach the chest. | |
| 60 | 3 × |
Infested Marshes North | Enter from Seared Lake to hit the switch opening the right path from Infested Marshes South. Return that way to reach the chest. | |
| 61 | 5 × |
Chilled Den | ||
| 62 | 3 × |
Infested Cavern Maze | ||
| 63 | 1 × |
Infested Cavern Maze | ||
| 64 | 2 × |
Lost Shrine | The entrance to the Lost Shrine isn't marked on the map initially. It's hidden behind the large tree in the north of Royal Grove reachable from Calm Backyard. The code for the shrine can be found by navigating to the entrance of Grand Krys'kajo, and then going to the north-east corner of that area, where an inscription states the code. The code is ↑↑↓↓←→←→AB (the Konami Code with A and B swapped). | |
| 65 | 3 × |
Lost Puzzle Room | ||
| 66 | 1 × LV01 |
Lost Power Room | Defeat the Tiefsee Angler to spawn the chest. | |
| 67 | 1 × |
Lead Office | Formerly Playstation exclusive. Obtainable at the end of the Foul Play quest. |
Enemies
| Name | Sprite | Drops | Locations |
|---|---|---|---|
| Papagun | Jungle Entrance, Crossroad, Overgrown Path, Drizzle Bosk, Wet Passage, River's Bed, Splitting Stumps, Clinging River, Old Timber, Tying Greens, Peridot Approach, V'rda Vil North, Covert Path, Royal Grove, Calm Backyard | ||
| Argeby | Jungle Entrance, Crossroad, Overgrown Path, Drizzle Bosk, Wet Passage, River's Bed, Splitting Stumps, Clinging River, Ringing River, Old Timber, Tying Greens, Peridot Approach, V'rda Vil North, Calm Backyard | ||
| Tunnel Argeby | None<ref name="nodrop" /> | Grubby Cave, Temple of Innovation | |
| Ampery | Overgrown Path<ref name="rootingforpower" />, Drizzle Bosk<ref name="rootingforpower" />, Wet Passage<ref name="rootingforpower" />, River's Bed<ref name="rootingforpower" />, Covert Path<ref name="rootingforpower" />, Royal Grove<ref name="rootingforpower" /> | ||
| Gelleric | Crossroad, Overgrown Path, Drizzle Bosk, Wet Passage, River's Bed, Tying Greens, Peridot Approach, Covert Path, Royal Grove, Calm Backyard | ||
| Tunnel Gelleric | None<ref name="nodrop" /> | Grubby Cave, Temple of Innovation | |
| Shokat | Crossroad, Splitting Stumps, Clinging River, Ringing River, Old Timber, Tying Greens, Peridot Approach, V'rda Vil North, Calm Backyard, Lost Lookout, Infested Marshes South, Infested Marshes North, Seared Lake, Chilled Den<ref name="tropicalchill" /> | ||
| Wiccat | V'rda Vil North<ref name="infestedvillage" />, Chief's Den<ref name="infestedvillage" />, K'tara's House<ref name="infestedvillage" />, Chief's House<ref name="infestedvillage" />, Sacred Pond<ref name="infestedvillage" />, Zir'vitar Temple Entrance<ref name="rootcause" />, Old Timber<ref name="rootcause" />, Lost Lookout<ref name="rootcause" />, Infested Marshes North<ref name="rootcause" />, Root<ref name="rootcause" /> | ||
| Tunnel Shockcat | None<ref name="nodrop" /> | Temple of Innovation | |
| Tunnel Wiccat | None<ref name="nodrop" /> | Temple of Innovation | |
| Angler | Covert Path, Royal Grove, Calm Backyard | ||
| Tunnel Angler | None<ref name="nodrop" /> | Grubby Cave, Temple of Innovation | |
| Leggy Angler | Clinging River<ref name="foulplay" />, V'rda Vil North<ref name="foulplay" />, Test Chamber<ref name="foulplay" /> | ||
| Behesloth | Ringing River, Lost Lookout, Infested Marshes South, Infested Marshes North, Seared Lake | ||
| ExeRepair(error++); | None | Sacred Pond<ref name="infestedvillage" />, Zir'vitar Temple Entrance<ref name="rootcause" />, Old Timber<ref name="rootcause" />, Lost Lookout<ref name="rootcause" />, Infested Marshes South<ref name="rootcause" />, Infested Marshes North<ref name="rootcause" />, The Descent<ref name="rootcause" />, Root<ref name="rootcause" /> | |
| Jungle Guard | None | Infested Cavern Maze | |
| Jack'On'Fire | Lost Lookout<ref name="pumpkinland" />, Infested Marshes South<ref name="pumpkinland" />, Infested Marshes North<ref name="pumpkinland" />, Seared Lake<ref name="pumpkinland" /> | ||
| Tourist Karotto | Chilled Den<ref name="tropicalchill" /> | ||
| Tunnel Teslabovine | None<ref name="nodrop" /> | Temple of Innovation | |
| Apollo 3 (PVP) | None | Jungle Entrance<ref name="respawn" /> | |
| Sephisloth (boss) | Root<ref name="rootcause" /> | ||
| Tiefsee Angler (boss) | Lost Power Room<ref name="respawn" /> | ||
| Buff Bloomy (boss) | Wet Passage<ref name="rootingforpower" /> | ||
| Karotto Fruitseeker (boss) | None | Frozen Lair<ref name="coldfiend" /> | |
| Mecha Gear FISH (boss) | Big Boss<ref name="foulplay" /> |
<references>
<ref name="booster">With ![]() Garden Booster enabled</ref>
<ref name="nodrop">Only fought in battles where item drops are disabled</ref>
<ref name="rootingforpower">Spawns during Rooting for Power quest</ref>
<ref name="tropicalchill">Spawns during Tropical Chill quest</ref>
<ref name="infestedvillage">Only fightable during An Infested Village quest</ref>
<ref name="rootcause">Spawns during The Root Cause quest</ref>
<ref name="norank">Additional drops not possible due to combat rank being disabled during this encounter</ref>
<ref name="foulplay">Spawns during Foul Play quest (Playstation exclusive)</ref>
<ref name="pumpkinland">Spawns during Pumpkin Land Superfun quest</ref>
<ref name="respawn">Does not respawn</ref>
<ref name="coldfiend">Spawns during Melting this Cold Fiend quest</ref>
</references>
Garden Booster enabled</ref>
<ref name="nodrop">Only fought in battles where item drops are disabled</ref>
<ref name="rootingforpower">Spawns during Rooting for Power quest</ref>
<ref name="tropicalchill">Spawns during Tropical Chill quest</ref>
<ref name="infestedvillage">Only fightable during An Infested Village quest</ref>
<ref name="rootcause">Spawns during The Root Cause quest</ref>
<ref name="norank">Additional drops not possible due to combat rank being disabled during this encounter</ref>
<ref name="foulplay">Spawns during Foul Play quest (Playstation exclusive)</ref>
<ref name="pumpkinland">Spawns during Pumpkin Land Superfun quest</ref>
<ref name="respawn">Does not respawn</ref>
<ref name="coldfiend">Spawns during Melting this Cold Fiend quest</ref>
</references>
Botanics
The following botanics can be found in Gaia's Garden:
| Destroyable | Contents | ||||||
|---|---|---|---|---|---|---|---|
 |
Alpha Puff Plant |
| |||||
|
| |||||||
 |
Beta Puff Plant |
| |||||
|
| |||||||
 |
Omega Puff Plant |
| |||||
|
| |||||||
 |
Alpha Closed Bareleles |
| |||||
|
| |||||||
 |
Beta Closed Bareleles |
| |||||
|
| |||||||
 |
Bee Hive |
| |||||
|
| |||||||
 |
Alpha Open Bareleles |
| |||||
|
| |||||||
 |
Beta Open Bareleles |
| |||||
|
| |||||||
 |
Omega Open Bareleles |
| |||||
|
| |||||||
 |
Alpha Vivid Puff Plant |
| |||||
|
| |||||||
 |
Beta Vivid Puff Plant |
| |||||
|
| |||||||
 |
Omega Vivid Puff Plant |
| |||||
|
| |||||||
 |
Alpha Virus Shroom |
| |||||
|
| |||||||
 |
Beta Virus Shroom |
| |||||
|
| |||||||
 |
Omega Virus Shroom |
| |||||
|
| |||||||
Traders
There is only one trader initially but more can be unlocked through quests. The V'rda Vil trades are particularly notable, as they offer sets and metals for fewer trade items than anywhere else in the game, and are therefore very useful when obtaining late-game equipment.
- Edgy Salesman – Located in Jungle Entrance
| Offered Item | Credits | Requisite Items |
|---|---|---|
| LV44 |
44444 | LV36 |
| LV41 |
39666 |
- V'rda Vil Sets – Located in V'rda Vil West after the An Infested Village quest
| Offered Item | Credits | Requisite Items |
|---|---|---|
| 100 | 4x | |
| 100 | 4x | |
| 250 | ||
| 250 |
- V'rda Vil Metals – Located in V'rda Vil West after the An Infested Village quest
| Offered Item | Credits | Requisite Items |
|---|---|---|
| 90 | 2x | |
| 450 | ||
| 2500 | ||
| 2500 |
- TurretDefense Trader – Located in Grubby Cave after the Turret Defense quest
| Offered Item | Credits | Requisite Items |
|---|---|---|
| 600 | 2x | |
| 5000 | 15x | |
| 6666 | 30x | |
| LV52 |
77777 | 33x |
<references> <ref name="temples">Available after completing Zir'vitar Temple and So'najiz Temple</ref> </references>
- TurretDefense Trader – Located in Temple of Innovation after the An Original Idea quest
| Offered Item | Credits | Requisite Items |
|---|---|---|
| 600 | 2x | |
| 5000 | 15x | |
| 6666 | 30x | |
| LV52 |
77777 | 33x |
Quests
The quests that can be started in Gaia's Garden are:
A New Home DLC Changes
The A New Home DLC adds several new quests that take place partially in Gaia's Garden, one of which also unlocks some new traders in the area.
Enemies
| Name | Sprite | Drops | Locations |
|---|---|---|---|
| Ampery | Basin Keep Entrance<ref name="saltydetox" /> | ||
| Picat | None | Lost Lookout<ref name="fridges" />, Infested Marshes North<ref name="fridges" /> | |
| Pinceron | Infested Marshes South<ref name="ontherun" /> | ||
| Boss Pincer | Infested Marshes South<ref name="ontherun" /> | ||
| Tim | Infested Marshes South<ref name="ontherun" /> | ||
| Ivory Bovine | Infested Marshes South<ref name="ontherun" /> | ||
| Sao | None | Overgrown Path<ref name="sao" /> | |
| Toxovolt (boss) | None | Basin Keep Entrance<ref name="saltydetox" /> |
<references> <ref name="saltydetox">During the Salty Detox quest</ref> <ref name="fridges">During the Riches with Fridges quest</ref> <ref name="norank">Additional drops not possible since combat rank is disabled during this encounter</ref> <ref name="ontherun">During the Lost and On the Run quest</ref> <ref name="sao">After encountering him in Basin Keep; does not respawn</ref> </references>
Traders
The new quests add two additional traders to the area.
- V'rda Vil Food – Located in V'rda Vil East after the Riches with Fridges quest
| Offered Item | Credits | Requisite Items |
|---|---|---|
| 4200 | 6x | |
| 4200 | 6x | |
| 11111 | 2x |
- V'rda Vil Trades – Located in 'V'rda Vil East after the Riches with Fridges quest
| Offered Item | Credits | Requisite Items |
|---|---|---|
| 2x |
2000 | |
| 2x |
2000 | |
| 2x |
2000 | |
| 2600 | 7x |
Role in the Plot
In CrossWorlds
Seekers arrive in Gaia's Garden to run the three temples of the Grand Krys'kajo and collect the Shock and Wave elements. However, on going to do so, they find their path blocked by the Shad of V'rda Vil. The Shad are blockading the temples in protest, as their village is overrun with Wiccats, which they blame on the humans who have built a power plant connected to Zir'vitar Temple. The Seekers must visit the mayor of Basin Keep in search of a solution, and are tasked with assisting the Shad K'tara with dealing with the problem, during the mandatory quest An Infested Village. With K'tara's help, the Seekers gain access to the infested part of V'rda Vil and discover the source of the problem, an ExeRepair(error++); in a sacred spring under the Eldress's house. After defeating this, the Wiccats disappear and the Shad free access to the temples, although they remain suspicious of humanity.
Seekers are then free to complete So'najiz Temple and Zir'vitar Temple in any order, collecting the Shock and Wave elements. However, before they can proceed with the Grand Krys'kajo proper, the Shad again block their path, as the Wiccats have returned to their village. The Seekers then encounter Lou Cretia, a scientist working at the power plant, who sends them on a second mandatory quest, The Root Cause. They follow a trail of ExeRepair(error++);s across the jungle, eventually discovering the true cause of the infestation: a rogue monster, the Sephisloth, had damaged the Track of the Ancients, and the ExeRepair(error++); and Wiccats were a manifestation of the Track's debugging process. After defeating the Sephisloth, the Wiccats vanish for good this time, the Shad retreat and the Seekers can proceed to the Grand Krys'kajo and prove their mastery of Shock and Wave.
In CrossCode
On arriving in Gaia's Garden, Lea is immediately confronted by Apollo and Joern, with Apollo challenging her to a duel. After the duel, Joern, realizing how depressed Lea seems, convinces Apollo to let her join their party. The three complete the An Infested Village quest together before logging off for the night. The next day, Lea is contacted by C'tron, who tricks her into meeting up with Emilie and then mediates between them, helping Emilie to forgive Lea for leaving the Para island raid. The trio complete one of the dungeons in the jungle, before deciding to call it a day.
The next day, Lea, Emilie, and C'tron return to Gaia's Garden and complete the second dungeon as well as the The Root Cause quest. After, they run into Apollo and Joern, and while C'tron and Joern choose to log off for the day, Lea, Emilie, and Apollo go on to complete the Grand Krys'kajo together.
In the A New Home DLC, Lea and C'tron return to Gaia's Garden to visit where C'tron reunited Lea and Emilie, in the hope that this will help C'tron to recover his memory.
Trophies
- There is no Cow Level
- Visit the perfectly normal mushroom in Seared Lake
- The None-Winted Devil
- Defeat the Sephisloth
- Showdown at Gaia's Garden
- Win the third PvP battle against Apollo
- Old and Mean
- Find and defeat Tiefsee Angler
- True Spheromancer
- Win the third PVP battle against Apollo without losing a single round
- Gaia Landmarks
- Find all landmarks in Gaia's Garden
- Gaia's Scavenger
- Open all chests in Gaia's Garden
Secrets and Challenges
The turret defense challenges from Turret Defense and An Original Idea can be repeated for high scores and to earn ![]() Turret Tokens to spend at traders.
Turret Tokens to spend at traders.
The Lost Shrine contains a miniboss which is necessary to complete the A Promise Is a Promise 4 quest. The shrine is locked with a code, which can be found on a plaque behind Grand Krys'kajo. The code is a slight variation on the Konami code, Up Up Down Down Left Right Left Right A B. Hints towards the locarion of both the shrine and the plaque are given in a book in Basin Keep Echelon Tower.