Beearbot: Difference between revisions
Oneiros108 (talk | contribs) (Created page with "{{Stub}} {{Enemy_Card|name=Beearbot |sprite=File:Beearbot-sprite.png |location=Ku'lero Temple |color={{Loc color|Ku'lero Temple}} |level=73 |type=Organic |subtype=B...") Tag: 2017 source edit |
(Wrote appearance, combat, strategies, locations, trivia, added gallery and removed stub template.) Tag: 2017 source edit |
||
| (One intermediate revision by one other user not shown) | |||
| Line 1: | Line 1: | ||
{{Enemy_Card|name=Beearbot | {{Enemy_Card|name=Beearbot | ||
|sprite=File:Beearbot-sprite.png | |sprite=File:Beearbot-sprite.png | ||
| Line 30: | Line 29: | ||
==Appearance== | ==Appearance== | ||
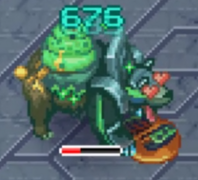
The Beearbot is a bear with a green honey-dripping beehive on its back. Its front half, which includes its face and frontal legs, is covered with a grey metallic armor with green accents, while its back half is fully exposed, revealing its brown fur and a tail covered in honey. Its claws are blue, representing their ability to deal [[Cold]] damage. | |||
==Combat== | ==Combat== | ||
Because of its armor, only its back is vulnerable. It uses two attacks, the first one being pouncing on the player and slashing with its [[Cold]] claws in an arc, and the other one allowing them to break it: the Beearbot throws a piece of its beehive on the floor, dealing [[Wave]] area damage and releasing one bee (two if under 50% health) that flies in the players direction. Hitting the beehive enough will destroy it, causing it to release three bees and honey which distracts the bear and allows it to heal, giving the player the opportunity to break it by punching its back. | |||
==Strategies== | ==Strategies== | ||
Don’t rush the beehive, wait until the bees fly away first, but don’t wait too long either, because not destroying it fast enough can allow the bear to throw another one. Also, ensure it heals the least possible. | |||
==Locations== | ==Locations== | ||
==== [[Ku'lero Temple]] ==== | |||
*Water Grave (x1) | |||
*Crystal Den (x1) <font color="yellow">(non-respawning)</font> | |||
*The Fall (x1) <font color="yellow">(non-respawning)</font> | |||
==Gallery== | ==Gallery== | ||
<gallery mode=packed> | |||
File:beearbot-claws.gif|Beearbot using its claws. | |||
File:beearbot-beehive.gif|Beehive throw and bees. | |||
File:beearbot-honey.png|Eating honey and healing. | |||
</gallery> | |||
==Trivia== | ==Trivia== | ||
*This is one of the two enemies known to have been created by a kickstarter backer, the other being [[Mizree]]. | |||
Latest revision as of 03:42, 17 June 2022
'
The Beearbot is an organic Monster in CrossCode. They can be encountered in the Ku'lero Temple.
 |
|---|
|
This powerful being is half machine, half bear and all danger. As if this was not enough, it has entered a symbiotic relationship with an entire hive filled with deadly bee weapons. Against the powerful armor a frontal assault seems hopeless so it might be a good idea to wait for a distraction. Thankfully, this bear is prone to playing with his food... |
| -Monster Fibula report |
Appearance
The Beearbot is a bear with a green honey-dripping beehive on its back. Its front half, which includes its face and frontal legs, is covered with a grey metallic armor with green accents, while its back half is fully exposed, revealing its brown fur and a tail covered in honey. Its claws are blue, representing their ability to deal Cold damage.
Combat
Because of its armor, only its back is vulnerable. It uses two attacks, the first one being pouncing on the player and slashing with its Cold claws in an arc, and the other one allowing them to break it: the Beearbot throws a piece of its beehive on the floor, dealing Wave area damage and releasing one bee (two if under 50% health) that flies in the players direction. Hitting the beehive enough will destroy it, causing it to release three bees and honey which distracts the bear and allows it to heal, giving the player the opportunity to break it by punching its back.
Strategies
Don’t rush the beehive, wait until the bees fly away first, but don’t wait too long either, because not destroying it fast enough can allow the bear to throw another one. Also, ensure it heals the least possible.
Locations
Ku'lero Temple
- Water Grave (x1)
- Crystal Den (x1) (non-respawning)
- The Fall (x1) (non-respawning)
Gallery
-
Beearbot using its claws.
-

Beehive throw and bees.
-
Eating honey and healing.


Trivia
- This is one of the two enemies known to have been created by a kickstarter backer, the other being Mizree.