Hummagnum: Difference between revisions
Oneiros108 (talk | contribs) No edit summary Tag: 2017 source edit |
Goatgoesmoo (talk | contribs) (→Combat) |
||
| (8 intermediate revisions by 2 users not shown) | |||
| Line 1: | Line 1: | ||
{{Enemy_Card|name=Hummagnum | {{Enemy_Card|name=Hummagnum | ||
|sprite=File:Hummagnum-sprite.png | |sprite=File:Hummagnum-sprite.png | ||
| Line 27: | Line 26: | ||
==Appearance== | ==Appearance== | ||
The Hummagnum ressembles a real-life hummingbird with a red body and black wings. Its beak works as a sniper rifle and has a sniper scope right on top of it. Black pupils can be seen on its eyes whenever it becomes dizzy. | |||
==Combat== | ==Combat== | ||
It dodges almost all incoming attacks from the player and with either a [[Shock]] round or a [[Wave]] snipe. With its shock attack, the Hummagnum stands in place and charges its shot. With its Wave attack, it spins rapidly and charges up a wave shot before teleporting to the opposite side of Lea (180 degrees) and then fires at the player. In both cases, after firing a shot, the Hummagnum becomes stationary and flashes red. When the Hummagnum is red, it is unable to dodge ranged attacks. When the Hummagnum is hit while red, it will teleport to a random place and become dizzy and fully vulnerable to attack. | |||
==Strategies== | ==Strategies== | ||
When Lea is moving perpendicular to a Hummagnum, she will never be hit by their attacks (not counting when the Hummagnums are shooting at Lea from across the bridge.) Keep moving perpendicular to them and the magnums will not hit you. | |||
If you find dealing with the timing of their attacks difficult as well as their teleportation, a viable strategy is to chase them around. This forces them to teleport through what seems to be a set number of dodges, and then engage in charging up an attack. You can chase them around, encouraging them to tire out more often, then going to use attacks on fully dazed ones, which will never teleport. (Ones that are showing red will still be able to teleport) This gives you the chance to use combat arts against them, even to charge up cold melee attacks. This can make fighting them much less complicated as Lea may choose to essentially chase them around. | |||
Prioritizing them is recommended because there are only a few opportunities to make them vulnerable. If they aren’t aggressive, they won’t dodge your first attack, so you can begin the fight by using a [[Combat Art]] to gain an advantage. | |||
==Locations== | ==Locations== | ||
;Ku'lero Temple | ;[[Ku'lero Temple]] | ||
:*Cracked Pillars (x2) <font color="yellow">(x5, non-respawning)</font> | |||
:*Birds of Prey (x3) <font color="yellow">(x6, non-respawning)</font> | |||
:*South Bridge (x3) <font color="yellow">(x6, non-respawning)</font> | |||
:*The Fall <font color="yellow">(x3, non-respawning)</font> | |||
==Gallery== | ==Gallery== | ||
<gallery mode=packed> | |||
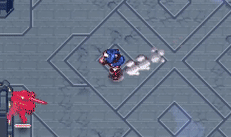
File:hummagnum-spin.png|A Hummagnum spinning really fast. | |||
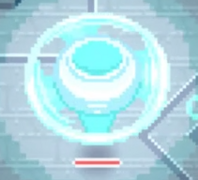
File:hummagnum-dizzy.gif|Becoming dizzy. | |||
</gallery> | |||
==Trivia== | ==Trivia== | ||
*Its spinning attack is probably based on the 360 no-scope meme, where the sniper tries to hit its target after doing a 360 degree turn, without using the scope. | |||
Latest revision as of 10:23, 11 May 2023
'
The Hummagnum is an organic Monster in CrossCode. They can be encountered in the Ku'lero Temple.
 |
|---|
|
Armed with a mouth that doubles as a sniper gun, this bird does not mess around. It can react to any movement in a split second and will dodge all incoming fire. However a shot from its beak and a dodge takes a lot of energy leaving it open for a counter attack |
| -Monster Fibula report |
Appearance
The Hummagnum ressembles a real-life hummingbird with a red body and black wings. Its beak works as a sniper rifle and has a sniper scope right on top of it. Black pupils can be seen on its eyes whenever it becomes dizzy.
Combat
It dodges almost all incoming attacks from the player and with either a Shock round or a Wave snipe. With its shock attack, the Hummagnum stands in place and charges its shot. With its Wave attack, it spins rapidly and charges up a wave shot before teleporting to the opposite side of Lea (180 degrees) and then fires at the player. In both cases, after firing a shot, the Hummagnum becomes stationary and flashes red. When the Hummagnum is red, it is unable to dodge ranged attacks. When the Hummagnum is hit while red, it will teleport to a random place and become dizzy and fully vulnerable to attack.
Strategies
When Lea is moving perpendicular to a Hummagnum, she will never be hit by their attacks (not counting when the Hummagnums are shooting at Lea from across the bridge.) Keep moving perpendicular to them and the magnums will not hit you.
If you find dealing with the timing of their attacks difficult as well as their teleportation, a viable strategy is to chase them around. This forces them to teleport through what seems to be a set number of dodges, and then engage in charging up an attack. You can chase them around, encouraging them to tire out more often, then going to use attacks on fully dazed ones, which will never teleport. (Ones that are showing red will still be able to teleport) This gives you the chance to use combat arts against them, even to charge up cold melee attacks. This can make fighting them much less complicated as Lea may choose to essentially chase them around.
Prioritizing them is recommended because there are only a few opportunities to make them vulnerable. If they aren’t aggressive, they won’t dodge your first attack, so you can begin the fight by using a Combat Art to gain an advantage.
Locations
- Ku'lero Temple
-
- Cracked Pillars (x2) (x5, non-respawning)
- Birds of Prey (x3) (x6, non-respawning)
- South Bridge (x3) (x6, non-respawning)
- The Fall (x3, non-respawning)
Gallery
-
A Hummagnum spinning really fast.
-
Becoming dizzy.


Trivia
- Its spinning attack is probably based on the 360 no-scope meme, where the sniper tries to hit its target after doing a 360 degree turn, without using the scope.