Ku'lero Temple: Difference between revisions
(Fully updated.) |
m (→Treasures) |
||
| Line 168: | Line 168: | ||
=== Treasures === | === Treasures === | ||
[[File:Kulero-temple-treasure-map.png|upright=1.8|thumb|left|link=https://static.wikia.nocookie.net/crosscode_gamepedia/images/ | [[File:Kulero-temple-treasure-map.png|upright=1.8|thumb|left|link=https://static.wikia.nocookie.net/crosscode_gamepedia/images/f/f7/Kulero-temple-treasure-map.png|Click the map for a full-resolution image.]] | ||
{{TreasureList| | {{TreasureList| | ||
{{TreasureList/entry|acc=1|type=silver|item=Rumble Hive|amount=2|loc=Comet Trail|info=Use a key to open the lock on the Southwest, then follow the lilypads and climb the steps. Follow the wall to the left to reach the jumping path. Jump onto the two small platforms, then the larger one, then go South and follow the jumping path, climb up the step, keep going South and jump very carefully onto the southern platform. Walk right - you may lose sight of Lea for a moment - and around the elevated land to get the chest.}} | {{TreasureList/entry|acc=1|type=silver|item=Rumble Hive|amount=2|loc=Comet Trail|info=Use a key to open the lock on the Southwest, then follow the lilypads and climb the steps. Follow the wall to the left to reach the jumping path. Jump onto the two small platforms, then the larger one, then go South and follow the jumping path, climb up the step, keep going South and jump very carefully onto the southern platform. Walk right - you may lose sight of Lea for a moment - and around the elevated land to get the chest.}} | ||
Latest revision as of 05:06, 17 May 2021
| This article contains SPOILERS for the A New Home DLC of CrossCode. Proceed at your own risk! |
Ku'lero Temple is a location in CrossWorlds. This area is exclusive to the A New Home DLC. It is a temple in the middle of a crater on an island north-west of The Croissant. This is the final temple of CrossWorlds.
| Ku'lero Temple |
|---|
|
This massive temple structure is located on a remote island inside an enormous crater. It was long believed that the end of the Track would reside deep inside the mountains of Sapphire Ridge however the temple found there merely serves as a teleporter which transports Seekers to the final leg of the journey. Huge curved pine trees litter the sparse landscape. Pockets of dark reflective crystal can be found all throughout the structure and they seem to slowly overtake the temple almost like a living organism. |
| -Encyclopedia entry |
Layout
Ku'lero Temple has several large and convoluted levels that you must descend through to reach the bottom of the crater.
After passing through a few linear entrance rooms, you reach a large outdoor hub area with a landmark. Several shortcut teleporters back to this landmark will unlock while you progress further through the dungeon. From here you can continue either east or west, and complete two small loops of puzzle rooms before unlocking a third set of rooms leading to the top floor of the Bridge. From here, you must return to the landmark and complete the other side to unlock the elevator down.
Floor B1 is very small, containing only the midboss fight.
Floor B2 contains two large and convoluted loops of puzzle rooms, both of which also branch upwards to previously inaccessible parts of the outdoor area on the ground floor. You must complete both loops to continue downwards.
Floor B3 has a smaller loop of rooms, containing four large bounce puzzles and a major battle against the stacking statues.
Starting from floor B4 is a long enemy rush during which you drop down a long ways to finally reach the bottom of the crater. Beyond this lies the boss fight, and the Secret of the Ancients.
Connecting Areas
- Sapphire Ridge (via teleporter in the Entrance)
Rooms
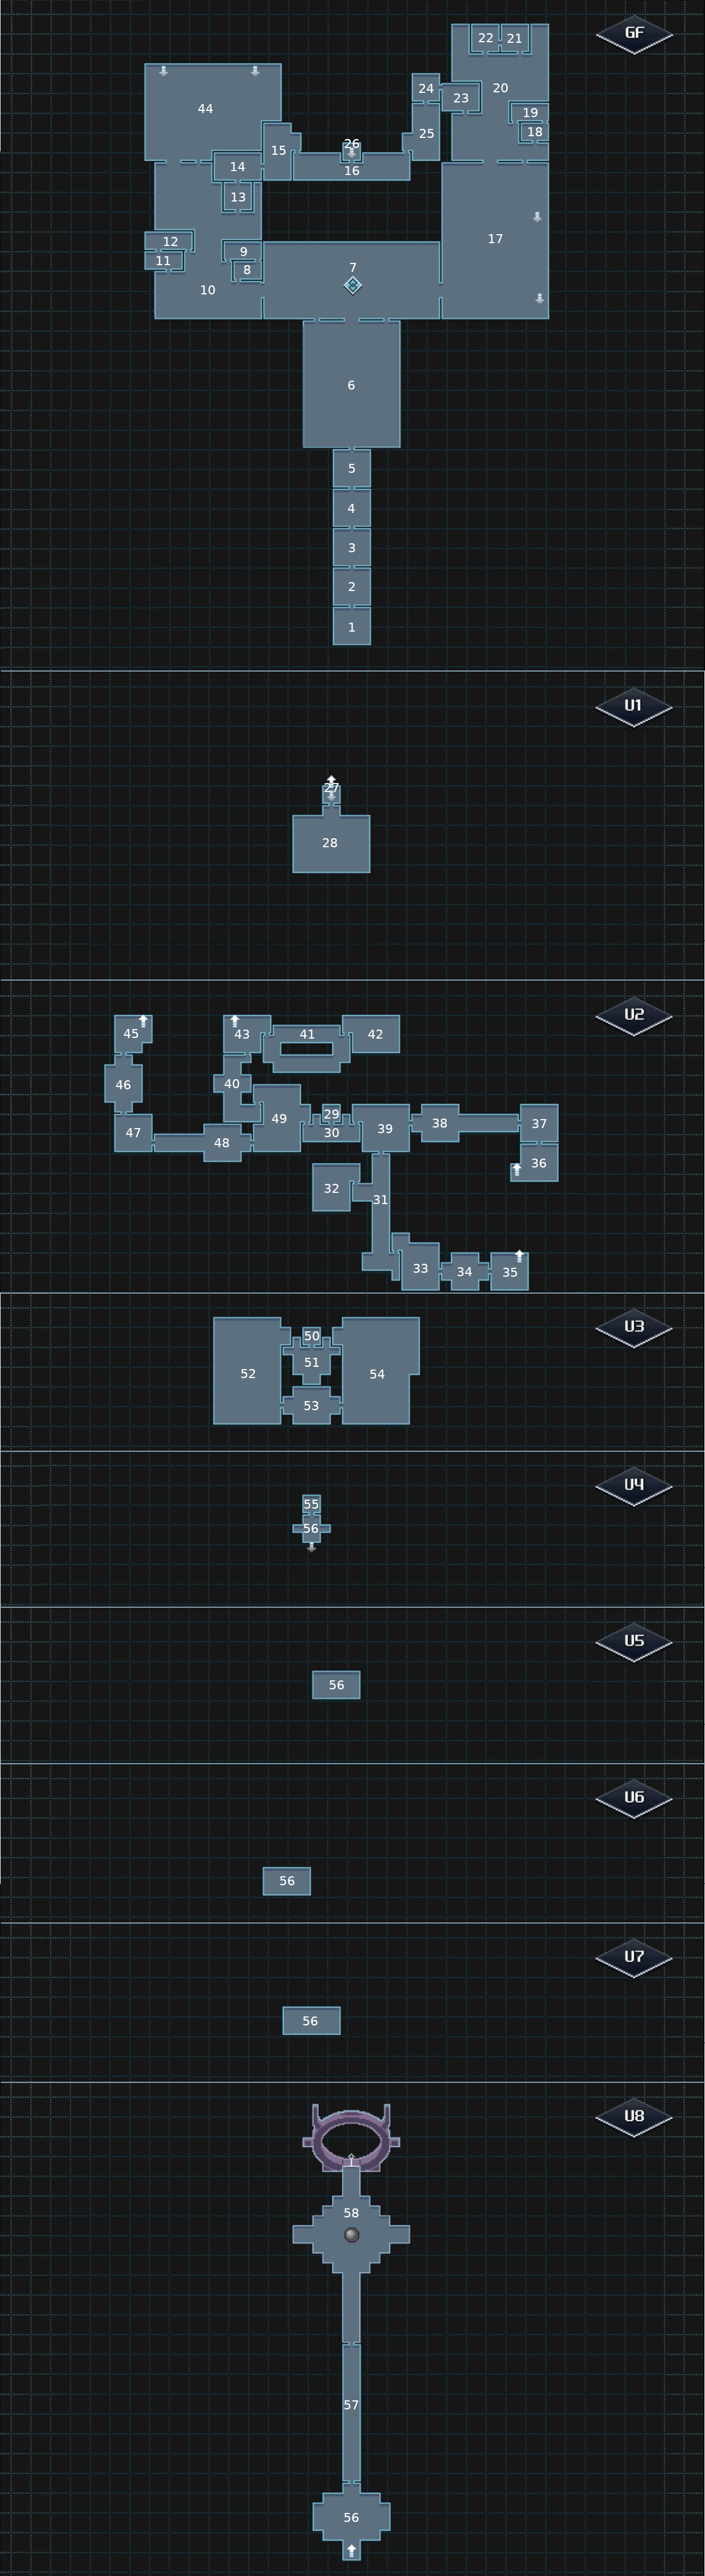
| # | Area Name | Floor |
|---|---|---|
| 1 | Entrance | GF |
| 2 | Entry Trial | GF |
| 3 | Shock Recall | GF |
| 4 | Floating Element | GF |
| 5 | Guardian of Old | GF |
| 6 | Comet Trail | GF |
| 7 | Outlook Landmark: Center |
GF |
| 8 | Passing of Heat | GF |
| 9 | Heat Carry | GF |
| 10 | Longleg Vale | GF |
| 11 | Passing of Wave | GF |
| 12 | Wave Carry | GF |
| 13 | Waving Flame | GF |
| 14 | Bomb Teleport | GF |
| 15 | Guardian of Ice | GF |
| 16 | Central Bridge | GF |
| 17 | Cracked Pillars | GF |
| 18 | Passing of Shock | GF |
| 19 | Shock Carry | GF |
| 20 | Water Grave | GF |
| 21 | Passing of Cold | GF |
| 22 | Cold Carry | GF |
| 23 | Cold Storm | GF |
| 24 | Shock Bubble | GF |
| 25 | Guardian of Flame | GF |
| 26 | Elevator G | GF |
| 27 | Elevator B1 | U1 |
| 28 | The Monk | U1 |
| 29 | Elevator B2 | U2 |
| 30 | Bridge B2 | U2 |
| 31 | South Bridge | U2 |
| 32 | Careful Transport | U2 |
| 33 | Looping Circuit | U2 |
| 34 | Pillar Chamber | U2 |
| 35 | Icless Sliding | U2 |
| 36 | Shard Trial East | U2 |
| 37 | Wall Bomb | U2 |
| 38 | Guardian of Peace | U2 |
| 39 | Bridge Building | U2 |
| 40 | North Bridge | U2 |
| 41 | Birds of Prey | U2 |
| 42 | Chasm Roundtrip | U2 |
| 43 | Cold Solutions | U2 |
| 44 | Crystal Den | GF |
| 45 | Wave Stacks | U2 |
| 46 | Shard Trial West | U2 |
| 47 | Red Herrings | U2 |
| 48 | Guardian of Strife | U2 |
| 49 | Connector Chamber | U2 |
| 50 | Elevator B3 | U3 |
| 51 | Bridge B3 | U3 |
| 52 | Western Path | U3 |
| 53 | Load Barring Pillars | U3 |
| 54 | Eastern Path | U3 |
| 55 | Elevator B4 | U4 |
| 56 | The Fall | U4, U5, U6, U7, U8 |
| 57 | The Path | U8 |
| 58 | The Rise | U8 |
Treasures
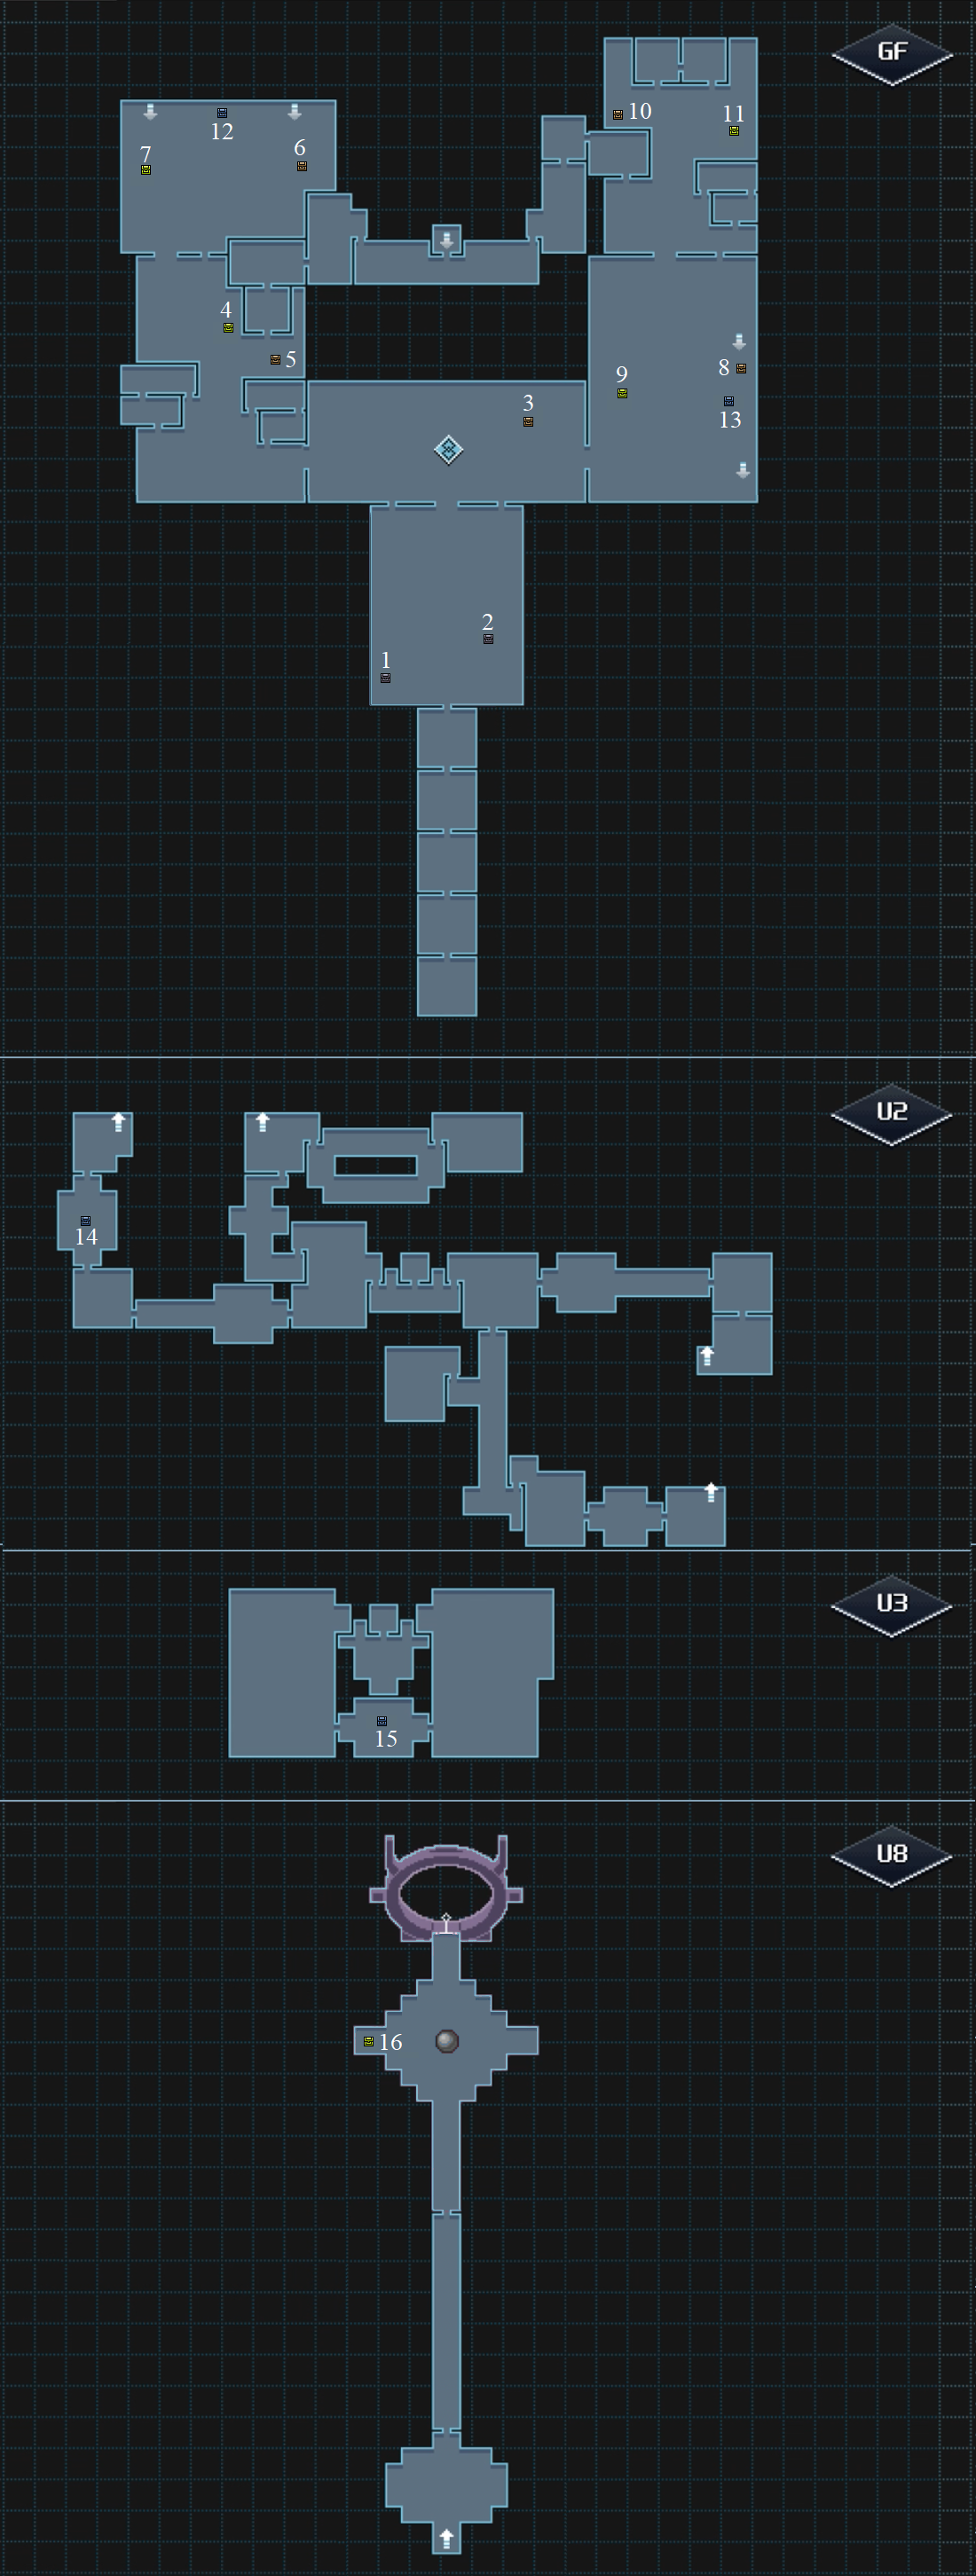
| Acc. | Type | Contains | Location | Info |
|---|---|---|---|---|
| 1 | 2 × |
Comet Trail | Use a key to open the lock on the Southwest, then follow the lilypads and climb the steps. Follow the wall to the left to reach the jumping path. Jump onto the two small platforms, then the larger one, then go South and follow the jumping path, climb up the step, keep going South and jump very carefully onto the southern platform. Walk right - you may lose sight of Lea for a moment - and around the elevated land to get the chest. | |
| 2 | 2 × |
Comet Trail | Use a key to open the lock on the Southeast, then walk South to climb up the steps and follow the jumping path, hit the switch if you have not done so, then walk North and jump to the East to get the chest. | |
| 3 | 3 × |
Outlook | Jump off the platform with the teleporters to the East, then follow the jumping path to the chest. | |
| 4 | 1 × |
Longleg Vale | Starting from Crystal Den, follow the jumping path East of the elevator on the Northwest, then use Wave to reach the southern platform. Follow the arrows to the South, then walk South into Longleg Vale (here you can use a key to open the lock to the West). Then walk East and follow the jumping path to get the chest. | |
| 5 | 4 × |
Longleg Vale | Go down the steps on the Southeast and jump on the disappearing platforms to reach the steps which will lead you to the chest. | |
| 6 | 4 × |
Crystal Den | Follow the jumping path South of the elevator on the Southeast. | |
| 7 | 1 × |
Crystal Den | First follow the instructions to get the Rift Spore and make sure to open the lock. Then, starting from Comet Trail, follow one of these alternatives:
1. Use a key to open the lock on the Southeast, then walk South to climb up the steps and follow the jumping path, hit the switch if you have not done so, then jump onto the pillar on the left. 2. Use a key to open the lock on the Southwest if you have not done it yet, then follow the lilypads and climb the steps. Follow the wall to the left to reach the jumping path. Jump onto the two small platforms, then the larger one, climb up the steps and jump onto the Southeast pillar to your right. Use Wave to reach the Northeast pillar. Jump to the East, then South and follow the lilypads to the steps. Climb up the steps and jump onto the Southeast pillar to your left. Either way, use Wave to reach the Northwest pillar, then jump West and walk North to press the switch. Walk North through the small passage into Outlook, then walk West to Longleg Vale, use Wave to continue going West until you reach the end of the room, then walk North and continue following the Wave path until you can go North to Crystal Den. Walk North and follow the jumping path to get the chest. | |
| 8 | 3 × |
Cracked Pillars | Starting from the elevator on the Southeast of the room (press the switch on the left if you have not done it yet), go North until you see the chest, then walk around the elevated land to your left until you reach a step. Climb up, walk South until you're level with the chest and then jump to the East to get it. | |
| 9 | 4 × |
Cracked Pillars | Starting from Comet Trail, use a key to open the lock on the Southwest, then follow the lilypads and climb the steps. Follow the wall to the left to reach the jumping path. Jump onto the two small platforms, then the larger one, climb up the steps and jump onto the pillar on the right. Use Wave to reach the Northeast pillar. Jump to the East, then North and walk North until you see the switch. Jump carefully to the West to heat the switch, then jump back and go North through the small passage to Outlook. Walk East all the way to Cracked Pillars until you reach the first prong where you can walk North. Do so and use Wave to reach the northern platform Then walk North and jump twice to the East to get the chest. | |
| 10 | 3 × |
Water Grave | Follow the lilypads on the west of the room and break the plants to get the chest. | |
| 11 | 1 × |
Water Grave | Starting from Cracked Pillars, climb up the same step used to get the Bronze Chest with the Focus Shards, then walk to the South and jump onto the pillar on the left. Use Wave to reach the Southwest pillar, then jump to the West, walk North jump onto the small platform and then the larger one, climb up the steps and jump onto the pillar on your right. Use Wave to reach the Northeast pillar, then jump to the right and press the switch, then walk North to reach Water Grave. Walk to the West and then North so you can use Wave to reach the northern platform. Walk North and follow the jumping path to the chest. | |
| 12 | 1 × |
Crystal Den | Spawns after defeating the enemies on the upper elevator platform. | |
| 13 | 1 × |
Cracked Pillars | Spawns after defeating the enemies on the upper elevator platform. | |
| 14 | 1 × |
Shard Trial West | Spawns after defeating the enemies. | |
| 15 | 1 × |
Load Barring Pillars | Spawns after defeating the enemies. | |
| 16 | 1 × |
The Rise | Found on the West side of the room. |
Enemies
The Ku'lero Temple has two enemies, Mizree and Beearbot, that only respawn in a single location and whose item drops are needed to make a lot of late-game equipment. Both of these items can also be obtained from traders in Rhombus Square.
| Name | Sprite | Drops | Locations |
|---|---|---|---|
| Heat Crystalid | Comet Trail, Outlook, Longleg Vale, Crystal Den, Cracked Pillars, South Bridge, Shard Trial East, The Fall<ref name="respawn" /> | ||
| Cold Crystalid | Comet Trail, Crystal Den, Cracked Pillars, Water Grave, North Bridge, Shard Trial West, The Fall<ref name="respawn" /> | ||
| Shock Crystalid | Comet Trail, Outlook, Crystal Den, Cracked Pillars, Water Grave, South Bridge, Shard Trial East, The Fall<ref name="respawn" /> | ||
| Wave Crystalid | Comet Trail, Longleg Vale, Crystal Den, North Bridge, Shard Trial West, The Fall<ref name="respawn" /> | ||
| Beearbot | Water Grave, Crystal Den<ref name="respawn" />, The Fall<ref name="respawn" /> | ||
| Hummagnum | Cracked Pillars, Birds of Prey, South Bridge, The Fall<ref name="respawn" /> | ||
| Mizree | Longleg Vale, Cracked Pillars<ref name="respawn" />, The Fall<ref name="respawn" /> | ||
| Heat Statue | None | Waving Flame<ref name="respawn" />, Birds of Prey<ref name="respawn" />, Load Barring Pillars<ref name="respawn" /> | |
| Cold Statue | None | Cold Carry<ref name="respawn" />, Birds of Prey<ref name="respawn" />, Pillar Chamber<ref name="respawn" />, Load Barring Pillars<ref name="respawn" /> | |
| Shock Statue | None | Cold Carry<ref name="respawn" />, Birds of Prey<ref name="respawn" />, Pillar Chamber<ref name="respawn" />, Load Barring Pillars<ref name="respawn" /> | |
| Wave Statue | None | Waving Flame<ref name="respawn" />, Birds of Prey<ref name="respawn" />, Pillar Chamber<ref name="respawn" />, Load Barring Pillars<ref name="respawn" /> | |
| E'nel | None | The Path<ref name="diorbis" /> | |
| Di'aro | None | The Path<ref name="diorbis" /> | |
| K'win | None | The Path<ref name="diorbis" /> | |
| G'oni | None | The Path<ref name="diorbis" /> | |
| Guardian Statue (boss) | Guardian of Old × 1 (Neutral)<ref name="respawn" /> Guardian of Flame × 1 (Heat)<ref name="respawn" /> Guardian of Ice × 1 (Cold)<ref name="respawn" /> Guardian of Strife × 1 (Shock)<ref name="respawn" /> Guardian of Peace × 1 (Wave)<ref name="respawn" /> The Fall × 6 (2 Neutral, 1 of each element)<ref name="respawn" /> | ||
| Gynthar (boss) | None | The Monk<ref name="respawn" /> | |
| Di'orbis (boss) | None | The Path<ref name="respawn" /> |
<references> <ref name="respawn">Does not respawn</ref> <ref name="diorbis">Spawned by Di'orbis</ref> </references>
Botanics
Ku'lero Temple, like the Temple Mine, is one of the only dungeons to have botanics in it, although unlike the Temple Mine they are only found in the outdoor areas. These botanics tend to have high unlock requirements, so some grinding may be required to unlock their botanic menu entries.
| Destroyable | Contents | ||||||
|---|---|---|---|---|---|---|---|

|
Alpha Cone Sprout |
| |||||
|
| |||||||

|
Beta Cone Sprout |
| |||||
|
| |||||||

|
Gamma Cone Sprout |
| |||||
|
| |||||||

|
Delta Cone Sprout |
| |||||
|
| |||||||

|
Alpha Shard |
| |||||
|
| |||||||
Role in the Plot
In CrossWorlds
Ku'lero Temple is the final stage of the Track of the Ancients. This is the end goal of Operation Trackwalker and the final destination of Seekers. It is built inside the massive crater that was formed when the Message of the Sky landed.
During the A New Home DLC, access to Ku'lero Temple is finally unlocked, with the opening being shadow dropped with only a day's notice. A large number of Seekers gather in Sapphire Ridge for the opening, which is led by the Trackwalker General in person. Within the temple, they descend into the crater, fighting another guardian of the Track, the monk Gynthar. At the very bottom of the crater, they must confront their final trial: the Gods of Shape themselves. After defeating them, the true Secret of the Ancients is revealed: a portal to another world, which the Ancients used to leave Shadoon. As more Seekers complete the Temple and channel power into the portal, it will eventually open, leading the way to a sequel to CrossWorlds, CrossWorlds: New Horizons. The Gods offer one final gift before leaving: 1 CP for every element.
In CrossCode
Lea and all her friends gather together to complete the Ku'lero Temple. Unlike in previous dungeons, this temple contains many outdoor, non-instanced areas, where Lea can meet and talk with the other characters. One particularly notable encounter is with Luke on floor B3, where he asks Lea on a date.
Hlin, Albert, Buggy, Schneider and Luke will always reach the end of the dungeon before Lea, even though they chose not to race. Emilie will also beat Lea if she chose to race and took more than 2 hours to complete the dungeon. Otherwise she will arrive immediately after Lea. Apollo, Joern, Shizuka and Satoshi arrive after. C'tron never arrives, having apparently left part way through the dungeon. Worrying about him, Lea and Emilie decide to go visit him in Homestedt.